Integrate Process into GitLab
This example shows how to integrate your process into GitLab® by using pipeline generator version 1. Pipeline generator version 2 is recommended for enhanced file propagation and artifact management capabilities. The setup and requirements for pipeline generator version 2 are shown in Process Integration and Artifact Management for GitLab.
Pipeline Generator Version 1
In this example, you connect a project to GitLab and generate a GitLab CI pipeline file for the project and its process model by using version 1 of the pipeline generator. You specify the pipeline generator options to create pipelines that separate tasks into different jobs and use other custom pipeline behaviors.
Set Up GitLab Project and Runner
Set up a source-controlled remote repository where you store your project and a build agent that can run your pipeline on that repository. For this example, you can use GitLab as both your remote repository and CI system, and then create a GitLab Runner to run your pipelines.
In GitLab, set up a remote repository by creating a new blank project. See the GitLab documentation for Create a project.
Install, register, and start a GitLab Runner on a machine. The GitLab Runner application allows a machine to act as a build agent in GitLab. If you assign a tag to your Runner, make note of the tag name. See the GitLab documentation for Install GitLab Runner.
Install MATLAB®, Simulink®, Simulink Check™, the CI Support Package for Simulink, and any other products that your process requires on the machine that has your GitLab Runner. Make sure that your GitLab Runner machine can access and run MATLAB before you continue.
For information on licensing considerations, Docker® containers, and virtual displays, see Tips for Setting Up CI Agents.
Note
To run CI jobs in parallel, you must either:
Have multiple runners available.
Configure your runner to run multiple jobs concurrently by specifying the
concurrentsetting. See the GitLab documentation for Advanced configuration.
Connect MATLAB Project to GitLab
Connect your MATLAB project to your remote repository so that you can push your changes to the remote GitLab repository and allow GitLab to automate a CI pipeline for the project.
Open a project in MATLAB. For this example, open an example project that uses an example process model.
The process model,processAdvisorExampleStart
processmodel.m, is at the root of the project and defines a process with common model-based design tasks. You can use the Process Advisor app to run the tasks in the process on your local machine. You can copy the default process model template into a project by enteringcreateprocess(Template = "default")at the command line. For information on how to customize a template process model for your development and verification workflow, see Customize Your Process Model.Connect your project, remote repository, and CI platform by adding the remote URL to your local repository. For more information, see Share Git Repository to Remote. Typically, a remote URL has the format
https://gitlab.com/gitlab-org/gitlab.git.The example project is already set up to use local Git™ source control. For information on how to use source control with your projects, see Use Source Control with MATLAB Projects.
Configure Template to Use GitLab Runner
In GitLab, you define your CI pipelines by using a CI/CD configuration file,
typically named .gitlab-ci.yml, in your project root. The support
package includes a GitLab template file that you can reconfigure and then use to automatically
generate pipelines.
Copy the GitLab template into your project folder. The GitLab template file is generic and can work with any project. In MATLAB, change your current folder to your project root and enter:
GitLabTemplate = fullfile(...
matlabshared.supportpkg.getSupportPackageRoot,...
"toolbox","padv","samples",".gitlab-ci-pipeline-gen.yml");

copyfile(GitLabTemplate,".gitlab-ci.yml")
In the Project pane, add the template file,
.gitlab-ci.yml, to your project. The template file contains a CI pipeline definition for GitLab.Open and inspect the template file. The file uses GitLab CI/CD YAML syntax to define a parent pipeline that can generate and execute pipelines for you.
Reconfigure the template to work for your CI setup. In the template, find and replace instances of
padv_demo_ciwith the tag name of the GitLab Runner that you want to use.For example, if your GitLab Runner has the tag name
high_memory, you specify that tag in thetagssection and in the pipeline generation options objectpadv.pipeline.GitLabOptions.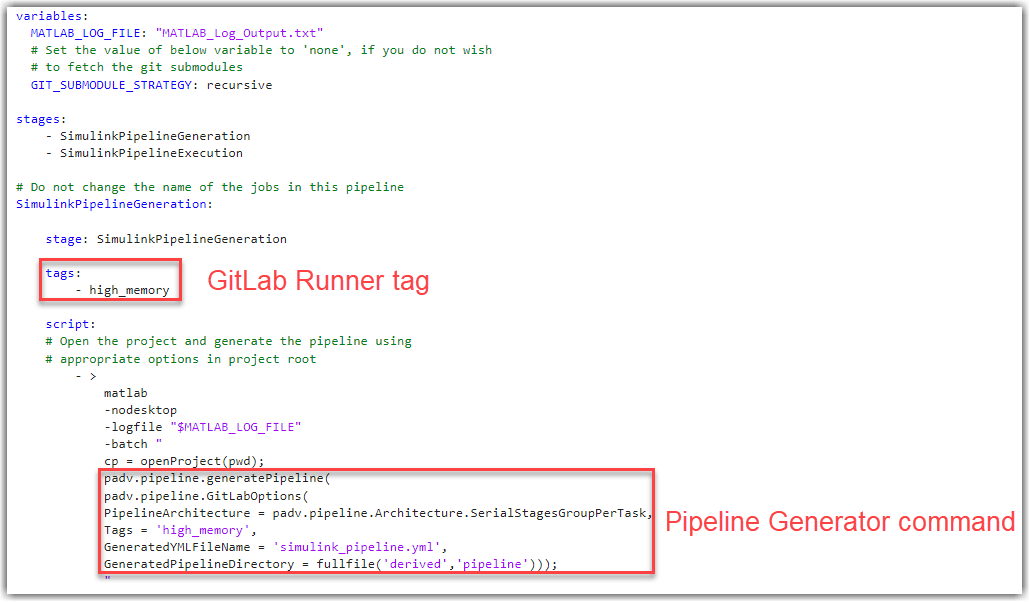
The template file can then generate a GitLab pipeline with stages for each task in your process the next time that
you push your changes to your remote repository. Optionally, you can further
customize the template file to change how the pipeline generator organizes and
executes the pipeline. You can dry run your tasks, separate your tasks into
different jobs, and specify other options by using the padv.pipeline.GitLabOptions object in the template.
Make Optional Customizations
Optionally, you can reconfigure the template file to customize how the pipeline
generator organizes and executes the pipeline. To customize the pipeline generator
options, modify the property values of the padv.pipeline.GitLabOptions object in the template.
For example, suppose that you want to:
Dry run tasks to quickly validate task inputs and generate representative outputs without performing the full task operation.
Perform license checkouts during the dry runs to make sure that your GitLab Runner has access to the required products.
Separate tasks into different jobs.
To change how the template file generates the pipeline, you can modify the
padv.pipeline.GitLabOptions in the script
section.
    script:
    # Open the project and generate the pipeline using
    # appropriate options in project root
        - >
            matlab
            -nodesktop
            -logfile "$MATLAB_LOG_FILE"
            -batch "
            cp = openProject(pwd);
            rpo = padv.pipeline.RunProcessOptions;
            rpo.DryRun = true;
            rpo.DryRunLicenseCheckout = true;
            padv.pipeline.generatePipeline(
            padv.pipeline.GitLabOptions(
            PipelineArchitecture = padv.pipeline.Architecture.SerialStagesGroupPerTask,
            RunprocessCommandOptions = rpo,
            Tags = 'padv_demo_ci',
            GeneratedYMLFileName = 'simulink_pipeline.yml',
            GeneratedPipelineDirectory = fullfile('derived','pipeline')));
"padv.pipeline.RunProcessOptions object, rpo,
that customizes the behavior of the runprocess function in CI.
This code specifies the runprocess arguments
DryRun and DryRunLicenseCheckout as
true, updates the
padv.pipeline.GitLabOptions object to use the
PipelineArchitecture
SerialStagesGroupPerTask, and uses the
RunprocessCommandOptions specified by
rpo. For more information, see How Pipeline Generation Works.If you modify other parts of the template file, make sure that your changes use valid GitLab CI/CD YAML syntax. For more information, see the GitLab documentation for CI/CD YAML syntax reference.
Generate Pipeline in GitLab
Commit and push the MATLAB project to your GitLab repository by using the Commit and
Push buttons in the Source Control
section of the Project tab. By default, GitLab uses .gitlab-ci.yml as the CI/CD configuration file
to automatically create pipelines when triggered.
Each time you submit changes to this remote repository, GitLab generates and executes a custom pipeline for your project, process,
and pipeline generation options. You do not need to update the
.gitlab-ci.yml file when you make changes to your projects or
process model. The pipeline generator automatically generates up-to-date pipelines
by using the latest project and process model. You only need to update the
.gitlab-ci.yml file if you want to change how the pipeline
generator organizes and executes the pipeline.
In GitLab, your pipeline contains two upstream jobs:
SimulinkPipelineGeneration — Generates a child pipeline file.
SimulinkPipelineExecution — Executes the child pipeline file. By default, the child pipeline contains:
Jobs for your process, organized by the
PipelineArchitectureproperty specified inpadv.pipeline.GitLabOptions.The
Generate_PADV_Reportjob, which generates a Process Advisor build report.The
Collect_Artifactsjob, which collects build artifacts.

See Also
padv.pipeline.generatePipeline | padv.pipeline.GitLabOptions