Generate and Deploy a MATLAB App with SimAppTemplate for a Model
This example shows you how to use the simulink.compiler.genapp function to generate a MATLAB® app for a model, that is deployable. Typically when a Simulink® model is functionally complete, you can use it to run multiple simulations with different input and parameter values. To try simulations for your model with different input and parameter values, you can generate a MATLAB App. You can also deploy this generated app for use outside of MATLAB.
This example illustrates the use of simulink.compiler.genapp function to generate a starter app for the model f14_mod, using the generated app to tune the parameters of the model and simulate the model, and customizing the app in MATLAB App Designer.
Open the Model
Open the model f14_mod.
open_system('f14_mod')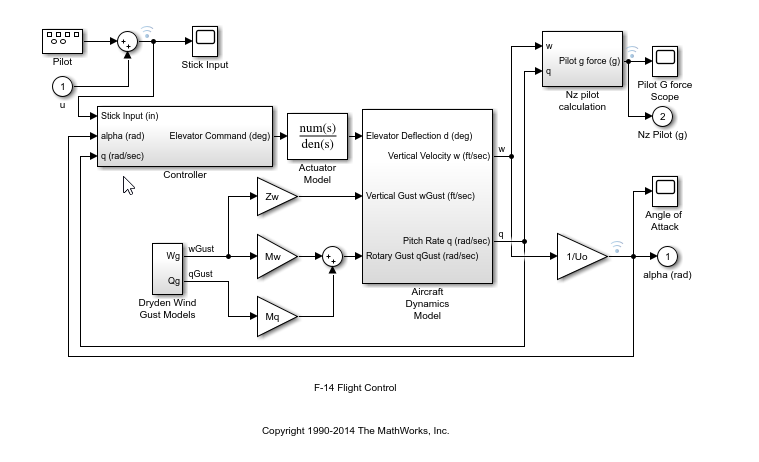
Generate a MATLAB App for the Model
Use the simulink.compiler.genapp function to generate an app for the f14 model. Running the simulink.compiler.genapp function with the model name as an argument generates an App named f14app. Simulink Compiler™ uses a default template to generate the app. The generated app provides an ability to tune the parameters and simulate the model for which the app is generated. The generated app also provides the plot of the simulation results. All the files are generated into the f14app directory.
To generate the app, the configuration parameter SaveFormat for the output data must be Dataset or Structure with time. To change SaveFormat for the f14 model, in the Modelling tab of the Simulink Toolstrip, go to Model Settings. In the Data Import/Export pane, change Format to Dataset.
simulink.compiler.genapp('f14_mod','AppName','f14app','Template','SimAppTemplate');
### Searching for referenced models in model 'f14_mod'.
### Total of 1 models to build.
### Building the rapid accelerator target for model: f14_mod
### Successfully built the rapid accelerator target for model: f14_mod
### Creating App: f14app
### Launching App: f14app
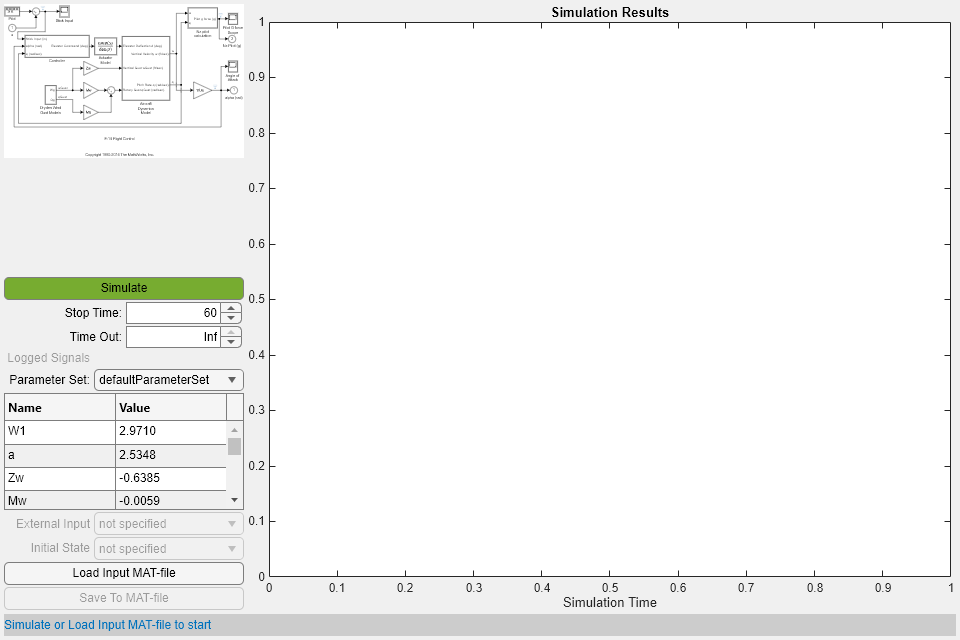
After generating the app, click Simulate to simulate the app.
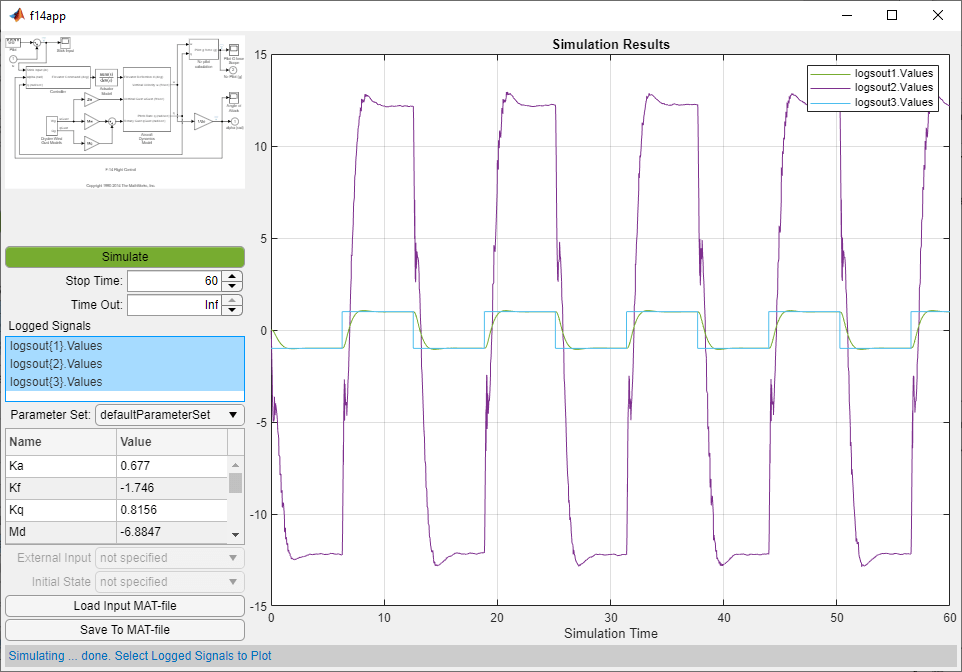
Along with the app, the following artifacts are generated :
f14app.mlappfile -- This file contains the code for the generated app. Open this file in App Designer for editing.Files starting with the
defaultprefix -- Functions returning default values used by the app such as, model name, model image aspect ratio, model image file, and input MAT-file name.Model Image, (
f14app_image.svg) -- Image of the Simulink Model.Inputs used in the simulation (
f14app_inputs.mat) --MATfile containing all the inputs that are used in the simulation of the model.App labels file
setLabels.m-- File specifying label contents.Default Simulink logo (
SimulinkLogo.png) -- File used as a placeholder for the model image.pragma.mdirectives file -- File used by Simulink Compiler to generate the deployable app.Set of MATLAB functions as M-files -- Files that the app uses to control user interface of the app.
Compile and Deploy the Generated App
You can use the MATLAB App Designer to compile and deploy the app. You can also use deploytool. For more information on compiling and deploying with App Designer, see Develop Apps Using App Designer, Web Apps and Application Compiler.
In this example, we compile the app with the mcc command followed by the app name.
mcc -m f14app
### Searching for referenced models in model 'f14_mod'.
### Total of 1 models to build.
### Building the rapid accelerator target for model: f14_mod
### Successfully built the rapid accelerator target for model: f14_mod
Customize the Generated App
To customize the app, use the App designer. The generated app f14 is generic, but it allows you to easily customize it in the App Designer. This section shows how to replace the one axis in the generated app with two axes. Open the generated app in the app designer.
appdesigner('f14app');To get two Axes components, use a grid with two rows and one column and placing the two components in the grid cells. You can follow:
Open the generated app in MATLAB App Designer
In Design View, select and delete the default Axes component.
Go to Component Library on the left side of the window. From the Component Library, drag and drop a Grid Layout component under the Containers section in place of the removed Axes component. In Component Browser on the right, on the Inspection tab under the Grid Layout, update
ColumnWidthandRowHeightproperties to'1x'and'1x,1x', respectively. This updates the grid to have two vertical cells. Drag two Axes components from the Common section in Component Library and place them in the two grid cells.The external input references to
UIAxes(the original Axes component) have to be updated toUIAxes2. If you added the top Axes first,UIAxesrefers toLogged SignalsandUIAxes2toExternal Inputs. Switch to Design View and verify which Axes gets the focus when the component is selected in Component Browser.Now find and replace the occurrences of old axes in the Code View. Using the
Find & Replacedialog, replace UIAxes with UIAxes2 or additions.Once you complete the replacements, add the following line code to the
cbkSimulate(app, event)function. After the line forUIAxes:app.SimulationHelper.UserInterface.clearGridAndLegend(app.UIAxes2).Save the app
.
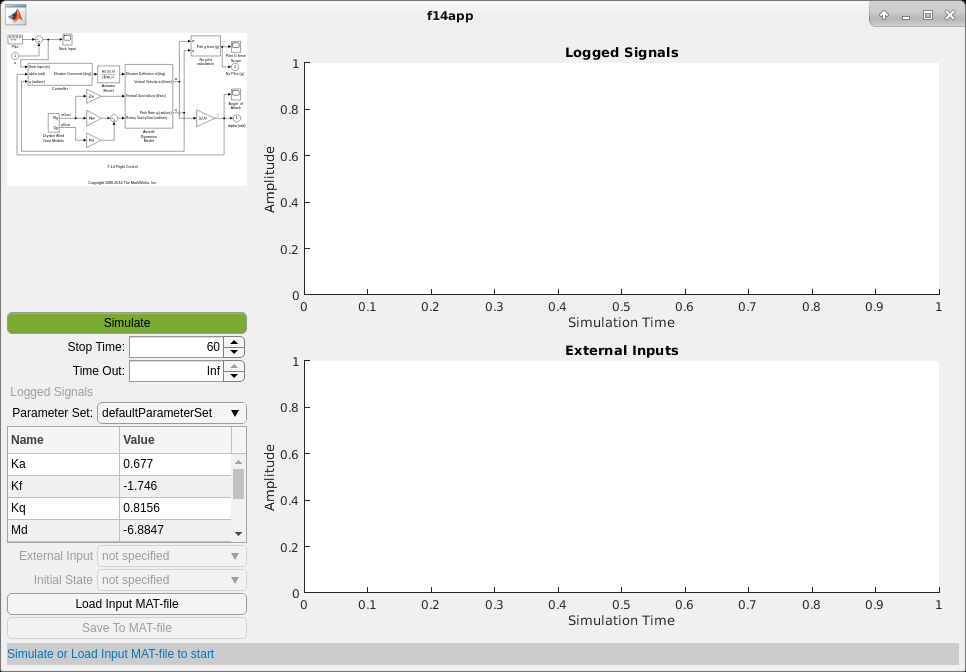
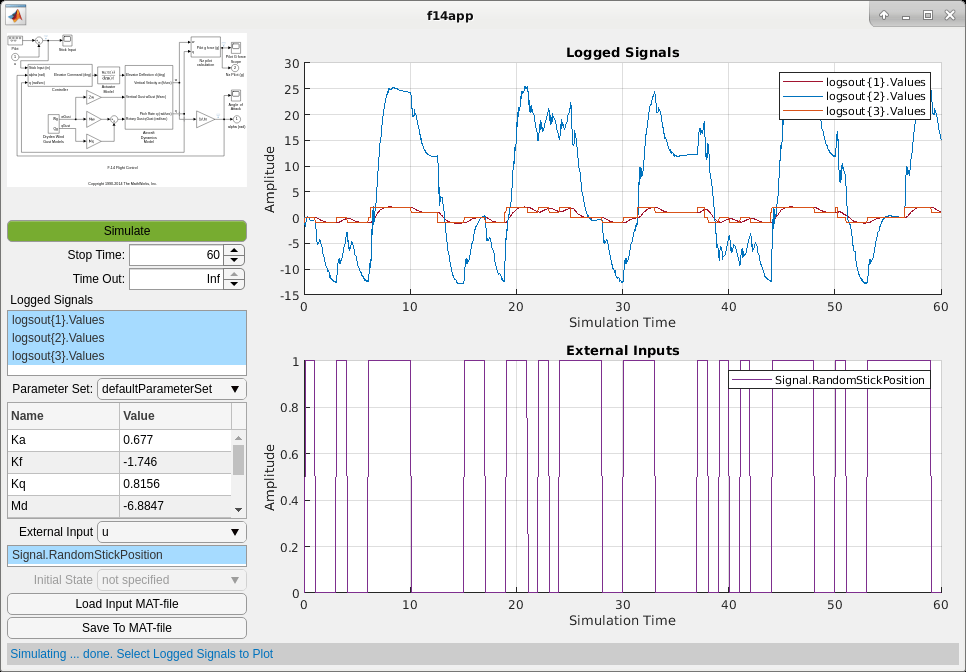
Use the Modified App to Simulate the Model
Use the modified app to simulate the model. You can then compile and deploy the app. To simulate the app, click Load Input MAT-file and choose the f14_mode_externalInputs.mat file to attach an external input signal to Inport 1 of the f14 model. This activates the External Input drop down and displays the loaded signal, Signal.RandomStickPosition in the list box under the drop down. Select the loaded signal to display in the bottom Axes component. Click Simulate. After the simulation completes, the two Axes components update. You can observe the effect of the loaded input signal on the logged signals in the top Axes.
