使用脚本过滤覆盖率结果
此示例显示如何以编程方式从覆盖率结果中过滤对象和结果。
打开模型并启用覆盖率分析
首先,将模型加载到内存中。
modelName = 'slvnvdemo_covfilt';
load_system(modelName);
使用 Simulink.SimulationInput 对象为模型配置覆盖率设置。
simIn = Simulink.SimulationInput(modelName);
simIn = simIn.setModelParameter('CovEnable','on');
simIn = simIn.setModelParameter('CovMetricStructuralLevel','MCDC');
simIn = simIn.setModelParameter('StopTime','20');
simIn = simIn.setModelParameter('CovSaveSingleToWorkspaceVar','on');
simIn = simIn.setModelParameter('CovSaveName','covData');
使用 SimulationInput 对象作为输入来仿真模型。
simOut = sim(simIn);
查看决策覆盖率结果
在应用过滤器之前查看覆盖率结果。您可以使用 decisioninfo 访问决策覆盖率结果。
saturationInitial = decisioninfo(covData,'slvnvdemo_covfilt/Saturation');
percentSaturationCov = 100 * saturationInitial(1)/saturationInitial(2)
percentSaturationCov =

    50
Saturation 模块具有 50% 的决策覆盖率。如果您不打算满足此模块,您可以过滤缺失的目标结果,以便不再将其报告为缺失覆盖率。首先,您需要一个选择器来过滤掉那些不满意的目标结果。
创建选择器
您可以使用适当的构造函数直接创建选择器。在这种情况下,您可以使用 slcoverage.MetricSelector。
因为被证明的目标是一个决策结果,所以度量选择器构造函数的第一个输入是 slcoverage.MetricSelectorType.DecisionOutcome。第二个输入是模块句柄。最后两个分别是需要申述的目标的索引和该目标的结果的索引。因为 input > lower limit 决策目标是 Saturation 模块的第一个目标,所以它的目标索引是 1。因为这个目标的 false 结果是第一个结果,所以它的结果索引也是 1。
metricSel = slcoverage.MetricSelector(...
                  slcoverage.MetricSelectorType.DecisionOutcome,...
                  'slvnvdemo_covfilt/Saturation',1,1)
metricSel =

  MetricSelector with properties:

     ObjectiveIndex: 1
       OutcomeIndex: 1
        Description: 'N/A'
               Type: DecisionOutcome
                 Id: 'slvnvdemo_covfilt:5'
    ConstructorCode: 'slcoverage.MetricSelector(slcoverage.MetricSelectorType.DecisionOutcome, 'slvnvdemo_covfilt:5', 1, 1)'
您还可以使用 slcoverage.Selector.allSelectors 查看 Saturation 模块的可用选择器。
saturationAllSels = ...
    slcoverage.Selector.allSelectors('slvnvdemo_covfilt/Saturation')
saturationAllSels =

  1×6 heterogeneous Selector (BlockSelector, MetricSelector) array with properties:

    Description
    Type
    Id
    ConstructorCode
您还可以使用 allSelectors 方法查看目标和结果指数。使用 Description 名称-值对搜索 F。
falseSelectors = ...
    slcoverage.Selector.allSelectors('slvnvdemo_covfilt/Saturation',...
               'Description','F')
falseSelectors =

  1×2 MetricSelector array with properties:

    ObjectiveIndex
    OutcomeIndex
    Description
    Type
    Id
    ConstructorCode
Saturation 模块中有两个 false case 选择器。第一个选择器是 F outcome of input > lower limit。
falseSel = falseSelectors(1)
falseSel =

  MetricSelector with properties:

     ObjectiveIndex: 1
       OutcomeIndex: 1
        Description: 'F outcome of input >= lower limit in Saturate block "Saturation"'
               Type: DecisionOutcome
                 Id: 'slvnvdemo_covfilt:5'
    ConstructorCode: 'slcoverage.MetricSelector(slcoverage.MetricSelectorType.DecisionOutcome, 'slvnvdemo_covfilt:5', 1, 1)'
falseSel 选择器与我们使用 slcoverage.MetricSelector 手动构建的选择器相同。目标和结果索引是结果选择器对象的属性。
创建理由规则
使用 slcoverage.Filter 创建一个过滤器对象。您可以分别使用方法 setFilterName 和 setFilterDescription 来设置过滤器文件名和过滤器描述。
filt = slcoverage.Filter;
setFilterName(filt,'slcoverage_filter');
setFilterDescription(filt,'Example Filter');
使用 slcoverage.FilterRule 创建过滤器规则。FilterRule 的第一个输入是您想要过滤的模块或结果的选择器。这可以是您创建的选择器,也可以是从 allSelectors 中检索的选择器。
第二个输入是过滤结果或模块的理由。这被指定为一个字符数组。
第三个输入是您想要使用的过滤模式。两种覆盖率过滤模式是申述和 exclude。使用申述模式来过滤单独的覆盖率目标结果,例如 F outcome of input > lower limit。使用排除模式来过滤整个模型元素或模块,这意味着将忽略该模块及其后代(如果适用)。在此示例中,使用申述模式来指定您想要过滤特定结果。
rule = slcoverage.FilterRule(...
    metricSel,'rate > 0',slcoverage.FilterMode.Justify);
使用 addRule 将规则添加到过滤器。
filt.addRule(rule);
使用 save 方法将过滤器保存到过滤器文件。然后通过将 cvdata 属性分配给新的过滤器文件,将过滤器文件应用于 filter 对象。
filt.save('covfilter');
covData.filter = 'covfilter';
使用过滤后的 cvdata 对象重新生成 Saturation 模块的覆盖率结果。
filteredSaturation = decisioninfo(covData,'slvnvdemo_covfilt/Saturation');
percentSaturationFilt = 100 * filteredSaturation(1)/filteredSaturation(2)
percentSaturationFilt =

    75
Saturation 模块的决策覆盖率现在为 75%。
在 Stateflow® 图中申述 MCDC 目标
您可以应用相同的工作流程来申述特定的 Stateflow 操作。在这个示例中,我们想要申述 tick MCDC 目标是 after(4, tick) 转移的一部分。
首先,使用 sfroot (Stateflow) 获取 Stateflow 根对象。
chartID = sfroot;
使用find (Stateflow)方法获取 'after(4, tick)' 转移 ID。您可以使用 find 通过将 '-isa' 标志与 'Stateflow.Transition' 结合使用来搜索转移。您可以通过使用其他输入搜索标签字符串来进一步指定精确的转移。
transitionID = chartID.find('-isa','Stateflow.Transition',...
                            'LabelString','after(4, tick)');
使用 allSelectors 获取我们想要过滤的 MCDC 目标结果的选择器。将 Stateflow 转移的 Simulink ID 作为第一个输入传递。因为我们想要申述 tick 的结果,所以在描述中搜索 "tick"。
sfSelectors = slcoverage.Selector.allSelectors(transitionID,...
                                  'Description','"tick"')
sfSelectors =

  1×3 MetricSelector array with properties:

    ObjectiveIndex
    OutcomeIndex
    Description
    Type
    Id
    ConstructorCode
allSelectors 返回三个可能的选择器。我们要过滤的转移是返回的第三个选择器。
sfSel = sfSelectors(3)
sfSel =

  MetricSelector with properties:

     ObjectiveIndex: 1
       OutcomeIndex: 1
        Description: 'Condition 1, "tick" outcome of Transition trigger expression in Transition "after(4, tick)" from "Clipped" to "Full"'
               Type: MCDCOutcome
                 Id: 'slvnvdemo_covfilt:6:5'
    ConstructorCode: 'slcoverage.MetricSelector(slcoverage.MetricSelectorType.MCDCOutcome, 'slvnvdemo_covfilt:6:5', 1, 1)'
创建规则,将其添加到过滤器并保存。过滤文件已应用于 cvdata 对象。
rule2 = slcoverage.FilterRule(sfSel,'tick never false');
filt.addRule(rule2);
filt.save('covfilter');
有关 Stateflow 编程 API 的更多信息,请参阅Stateflow API 概述 (Stateflow)。
使用模块选择器排除模块
您可以使用 slcoverage.BlockSelector 过滤一个模块。在这种情况下,我们希望排除可切换配置子系统,因此我们使用 SubsystemAllContent 选择器类型和 slcoverage.FilterMode.Exclude 过滤模式。
subsysSel = slcoverage.BlockSelector(...
                      slcoverage.BlockSelectorType.SubsystemAllContent,...
                      'slvnvdemo_covfilt/Switchable config');
通过将选择器、基本原理和排除过滤模式作为输入来创建过滤器规则。
rule3 = slcoverage.FilterRule(subsysSel,...
                       'Unused configuration',...
                        slcoverage.FilterMode.Exclude);
将规则添加到过滤器并保存。
filt.addRule(rule3);
filt.save('covfilter');
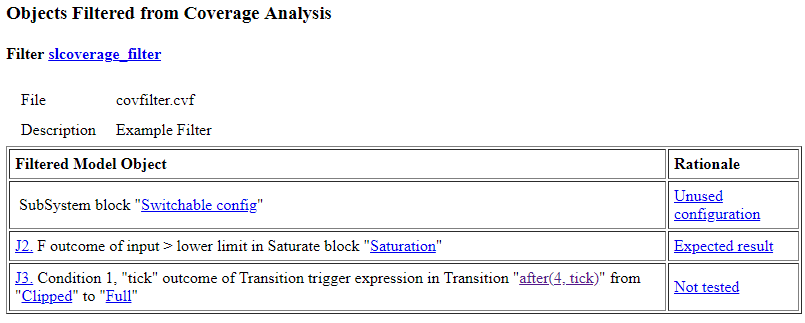
最后,您可以使用 cvhtml 查看覆盖率报告。从覆盖率分析中过滤的对象部分显示了过滤后的模型对象及其原理的摘要。'-sRT=0' 标志可用于生成覆盖率报告,但不会自动打开报告。
cvhtml('filteredCovReport',covData,'-sRT=0');
另请参阅
slcoverage.BlockSelector | slcoverage.FilterRule | slcoverage.MetricSelector | slcoverage.Selector | allSelectors | cvhtml | decisioninfo | cvdata
主题
- 使用脚本分析覆盖率数据
- 创建和使用覆盖率过滤器
- Stateflow 编程接口 (Stateflow)