Main Content

Requirements Manager

Manage requirements and links in model

Description

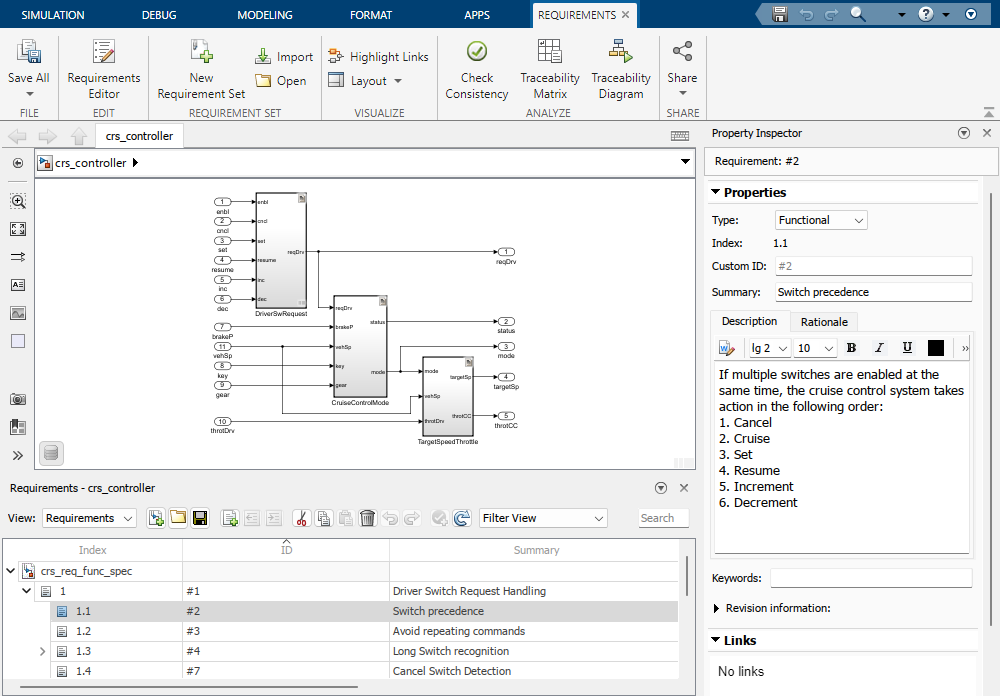
You can use the Requirements Manager to view the Requirements Perspective for the current model. By default, the Requirements Perspective displays the Requirements tab in the toolstrip, the Property Inspector, and the Requirements Browser.

You can use the Requirements Perspective to:

  • View and create requirement sets.

  • Create, edit, and delete requirements.

  • View and create links from the model to requirements.

  • Manage link storage settings for links from models.

Opening the Requirements Manager also opens the Requirements Browser pane. You can use the Requirements Browser to view requirements or links. Select whether the Requirements Browser displays requirements or links by using the View drop-down menu.

The Requirements Browser set to the requirements view

To display tasks to manage requirements in the Requirements tab, in the Requirements Browser, set View to Requirements. The Requirements tab displays the Requirement Set section and the Requirements Browser displays requirements.

The Requirements tab toolstrip when the view is set to requirements

To display tasks to manage links in the Requirements tab, set View to Links. The Requirements tab displays the Links section and the Requirements Browser displays the outgoing links from the model. The Requirements Browser does not display links from other artifacts to requirements in the requirement set.

The Requirements tab toolstrip when the view is set to links

The Requirements Perspective

Open the Requirements Manager App

  • Simulink® Toolstrip: On the Apps tab, under Model Verification, Validation, and Test, click Requirements Manager.

  • Simulink Editor: In the lower-right corner of the Simulink model canvas, click the Show Perspectives views icon and select Requirements.

  • MATLAB® command prompt: Enter slreq.openRequirementsManager.

Examples

expand all

To open a requirement set, in the Requirements Browser, in the View drop-down menu, select Requirements and click the Open Requirement Set button Open Requirement Set.

To create a requirement set, in the Requirements Browser, in the View drop-down menu, select Requirements and click the New Requirement Set button New Requirement Set.

In the Requirements Browser, in the View drop-down menu, select Requirements then:

  • To add a requirement, select a requirement set or requirement and click the Add Requirement button Add Requirement.

  • To edit a requirement, select a requirement. In the Property Inspector, edit the requirement.

  • To delete a requirement, select a requirement and click the Delete Requirement buttonDelete Requirement.

In the Requirements Browser, in the View drop-down menu, select Requirements. Then, right-click a requirement and select Implementation Status and Verification Status. The Requirements Browser displays the Implemented and Verified columns. For more information on implementation and verification status, see Track Requirement Links by Using Implementation Status and Review Requirements Verification Status.

To view links, in the Requirements Browser, in the View drop-down menu, select Links.

To create a link, in the Requirements Browser, in the View drop-down menu, select Requirements. From the Requirements Browser, drag the requirement to the model item. When you set View to Links the Requirements Browser displays the new link.

To specify how to store requirement links:

  1. In the Requirements Browser, in the View drop-down menu, select Links. In the toolstrip, click Link Settings > Linking Options.

  2. In the Requirements Settings dialog box, select the Storage tab.

  3. Under Default storage location for traceability data:

    • To enable internal storage, select Store internally (embedded in Simulink diagram file).

    • To enable external storage, select Store externally (in a separate *.slmx file).

To load links stored in an external file:

  1. In the Requirements Browser, set the View drop-down to Links.

  2. In the Requirements tab, click Load Links.

  3. Select the file from which to load the requirements links. Click Open.

  4. Save changes to your links before loading links from another file.

If you have a model with requirements links that are stored with the model, you can move those links to an external file. When you move internally stored links to a file, Requirements Toolbox™ deletes the internal links data from the model file and saves the model. Afterwards, the data exists only in the external file. To move internally stored requirements links to external storage:

  1. In the Requirements Browser, in the View drop-down menu, select Links.

  2. In the Requirements tab, click Link Settings > Save Links As Link Set File.

  3. Enter a file name and click OK.

If you have a model with requirements links that are stored in an external file, you can move those links to the model file.

  1. Open the model that has externally stored requirements links. Ensure that the right set of requirements links are loaded from the external file.

  2. In the Requirements Browser pane, in the View drop-down menu, select Links.

  3. In the Requirements tab, select Link Settings > Save Links in Model File.

  4. Save the model to save the internally saved requirements links.

To highlight model objects that are linked to requirements, in the Requirements tab, in the Visualize section, click Highlight Links.

When you copy Simulink and Stateflow® objects, their associated requirements links are duplicated by default. You can choose to duplicate requirements links only when the links are highlighted in the Simulink model by following this process:

  1. In the Requirements Browser, in the View drop-down menu, select Links.

  2. In the Requirements tab, click Link Settings > Default Link Storage.

  3. Select Duplicate links only when model requirements are highlighted.

Related Examples

Version History

Introduced in R2019b