Main Content

Import Requirements from IBM DOORS Next

You can manage requirements in IBM® DOORS® Next and import either the entire requirements module or requirements that match a query into Requirements Toolbox™. Requirements Toolbox imports the requirements as slreq.Reference objects, which are also called referenced requirements. After you establish links with the imported referenced requirements, you can use the Requirements Editor or Requirements Perspective to navigate from the imported referenced requirements to the original requirement in DOORS Next. You can also measure how the requirements contribute to the implementation status, verification status, and change tracking. For more information, see:

Configure IBM DOORS Next Session

To interface with IBM DOORS Next, you must configure MATLAB® every session.

  1. At the MATLAB command prompt, enter:

    slreq.dngConfigure

  2. In the DNG Server Login Configuration dialog box, enter the DOORS Next server address, port number, and service root as they appear in the web browser when accessing DOORS Next. Enter your username and password, or enter the name of a custom authentication callback function. For more information, see setCustomLoginProvider. Click OK.

    If you do not see a port number in the web browser, enter the default value of 443.

  3. In the DOORS Project dialog box, select the project and, if applicable, the configuration context. If your configuration context is not listed in the Select configuration stream or changeset list, load additional configurations by selecting <more>. To display global configurations in the configurations list, at the MATLAB command line, enter:

    rmipref("OslcUseGlobalConfig",true);
    For more information, see rmipref and Specifying and Updating the IBM DOORS Next Configuration.

Tip

You can also programmatically establish a connection between your MATLAB session and an IBM DOORS Next server without using the DNG Server Login Configuration dialog box or DOORS Project dialog box. For more information, see slreq.dngConfigure.

MATLAB tests the connection by opening a window in your browser. If the connection is successful, the MATLAB Connector Test dialog box appears with a confirmation message. Click OK. If the dialog does not appear or if an error appears after you enter slreq.dngConfigure, see Tips for using slreq.dngConfigure.

Note

If you plan to create direct links to requirements in IBM DOORS Next, you must leave the test connection browser window open, because this instance of the web browser is authenticated to communicate with MATLAB. Use this web browser to select requirements in your IBM DOORS Next project to create direct links. You can re-open the test connection browser window by copying and pasting this address in the browser address bar: https://localhost:31515/matlab/oslc/inboundTest.

Import DOORS Next Requirements

You can import requirements by selecting a DOORS Next module or by creating a query. Because Requirements Toolbox imports requirements as slreq.Reference objects, you must import the requirements into a new requirement set. You cannot import images in requirements from DOORS to Requirements Toolbox.

When you import requirements from IBM DOORS Next, Requirements Toolbox sets the Type property based on the external type:

IBM DOORS Next Requirement Type

Requirements Toolbox Requirement Type
HeadingContainer
InformationInformational
Diagrams and sketchesInformational

All other types

Functional

For more information, see Requirement Types.

Additionally, Requirements Toolbox disables index numbering for requirements that do not have the external type Heading. For more information, see Customize Requirement Index Numbering.

When you import requirements from a DOORS Next project that has configuration management enabled, you must select the configuration context for your MATLAB session before importing. The content of the imported requirements corresponds to the configuration. For more information about enabling configuration management in DOORS Next, see Configuration management in the RM application on the IBM website. For more information about configuring your MATLAB session, see slreq.dngConfigure.

You can view the configuration context for the imported requirements by selecting the import node in the Requirements Editor. The Requirements Editor displays the configuration context in the right pane, under Properties, in the Description tab.

Importing a Requirements Module

When you import requirements from a DOORS Next module, the Requirements Toolbox imports the entire module.

  1. Open the Requirements Editor:

    slreq.editor

  2. In the Requirements Editor, click Import.

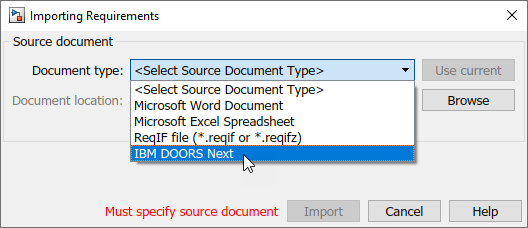
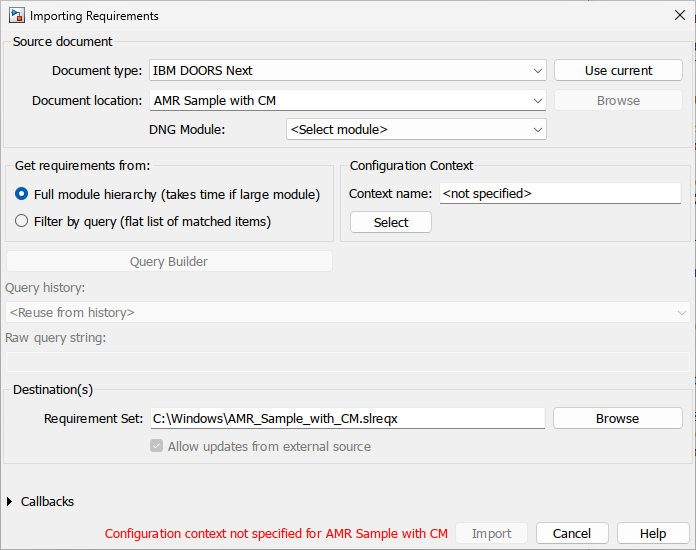
    In the Importing Requirements dialog box, set Document type to IBM DOORS Next.

    The Importing Requirements dialog is shown. IBM DOORS Next is selected from the Document type drop-down menu.

  3. Set Document location to the project that you want to work with.

  4. Under Get requirements from, select Full module hierarchy (takes time if large module). Wait for the DNG Module list to populate.

    The Importing Requirements dialog box

  5. In the Configuration Context section, click Select to display the configuration contexts in the Select configuration stream or changeset list. Select the desired configuration context from the list. Alternatively, you can enter the configuration context name or URL in the Context name field.

    Tip

    To save time, enter the URL in the Context name field instead of entering the context name or using the Select button.

  6. Select the desired module from the DNG Module list.

  7. Enter the name and file path for the Requirement Set. You can click Browse to browse for a save location.

  8. Click Import and wait for the process to import the data from the server into Requirements Toolbox. When the import completes, the Requirements Editor displays the hierarchy of the imported items.

Importing Requirements by Using Queries

  1. Open the Requirements Editor by entering:

    slreq.editor

  2. In the Requirements Editor, click Import.

    In the Importing Requirements dialog box, set Document type to IBM DOORS Next.

    The Importing Requirements dialog is shown. The mouse points to the selected IBM DOORS Next menu option in the Document type drop-down menu.

  3. Set Document location to the project that you want to work with.

  4. Under Get requirements from, select Filter by query (flat list of matched items).

  5. Click Query Builder to open the OSLC Query Builder dialog box and specify your query. Use the drop-down menus next to Object Type to choose the object type to import.

    For example, you can import only stakeholder requirements by setting the drop-down menus to Is A and Stakeholder Requirement.

    The OSLC Query Builder dialog is shown, with a query that would return only the stakeholder requirements shown.

  6. To create a query with other query parameters, click Add Filter.

    Note

    If an attribute is only defined for a given type of object, you must set Object Type to that object type before you can filter by that attribute.

  7. When you are done building your query, click Add to Query, then click OK. In the Importing Requirements dialog, the Raw query string is populated.

  8. Enter the name and file path for the Requirement Set. You can click Browse to browse for a save location.

  9. Click Import and wait for the process to import the data from the server into Requirements Toolbox.

Update Referenced Requirements

If you update the requirements in DOORS Next after importing them to Requirements Toolbox, you can update the requirement set to reflect the changes. In the Requirements Editor, select the top import node and, in the right pane, under Requirement Interchange, click Re-import Module or Re-run Query, depending on the type of import you originally did.

The Requirements Editor displays an imported requirement set. The import node is selected and the mouse points to the Re-import Module button in the right pane, under Requirement Interchange.

If the update changes or removes a referenced requirement that has links, the links have a change issue. For more information, see Track Changes to Requirement Links.

Tip

Re-importing a large module might take some time. If you know which requirement has changed on the DOORS Next server, you can select that referenced requirement in the Requirements Editor and in the right pane, under Properties, click Update from Server to update that individual requirement.

If your DOORS Next project has configuration management enabled and you selected a configuration context when you configured your MATLAB session, then the DOORS Next requirement updates from the configuration context.

Navigate from Referenced Requirements to Requirements in DOORS Next

You can use the Requirements Editor to navigate from the referenced requirement to the original requirement in DOORS Next. Select the referenced requirement in the Requirements Editor. In the right pane, under Properties, click Show in document.

You can also use the Requirements Perspective to navigate from the imported referenced requirement to the original requirement. In a Simulink® model, navigate to the Apps tab and select Requirements Manager. Ensure that Layout > Requirements Browser is selected. In the Requirements Browser, in the View drop-down, select Requirements. Select a requirement. In the Property Inspector, in the Details tab, under Properties, click Show in document.

If your DOORS Next project has configuration management enabled and you selected a configuration context when you configured your MATLAB session, then the DOORS Next requirement opens in the configuration context.

Linking with Referenced Requirements

After importing requirements from DOORS Next to Requirements Toolbox, you can link these referenced requirements the same way you link other slreq.Reference objects. For more information, see Create and Store Links.

You can also add backlinks in your DOORS Next project, which allow you to navigate from DOORS Next requirements to items that are linked to the corresponding referenced requirement in Requirements Toolbox. For more information, see Inserting Backlinks in DOORS Next.

See Also

|

Related Topics