MPPT Using Flyback Converter in TI Solar Micro Inverter Development Kit
This example shows how to implement a Maximum Power Point Tracking (MPPT) Algorithm along with control of DC-DC flyback converter using the C2000™ Microcontroller Blocket. The example uses the Texas Instruments™ Solar Micro Inverter Development Kit along with the Texas Instruments F28069M/F28035 controlCARD.
Using this example, you can:
Simulate a plant model for a DC-DC flyback converter
Simulate MPPT algorithm
Generate code for the controller and load it on the controlCARD
Monitor signals and tune parameters using the host computer
Required Hardware
Texas Instruments Solar Micro Inverter Development Kit (TMDSSOLARUINVKIT)
F28035 controlCARD or F28069M controlCARD
DC Voltage source 0-30V
Resistance 10 ohm
60W Lamp
Available Models
c28069mpptsolarkit.slx can be used to simulate the plant model and generate code for the controller and deploy it on F28069 controlCARD.
c2000_solarkit_host_model.slx can be run on the host computer to log signals and tune parameters.
Hardware Connections
Make the hardware connection as shown in the diagram.

Connect a DC Voltage source and a series resistance to
TP12(PV+)andTP13(PV-). You can also connect a Solar emulator or panel to the input terminals.Ensure you modify the controller parameters, MPPT parameters accordingly.
Connect the external
+15VDCisolated bias supply toC:JP3connector.Connect the external
+12VDCisolated bias supply toC:JP2connector.Connect a USB cable from the ISO Control Card to the PC on which host model needs to run. Verify that the LED
LD4on the control card isONindicating USB connection.Connect a resistive load or lamp at the Flyback output stage TP8(VBus Flyback) and TP10(PGND).
Simulate the DC-DC Flyback Converter with MPPT
The simulation model consists of the plant model and the controllers. The plant model consists of two major components:
Thevenin's Equivalent of PV Panel: This module uses a constant voltage source and a series resistor to emulate the PV characteristic.
DC-DC Flyback Converter: This module simulates the flyback converter, which steps up or steps down the input voltage based on the duty cycle of the PWM pulses.
The controllers in the simulation model consists of:
Maximum power point tracking (MPPT) using Perturb & Observe (P&O) algorithm
DC-DC flyback controller
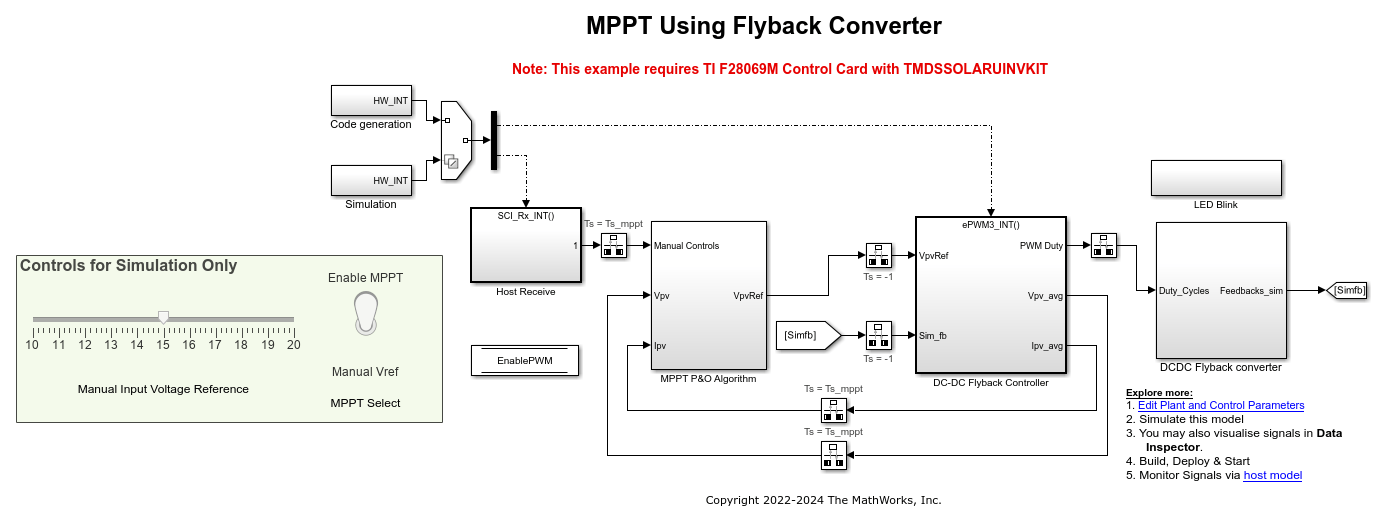
In this example, we are emulating the solar panel using the Thevenin's equivalent to provide input to the flyback converter. A fixed voltage source(28V) in series with a resistance (10 ohms) is used to create a variable voltage source depending on the current drawn from the input.
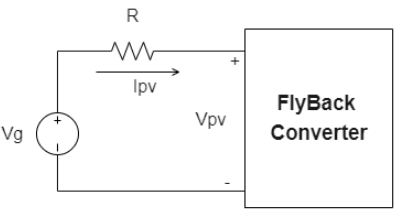
Here, Vpv=Vg-Ipv*R
PV characteristics of the equivalent solar panel:
The below PV characteristics is linear and obtained when the impedance across the input terminals of flyback converter is varied from 0(short circuit) to inf (open circuit).

The perturb & observe (P&O) algorithm is implemented using a Simulink® for calculating the reference voltage required for maximum power point operation. For the above type of characteristic, the maximum power point will occur at the midpoint of the above PV characteristic that is when input to the flyback converter is 14V. The reference voltage is achieved with the help of a voltage controller which implements a PI controller to track the reference voltage set by the MPPT algorithm. For tracking the reference voltage, the input to the flyback converter is measured. To achieve the reference voltage value, the feedback and the voltage reference inputs of the PI controller are reversed. The controller operates at a rate of 50 kHz.
The flyback converter output voltage is not controlled. Ensure that a proper resistive load is connected to the output. In the example, a lamp of 60W has been used as a load.
Configure the Model
1. Open the model. The model is configured for TI F2806x hardware.
2. To run the model on other TI C2000 processors, press Ctrl+E to open the Configuration Parameters dialog box and select the required hardware board by navigating to Hardware Implementation > Hardware board.
3. Ensure that SCI has desired baud rate of 5.625e6 Mbps for F28069 and 1.5Mbps for F28035 and receive FIFO interrupt is enabled as shown.

Peripheral Block Configuration
The PWM signals are generated at a frequency of 100 kHz. The ePWM3 module is configured to operate in up-down count mode. This ISR is triggered by ePWM3 on every second Time base period match event and ADC SoC is sent on every second event of ePWM3 counter equal to zero so that the ISR is triggered only after the ADC conversions are complete.
ePWM

ADC
Input Voltage, input current to the flyback converter and Output Voltage are sampled when ePWM3 counter equals to zero.

Over Current Protection
The comparator3 is used to compare the switch current with a predefined current limit which drives the digital compare module A to trip the PWM.


Over Voltage Protection
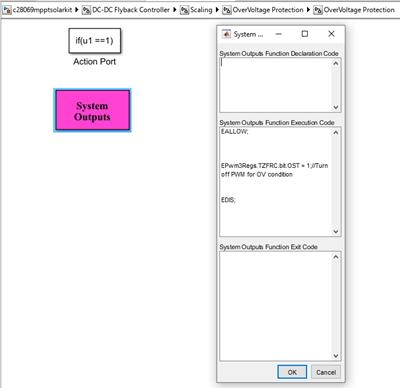
An overvoltage protection mechanism is implemented using custom code in System Outputs block. The sensed DC bus output voltage from the ADC input is compared against the overvoltage protection threshold set in the initialization script file. When overvoltage condition is met, the one-shot trip in ePWM is enabled.
Simulate the Model
Run the Model
1. Open the c28069mpptsolarkit.slx model and click the Run button to simulate the model.
2. Observe the output waveforms on the Simulink Data Inspector (SDI).
Generate Code for Controller and Load It on controlCARD
The deployment model consists of two real-time interrupt service routines (ISR) used for:
Closed-loop control of the DC-DC Flyback converter (50 kHz)
Gets users commands such as Input Voltage reference in Manual Voltage mode and MPPT enable command
Load Model on controlCARD
1. Ensure the hardware connections are made as mentioned in the Hardware Connections section.
2. Open the c28069mpptsolarkit model and generate code by pressing Ctrl+B.
3. Follow the build process by opening the diagnostic viewer using the link at the bottom of the model canvas.
4. Connect an appropriate resistive load to the flyback output terminals (TP8 & TP10). Currently, the model has been tested with a 60W bulb connected as load.
5. Turn on the DC power supply and ensure it is 28V.
6. Run the host model and observe the input voltage and input power of the flyback converter.
Monitor Signals and Tune Parameters Using the Host Computer
The host model receives the data from the kit and plots it to verify the performance of the MPPT and the control algorithms.
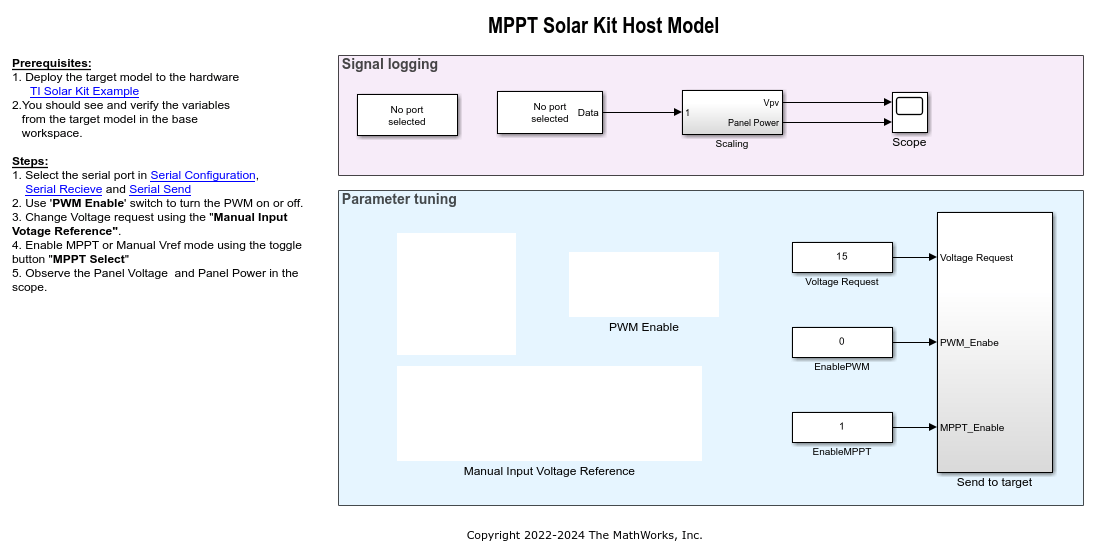
Configure and Run Model on Host Computer
1. On the host computer, browse to Device Manager > Ports (COM & LPT) to find the COM port.
2. Set the parameter Port of the following blocks in the c2000_solarkit_host_model to match the COM port of the host computer:
c2000_solarkit_host_model.slx > Serial Configuration
c2000_solarkit_host_model > Serial Receive
c2000_solarkit_host_model > Send to target > Serial Send
3. Click the Run button on the Simulation tab to run the host model.
4. While the model runs, you can monitor the input voltage and input power to the flyback converter to analyze and monitor the performance of the MPPT algorithm.
Tune the Parameters
While the model runs, you can tune parameters using the dashboard blocks:
Manual Input Voltage Reference - The value used to manually set the operating point of the PV emulator. This value is used when the toggle switch is set to the Manual Vref option. Toggling the switch turns off the MPPT algorithm and lets you choose the operating voltage of the PV emulator.
PWM Enable- This enables the PWM to the switch in flyback converter.
Hardware Results
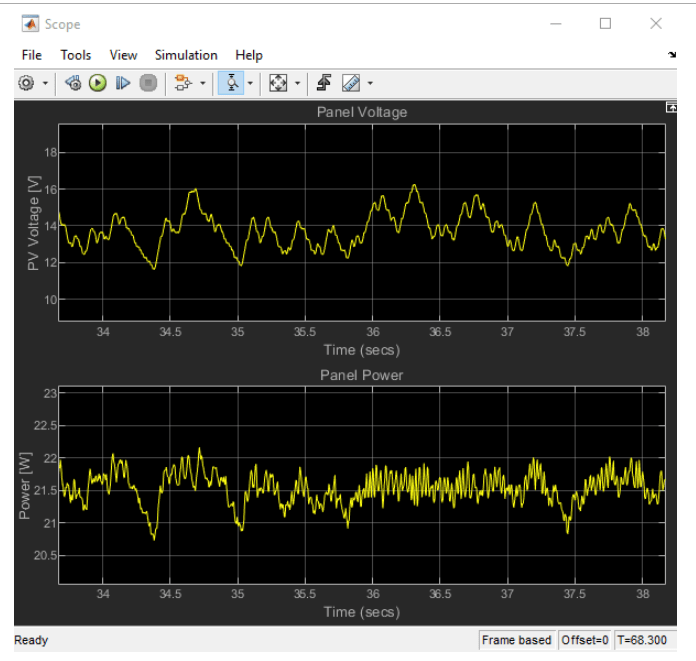
The hardware results show that the input power is controlled at around 21 watts and input voltage to the fly back converter is controlled at around the MPPT voltage of 14V.
