ArduPlane SITL Setup and Control Tutorial Using Simulink
This example shows how to run an ArduPlane Software-in-the-Loop (SITL) simulation on a Windows PC using Simulink, Windows Subsystem for Linux (WSL), and Mission Planner. The workflow allows you to simulate, control, and tune a fixed-wing autopilot without deploying code to physical hardware.
ArduPlane is a powerful open-source autopilot system designed for fixed-wing aircraft, widely used in research, hobby, and professional applications. This tutorial will guide you through setting up ArduPlane’s Software-In-The-Loop (SITL) simulation environment on Windows using WSL and Ubuntu 22.04.
You can use this approach to validate flight control logic, tune parameters, and verify servo mappings early in development before moving to hardware-in-the-loop (HIL) or flight testing.
Prerequisites
If you are new to Simulink, watch the Simulink Quick Start video.
SITL Setup Steps
Perform these steps to set up Software-in-the-Loop (SITL) simulation for your ArduPilot hardware using Simulink.
Install or Verify if WSL is Installed.NoteIf you have previously used ArduPilot® support package in your existing WSL distribution, it is recommended to install a fresh Ubuntu distribution to avoid conflicts.
If WSL is already installed, proceed to the next step.
If WSL is not installed, install WSL. For more information, see Install Ubuntu Distribution for Windows Subsystem for Linux (WSL).
Start the hardware setup screens and in the Install Ubuntu Distribution for WSL screen, select I have already installed Ubuntu 22.04.
Select
Ubuntu 22.04from the Ubuntu Distribution drop-down list and then click Next.Install Python. In the Install Python 3.8.2 Software screen, select the required option.
If Python is not installed, select Automatically download and install option. This is a recommended option and will install Python and other required packages.
If required version Python is already installed, select I have already installed Python 3.7 or a later version and then click Next.Python 3.8.2 or later is required to upload the ArduPilot executable to an ArduPilot device.
Specify the path for installing Python and other packages and click Install.A message indicating successful installation is displayed.
In the Select and ArduPilot Vehicle Type screen, select ArduPlane and then click Next.
In the Download ArduPilot Code & Set Up Toolchain on WSL screen, download the ArduPilot source code and setup the toolchain. Click Next. For more information, see Download ArduPilot Source Code and Set Up Toolchain in Windows Subsystem for Linux.
Specify the folder where you downloaded the ArduPilot source code and then click Validate to check that the folder contains a valid ArduPilot installation.
Select SITL and ArduPlane.
In the Select and ArduPilot Board screen, select
ArduPilot Host Targetfor Autopilot name andsitlfor Board options.Click Next.
Download Mission Planner.
In the Download Mission Planner screen, download and install the mission planning software. For more information, see Download and Install Mission Planner.
Click Next.
Build ArduPilot Firmware.
Click Build Firmware to start building the firmware. This might take a few minutes to complete.
After the firmware build is complete, click Next.This completes the hardware setup process,
Click Finish.
Since this is a manual controller setup, try tuning the gains for roll, pitch, yaw, and throttle. Gains are parameters that determine how strongly the controller responds to your input or to changes in the system.
Lowering the gains can reduce sensitivity, resulting in smoother and more stable plane movements.
Configure and Control the Plane
After completing the hardware setup process, perform these steps in the example model.
Open the ManualControlFixedWing.slx example model. Monitor signals and tune parameters on the example model.
modelName = "ManualControlFixedWing";
open_system(modelName)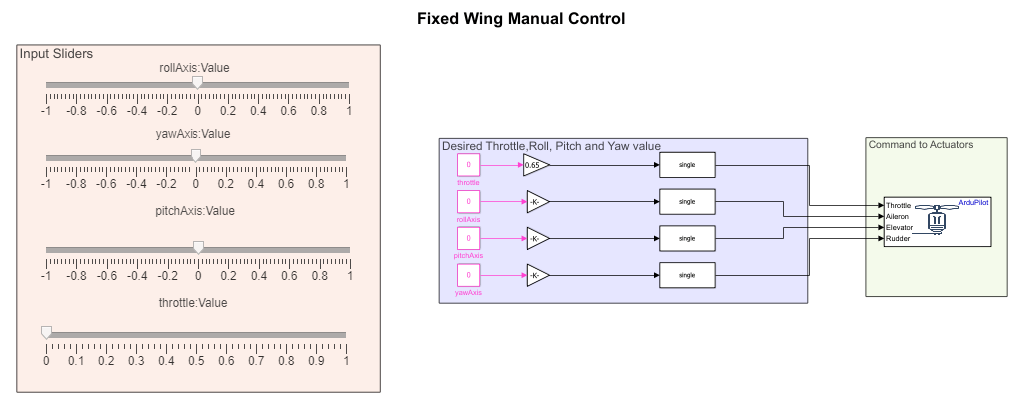
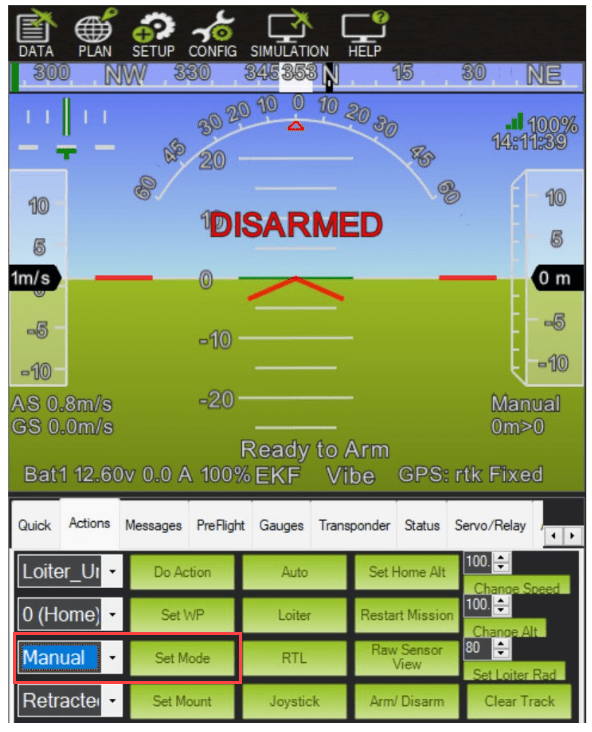
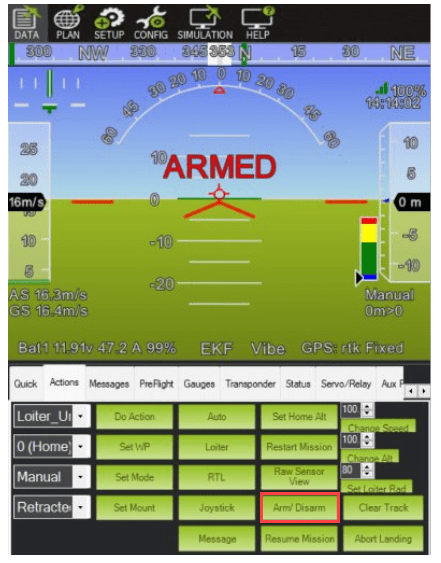
Open Mission Planner. Select the Data tab, go to Actions tab, select Manual mode from the drop-down list, and then click Set Mode.
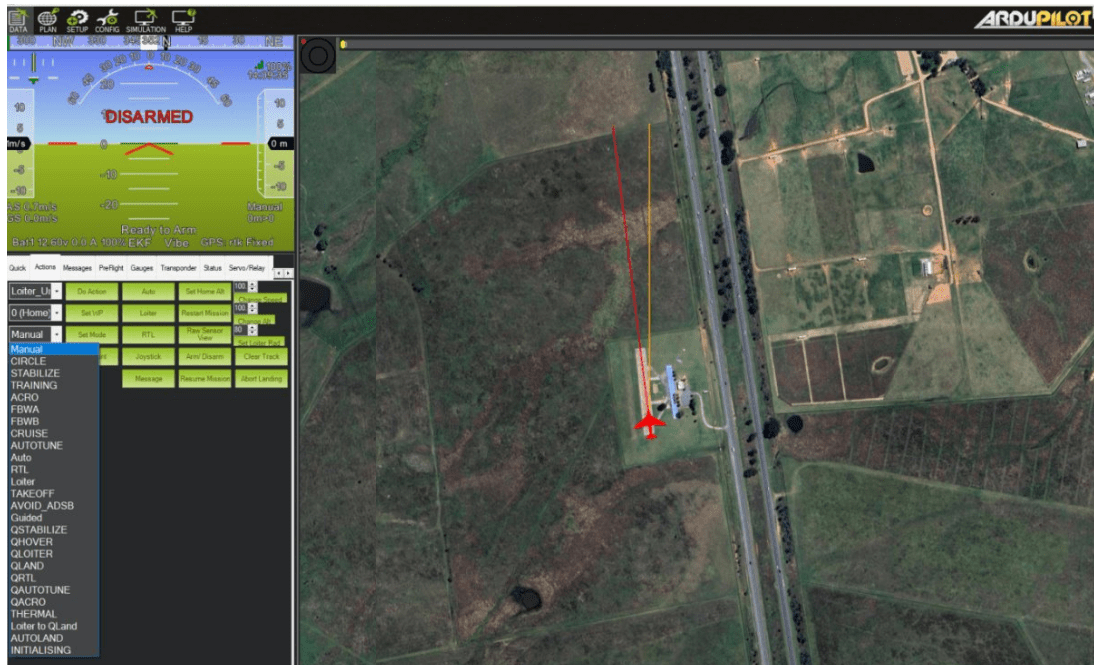
From the Flight Mode drop-down list, usually labeled Set Mode, select Manual and then click Set Mode.
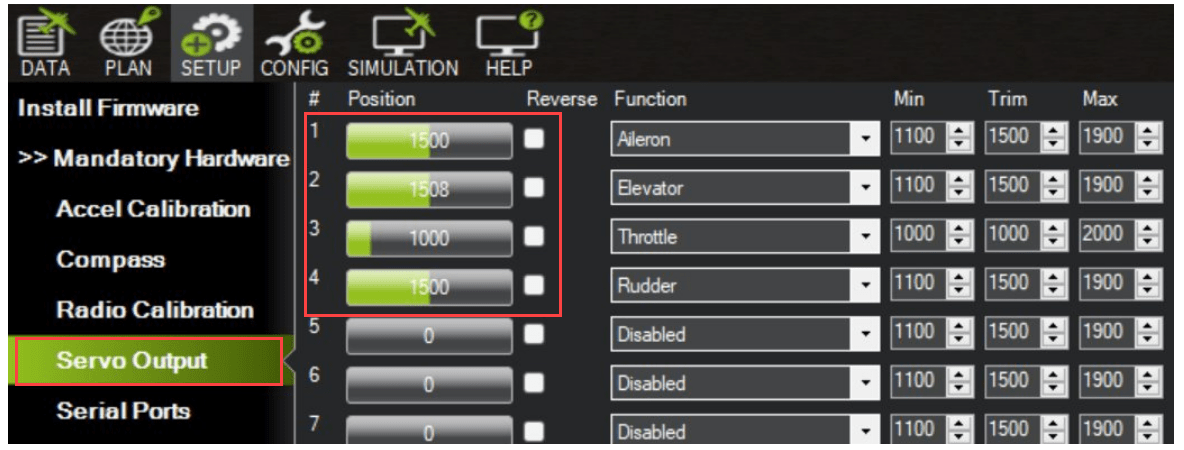
Verify Servo configuration. Go to Setup > Mandatory Hardware > Servo Output and check that the servos are configured correctly.Default mapping for a plane:
Servo 1: Aileron
Servo 2: Elevator
Servo 3: Throttle
Servo 4: Rudder
To arm the plane, from the Data tab, go to Actions tab, and then click Arm/Disarm. The display changes from Disarmed to Armed.
While the simulation runs:
Use the throttle control to increase or decrease the engine power.
Adjust the sliders for roll, pitch, and yaw.
Observe the plane's movement in the Launch Map console as you change the controls You can find the Launch Map console in the main Mission Planner window, typically located under the Flight Data or Simulation tab. It displays a real-time map view of your plane’s position and movement during simulation or flight..
Since this is a manual controller setup, try tuning the gains for roll, pitch, yaw, and throttle.
Lowering the gains can reduce sensitivity, resulting in smoother and more stable plane movements.