Create Project and Add Source Files in Polyspace Platform User Interface
The Polyspace Platform user interface allows you to author functional tests for C/C++ code, or check C/C++ code for bugs or run-time errors using static code analysis. Before you begin test authoring or code analysis, you must add your source code to a project.
You can specify your source code manually or extract source code information from a build command after executing the command. If you use a build command or compilation database for building your source code or you build your source code in an IDE (using an underlying build command), try creating a project from the build command first. For more information, see Add Sources from Build Command. If project creation from build command fails, manually add your code.
The Polyspace® Platform user interface saves your project as a .psprjx file. When you add source files to your project, Polyspace saves the paths to your source files relative to the project location.
If you are trying to migrate a project created in the older Polyspace user interface from a .psprj format to a .psprjx format, see Import Projects into Polyspace Platform User Interface.
Add Sources Manually
You can create an empty project and add source files to it manually.
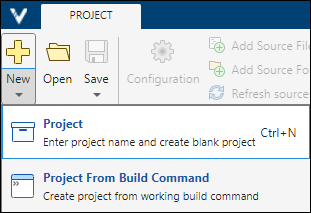
Select the option New > Project in the toolstrip.

Name your project and select a save location. This creates a
.psprjxfile in the location you specified.You can add individual files or folders to a project. For your convenience, make sure that your sources and tests are in separate folders. Otherwise, when you add sources by folder, you might inadvertently add tests as sources leading to later problems during project build or static analysis.
To add files to a project, select the project in the Projects pane and click the Add Source File button in the toolstrip. Alternatively, right-click the Code node of a project and select Add Source File. In the explorer window, select files to add to the project.
You can also select several files to add at once. In Windows®, select multiple files using Ctrl+click or select a range of files by using Shift+click.
You can also remove files that you added previously. To remove a file, right-click the file and select Remove From Project. Note that you can remove only those files that were explicitly added to the project and not added by adding their parent folder. To see all explicitly added files, locate the Project tab in the Configuration pane and see the option Application source files.
To add folders to a project, select the project in the Projects pane and click the Add Source Folder button in the toolstrip.
You can also remove folders that you added previously. To remove a folder, right-click the folder name on the project and select Remove Folder. Note that you can remove only those folders that were explicitly added to the project. To see all explicitly added folders, locate the Project tab in the Configuration pane and see the section Application source folders.
To add folders containing include files to a project, double-click the Configuration node of the project. On the Project tab, specify the include folder paths for the option Include paths.
If you want to exclude certain files permanently from your project, instead of removing the files, exclude them from the project. Excluding a file ensures that someone else cannot accidentally re-add the file by refreshing the parent folder. To exclude a file (or folder) from a project, right-click the file (or folder) on the Projects pane and select Exclude File (or Exclude Folder). Excluded files and folders appear with the
 icon next to them. To reinclude an excluded file or folder, right-click the file or folder and select Re-include File.
You can see all folders and files explicitly added to the project on the Project tab in the Configuration pane. On the Project tab, besides seeing the files and folders added, you can:
Add more files or folders, or remove previously added files or folders.
For more information, see
Application source foldersorApplication source files.Include C/C++ files with nonstandard extensions in your project.
For more information, see
Include file name patterns.Exclude files specifically for static analysis or testing.
For more information, see
Exclude paths.Define project variables to use as shorthands when defining paths.
For more information, see
Project variables.
For information on how to keep this project updated, see Update Projects in Polyspace Platform User Interface.
Add Sources from Build Command
If you use a build command such as make to build your source code (or build your source code in an IDE), you can create a Polyspace project from your build command. To create a Polyspace project from a build command, do one of the following:
Run
polyspace-configure -output-platform-projecton your build command at the command line and create a Polyspace project (projectName.psprjxprojectName.psprjxpolyspace-configure.Create a project directly in the Polyspace Platform user interface.
Creating a project at the command line might have certain advantages:
You can make sure that your build command completes successfully. Then, to create a Polyspace Platform project, you can simply prepend
polyspace-configure(along with required options) to your build command.You can execute your build command on command-line interfaces with predefined environment variables. For instance, you can execute a Microsoft® Visual Studio® build command on a Developer Command Prompt, where environment variables related a Visual Studio build are already set up. You do not have access to these environment variables from within the Polyspace Platform user interface.
This section describes how to create a Polyspace Platform project in the user interface from a build command.
You are not able to create a project with the same name as a project that is currently open in the project browser. Before you begin, close any open projects that share the same name as the project you are creating.
To create a project in the user interface from a build command:
Click New > Project From Build Command.
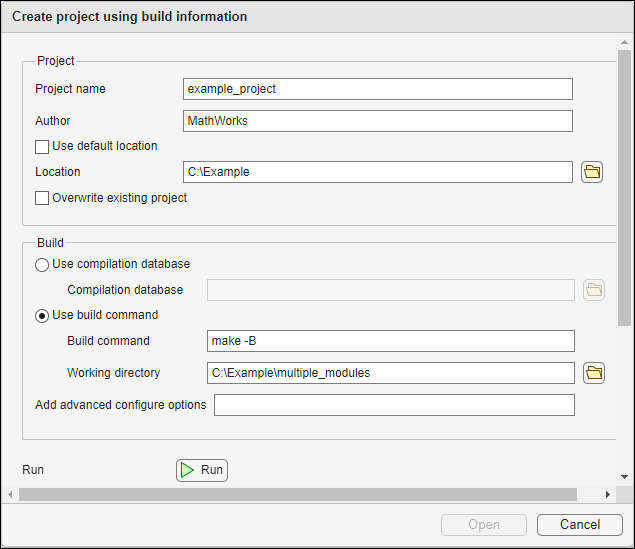
In the Create project using build information window, specify the following information:
Project name: If a project with the same name exists in the specified location, the Project name text box prompts you to change your project name or select the option Overwrite existing project to overwrite the existing project with your new build information. Overwrite existing project is not selected by default.
Location
Specify a compilation database or build command from which to create a project:
To create a project from a compilation database, select Use compilation database. Enter the path to a compilation database file (
.jsonfile). For an example of how to create a compilation database, seepolyspace-configure.To create a project from a build command, select Use build command.
For Build command, specify a build command such as
makeor specify the path to an IDE executable such as"C:\Program Files (x86)\Microsoft Visual Studio\2019\Professional\Common7\IDE\devenv.exe". If you specify the path to a build command, also specify a Working directory from which the build command is run.
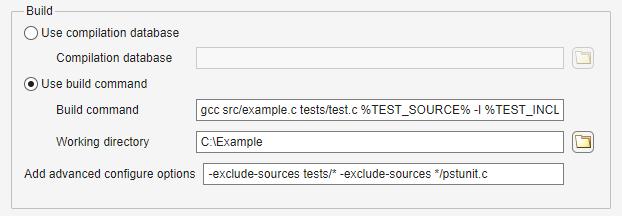
Use the Add advanced configure options text box to configure the project using command-line options including options supported by
polyspace-configure. For instance, you can exclude certain sources from your project. Use the-exclude-sourcesoption along with a glob pattern to remove any source with a matching filename. For more information, see Select Files for Polyspace Analysis Using Pattern Matching.This example excludes all files in the
testsfolder along with any file namedpstunit.c.
Click
 . Polyspace runs your build command and if successful, creates a Polyspace Platform project based on this information.
If you specify the path to an IDE, clicking Run opens the IDE. Build your project within the IDE and close the IDE to complete creating the Polyspace Platform project. See Create Projects from Visual Studio in Polyspace Platform User Interface.
If you are using Polyspace Platform projects for authoring and running tests, set the configuration options relevant for testing.
Creating a Polyspace Platform project from your build command extracts the following information from your build command into the project. You might have to set additional options for successful project build. In particular, before you begin the test authoring workflow, set the option
Compilation toolchain (Testing)(Polyspace Test).Adds required source files to your project.
Sets the project language and language version. For more information, see
Source code language (-lang).Adds include paths and macro definitions that are implicitly defined by your compiler.
Adds include paths and macro definitions that are part of your build command. See:
If your build command compiles different files with different options, the Polyspace project you create from the build command also specifies the equivalent Polyspace options per file. To see the options associated with a file:
Open your project configuration.
Select Target & Compiler > File Specific Options.
Select the file that you want from the drop-down list of files.
Note that file-specific options are attached to their respective files only when you run static analysis. When you build a project for testing, all options are pooled into a global option list for project build. A message in the build log states that file-specific options have been merged with the global options.
Sets the compiler for static analysis with Polyspace Bug Finder™ or Polyspace Code Prover™. For more information, see
Compilation toolchain (Static Analysis).Sets processor information such as sizes of types, underlying types of
size_t, and so on. For more information, see:Sets additional flags that are part of the build command. See:
Extra C flags(Polyspace Test)Extra C++ flags(Polyspace Test)Extra flags for linking(Polyspace Test) (only for GCC, Clang and Microsoft Visual Studio linkers)
Sets libraries and library paths. See
Libraries(Polyspace Test) andLibrary paths(Polyspace Test).
If you open the project configuration, the Project and Build tabs contain a label Auto-generated on the top right indicating that at least part of the configuration was automatically generated from an external source. If you add additional options besides the auto-generated ones, these options are lost during a project update. For information on how to keep this project updated, see Update Projects in Polyspace Platform User Interface.
See Also
Application source folders | Application source files | Include file name patterns | Exclude paths | Project variables | polyspace-configure