Automate Attributes of Labeled Objects
This example shows how to develop a vehicle detection and distance estimation algorithm and use it to automate labeling using the Ground Truth Labeler app. In this example, you will learn how to:
Develop a computer vision algorithm to detect vehicles in a video, and use the monocular camera configuration to estimate distances to the detected vehicles.
Use the
AutomationAlgorithmAPI to create an automation algorithm. See Create Automation Algorithm for Labeling for details. The created automation algorithm can be used with the Ground Truth Labeler app to automatically label vehicles, along with attributes to store the estimated distances.
The Ground Truth Labeler App
Good ground truth data is crucial for developing driving algorithms and evaluating their performances. However, creating a rich and diverse set of annotated driving data requires significant effort. The Ground Truth Labeler app makes this process efficient. You can use this app as a fully manual labeling tool to mark vehicle bounding boxes, lane boundaries, and other objects of interest for an automated driving system. You can also manually specify attributes of the labeled objects. However, manual labeling requires a significant amount of time and resources. As an alternative, this app provides a framework for creating algorithms to extend and automate the labeling process. You can use the algorithms you create to quickly label entire data sets, automatically annotate the labels with attributes, and then follow it up with a more efficient, shorter manual verification step. You can also edit the results of the automation step to account for challenging scenarios that the automation algorithm might have missed.
This example describes how to insert a vehicle detection and distance estimation automation algorithm into the automation workflow of the app. This example reuses the ACF Vehicle Detection automation algorithm to first detect vehicles and then automatically estimate the distances of the detected vehicles from the camera mounted on the ego vehicle. The algorithm then creates a label for each detected vehicle, with an attribute specifying the distance to the vehicle.
Detect Vehicles from a Monocular Camera
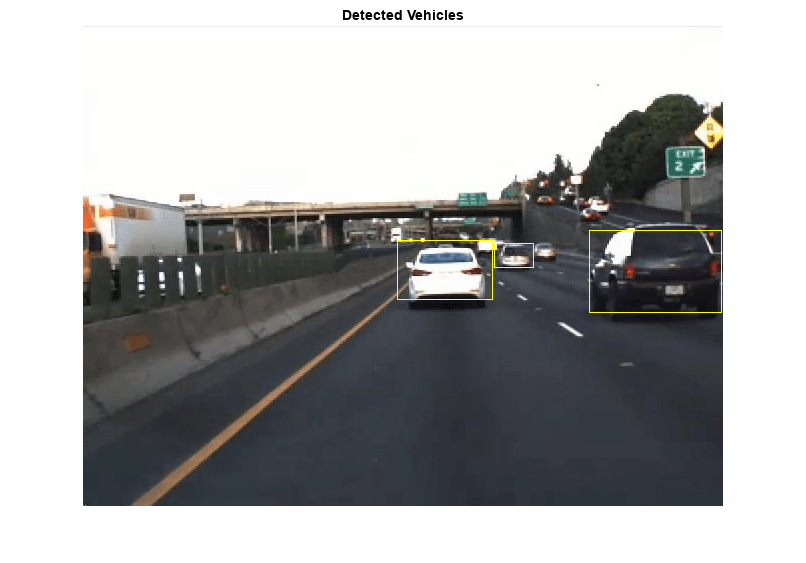
First, create a vehicle detection algorithm. The Visual Perception Using Monocular Camera example describes how to create a pretrained vehicle detector and configure it to detect vehicle bounding boxes using the calibrated monocular camera configuration. To detect vehicles, try out the algorithm on a single video frame.
% Read a frame of interest from a video.
vidObj   = VideoReader('05_highway_lanechange_25s.mp4');
vidObj.CurrentTime = 0.1;
I = readFrame(vidObj);

% Load the monoCamera object.
data = load('FCWDemoMonoCameraSensor.mat', 'sensor');
sensor = data.sensor;

% Load the pretrained detector for vehicles.
detector = vehicleDetectorACF();

% Width of a common vehicle is between 1.5 to 2.5 meters.
vehicleWidth = [1.5, 2.5];

% Configure the detector to take into account configuration of the camera
% and expected vehicle width
detector = configureDetectorMonoCamera(detector, sensor, vehicleWidth);

% Detect vehicles and show the bounding boxes.
[bboxes, ~] = detect(detector, I);
Iout = insertShape(I, 'rectangle', bboxes);
figure;
imshow(Iout)
title('Detected Vehicles')
Estimate Distances to Detected Vehicles
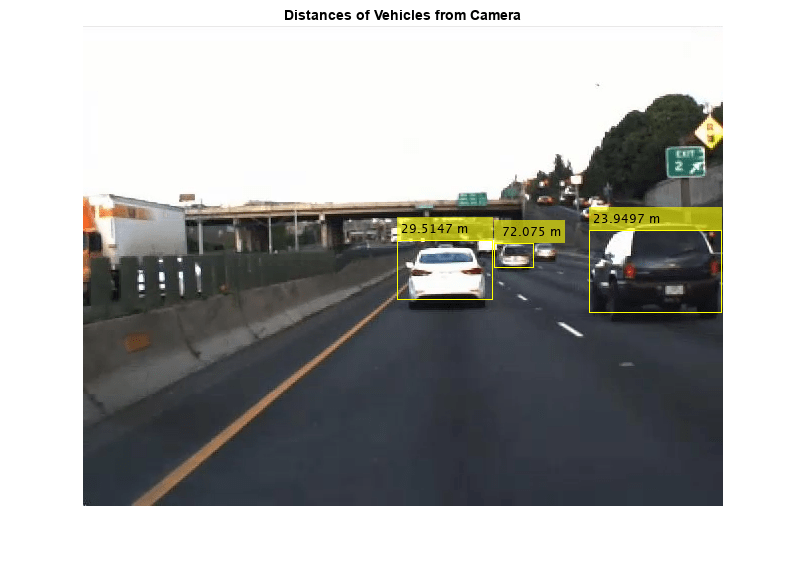
Now that vehicles have been detected, estimate distances to the detected vehicles from the camera in world coordinates. monoCamera provides an imageToVehicle method to convert points from image coordinates to vehicle coordinates. This can be used to estimate the distance along the ground from the camera to the detected vehicles. The example specifies the distance as the center point of the detected vehicle, along the ground directly below it.
% Find the midpoint for each bounding box in image coordinates.
midPtsImg = [bboxes(:,1)+bboxes(:,3)/2  bboxes(:,2)+bboxes(:,4)];
midPtsWorld = imageToVehicle(sensor, midPtsImg);
x = midPtsWorld(:,1);
y = midPtsWorld(:,2);
distance  = sqrt(x.^2 + y.^2);

% Display vehicle bounding boxes and annotate them with distance in meters.
distanceStr = cellstr([num2str(distance) repmat(' m',[length(distance) 1])]);
Iout = insertObjectAnnotation(I, 'rectangle', bboxes, distanceStr);
imshow(Iout)
title('Distances of Vehicles from Camera')
Integrate Vehicle Detection and Distance Estimation Algorithm Into Ground Truth Labeler
Incorporate the vehicle detection and distance estimation automation class into the automation workflow of the app. See Create Automation Algorithm for Labeling for more details. Start with the existing ACF Vehicle Detection automation algorithm to perform vehicle detection with a calibrated monocular camera. Then modify the algorithm to perform attribute automation. In this example, use the distance of the vehicle from the camera as an attribute of the detected vehicle. This section describes the steps for making changes to the existing ACF Vehicle Detection automation algorithm class.
Step 1 contains properties that define the name and description of the algorithm, and the directions for using the algorithm.
   %--------------------------------------------------------------------
   % Define algorithm Name, Description, and UserDirections.
   properties(Constant)
       %Name: Algorithm Name
       %   Character vector specifying name of algorithm.
       Name = 'Vehicle Detection and Distance Estimation';
       % Description: Provide a one-line description for your algorithm.
       Description = 'Detect vehicles using a pretrained ACF vehicle detector and compute distance of detected vehicles from camera.';
       % UserDirections: Provide a set of directions that are displayed
       %                 when this algorithm is invoked. The directions
       %                 are to be provided as a cell array of character
       %                 vectors, with each element of the cell array
       %                 representing a step in the list of directions.
       UserDirections = {...
           'Define a rectangle ROI Label to label vehicles.',...
           'For the label definition created, define an Attribute with name Distance, type Numeric Value and default value 0.', ...
           'Run the algorithm',...
           'Manually inspect and modify results if needed'};
   end
Step 2 contains the custom properties needed to support vehicle detection and distance estimation automation
   %--------------------------------------------------------------------
   % Vehicle Detector Properties
   %--------------------------------------------------------------------
   properties
       %SelectedLabelName Selected label name
       %   Name of selected label. Vehicles detected by the algorithm will
       %   be assigned this variable name.
       SelectedLabelName
       %Detector Detector
       %   Pretrained vehicle detector, an object of class
       %   acfObjectDetector.
       Detector
       %VehicleModelName Vehicle detector model name
       %   Name of pretrained vehicle detector model.
       VehicleModelName = 'full-view';
       %OverlapThreshold Overlap threshold
       %   Threshold value used to eliminate overlapping bounding boxes
       %   around the reference bounding box, between 0 and 1. The
       %   bounding box overlap ratio denominator, 'RatioType' is set to
       %   'Min'
       OverlapThreshold = 0.65;
       %ScoreThreshold Classification Score Threshold
       %   Threshold value used to reject detections with low detection
       %   scores.
       ScoreThreshold = 30;
       %ConfigureDetector Boolean value to decide on configuring the detector
       %   Boolean value which decides if the detector is configured using
       %   monoCamera sensor.
       ConfigureDetector = true;
       %SensorObj monoCamera sensor
       %   Monocular Camera Sensor object used to configure the detector.
       %   A configured detector will run faster and can potentially
       %   result in better detections.
       SensorObj = [];
       %SensorStr monoCamera sensor variable name
       %   Monocular Camera Sensor object variable name used to configure
       %   the detector.
       SensorStr = '';
       %VehicleWidth Vehicle Width
       %   Vehicle Width used to configure the detector, specified as
       %   [minWidth, maxWidth] describing the approximate width of the
       %   object in world units.
       VehicleWidth = [1.5 2.5];
       %VehicleLength Vehicle Length
       %   Vehicle Length used to configure the detector, specified as
       %   [minLength, maxLength] describing the approximate length of the
       %   object in world units.
       VehicleLength = [ ];
   end
   %--------------------------------------------------------------------
   % Attribute automation Properties
   %--------------------------------------------------------------------
   properties (Constant, Access = private)
       % Flag to enable Distance attribute estimation automation
       AutomateDistanceAttribute = true;
       % Supported Distance attribute name.
       % The label must have an attribute with the name specified.
       SupportedDistanceAttribName = 'Distance';
   end
properties (Access = private)
       % Actual attribute name for distance
       DistanceAttributeName;
       % Flag to check if attribute specified is a valid distance
       % attribute
       HasValidDistanceAttribute = false;
   end
Step 3 initializes properties.
   %--------------------------------------------------------------------
   % Initialize sensor, detector and other relevant properties.
   function initialize(algObj, ~)
       % Store the name of the selected label definition. Use this
       % name to label the detected vehicles.
       algObj.SelectedLabelName = algObj.SelectedLabelDefinitions.Name;
       % Initialize the vehicle detector with a pretrained model.
       algObj.Detector = vehicleDetectorACF(algObj.VehicleModelName);
       % Initialize parameters to compute vehicle distance
       if algObj.AutomateDistanceAttribute
           initializeAttributeParams(algObj);
       end
   end
   function initializeAttributeParams(algObj)
       % Initialize properties relevant to attribute automation.
       % The label must have an attribute with name Distance and type
       % Numeric Value.
       hasAttribute = isfield(algObj.ValidLabelDefinitions, 'Attributes') && ...
                      isstruct(algObj.ValidLabelDefinitions.Attributes);
       if hasAttribute
          attributeNames = fieldnames(algObj.ValidLabelDefinitions.Attributes);
          idx = find(contains(attributeNames, algObj.SupportedDistanceAttribName));
          if ~isempty(idx)
             algObj.DistanceAttributeName = attributeNames{idx};
             algObj.HasValidDistanceAttribute = validateDistanceType(algObj);
          end
       end
   end
   function tf = validateDistanceType(algObj)
       % Validate the attribute type.
       tf = isfield(algObj.ValidLabelDefinitions.Attributes, algObj.DistanceAttributeName) && ...
            isfield(algObj.ValidLabelDefinitions.Attributes.(algObj.DistanceAttributeName), 'DefaultValue') && ...
            isnumeric(algObj.ValidLabelDefinitions.Attributes.(algObj.DistanceAttributeName).DefaultValue);
   end
Step 4 contains the updated run method to compute the distance of the detected cars and writes the label and attribute info to the output labels.
   %--------------------------------------------------------------------
   function autoLabels = run(algObj, I)
autoLabels = [];
       % Configure the detector.
       if algObj.ConfigureDetector && ~isa(algObj.Detector,'acfObjectDetectorMonoCamera')
           vehicleSize = [algObj.VehicleWidth;algObj.VehicleLength];
           algObj.Detector = configureDetectorMonoCamera(algObj.Detector, algObj.SensorObj, vehicleSize);
       end
       % Detect vehicles using the initialized vehicle detector.
       [bboxes, scores] = detect(algObj.Detector, I,...
           'SelectStrongest', false);
       [selectedBbox, selectedScore] = selectStrongestBbox(bboxes, scores, ...
           'RatioType', 'Min', 'OverlapThreshold', algObj.OverlapThreshold);
       % Reject detections with detection score lower than
       % ScoreThreshold.
       detectionsToKeepIdx = (selectedScore > algObj.ScoreThreshold);
       selectedBbox = selectedBbox(detectionsToKeepIdx,:);
       if ~isempty(selectedBbox)
           % Add automated labels at bounding box locations detected
           % by the vehicle detector, of type Rectangle having name of
           % the selected label.
           autoLabels.Name     = algObj.SelectedLabelName;
           autoLabels.Type     = labelType.Rectangle;
           autoLabels.Position = selectedBbox;
           if (algObj.AutomateDistanceAttribute && algObj.HasValidDistanceAttribute)
               attribName = algObj.DistanceAttributeName;
               % Attribute value is of type 'Numeric Value'
               autoLabels.Attributes = computeVehicleDistances(algObj, selectedBbox, attribName);
           end
       else
           autoLabels = [];
       end
   end
   function midPts = helperFindBottomMidpoint(bboxes)
      % Find midpoint of bottom edge of the bounding box.
      xBL = bboxes(:,1);
      yBL = bboxes(:,2);
      xM = xBL + bboxes(:,3)/2;
      yM = yBL + + bboxes(:,4);
      midPts = [xM yM];
end
   function distances= computeDistances(algObj, bboxes)
      % Helper function to compute vehicle distance.
      midPts = helperFindBottomMidpoint(bboxes);
      xy = algObj.SensorObj.imageToVehicle(midPts);
      distances  = sqrt(xy(:,1).^2 + xy(:,2).^2);
end
   function attribS = computeVehicleDistances(algObj, bboxes, attribName)
       % Compute vehicle distance.
       numCars = size(bboxes, 1);
       attribS = repmat(struct(attribName, 0), [numCars, 1]);
       for i=1:numCars
           distanceVal = computeDistances(algObj, bboxes(i,:));
           attribS(i).(attribName) = distanceVal;
       end
   end
Use the Vehicle Detection and Distance Estimation Automation Class in the App
The packaged version of the vehicle distance computation algorithm is available in the VehicleDetectionAndDistanceEstimation class. To use this class in the app:
Create the folder structure required under the current folder, and copy the automation class into it.
Note: The VehicleDetectionAndDistanceEstimation.m file must be in the same folder where you create the +vision/+labeler folder structure
     mkdir('+vision/+labeler');
     copyfile('VehicleDetectionAndDistanceEstimation.m','+vision/+labeler');
Load the
monoCamerainformation into the workspace. This camera sensor information is suitable for the camera used in the video used in this example,05_highway_lanechange_25s.mp4. If you load a different video, use the sensor information appropriate for that video.
load('FCWDemoMonoCameraSensor.mat', 'sensor')
Open the
groundTruthLabelerapp.
groundTruthLabeler 05_highway_lanechange_25s.mp4
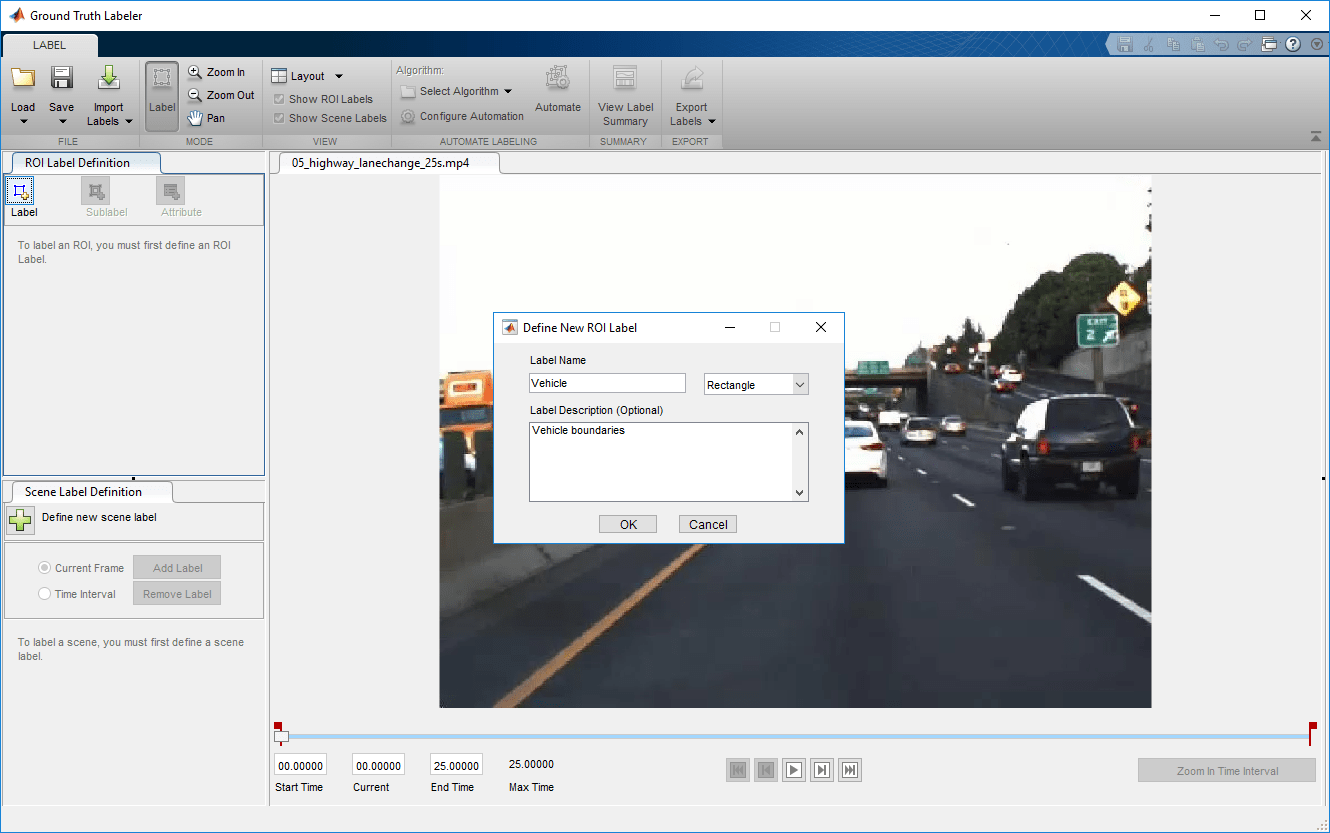
Under Ground Truth Labeler tab, from the Label Definition section on the app toolstrip, click Add Label and select
Rectangle/Cuboidfrom the drop down. Define a Rectangle/Cuboid ROI label with the nameVehicle. You can choose a color for each label. Click OK.
Under Ground Truth Labeler tab, from the Label Definition section on the app toolstrip, click Attribute and select
Numericfrom the drop down. Define an attribute with the nameDistanceand a default scalar value of0. You can add a description for the attribute. Click OK.

Select Algorithm > Select Algorithm > Refresh list.
Select Algorithm > Vehicle Detection and Distance Estimation. If you do not see this option, ensure that the current working folder has a folder called
+vision/+labeler, with a file namedVehicleDetectionAndDistanceEstimation.min it.
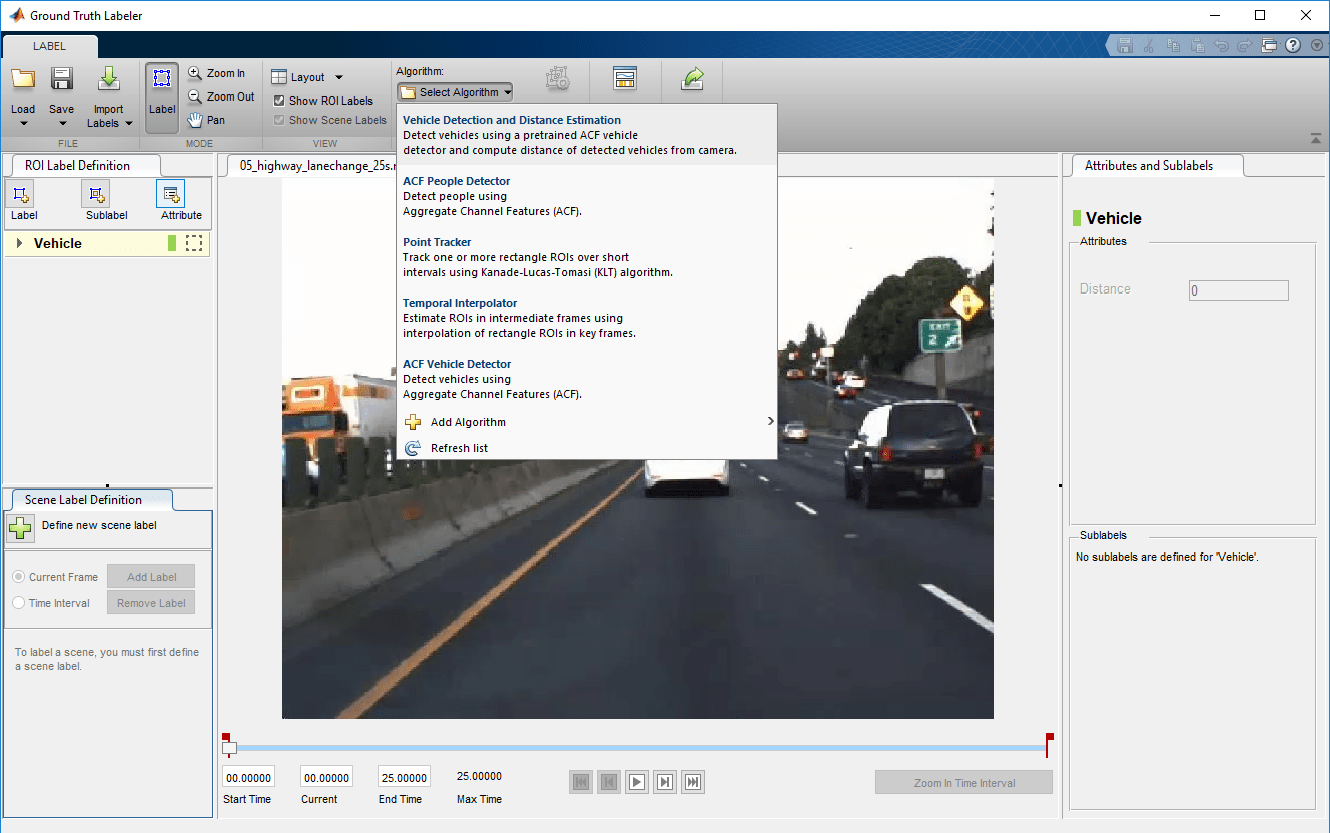
Click Automate. A new tab opens, displaying directions for using the algorithm.
Click Settings, and in the dialog box that opens, enter
sensorin the first text box. Modify other parameters if needed before clicking OK.
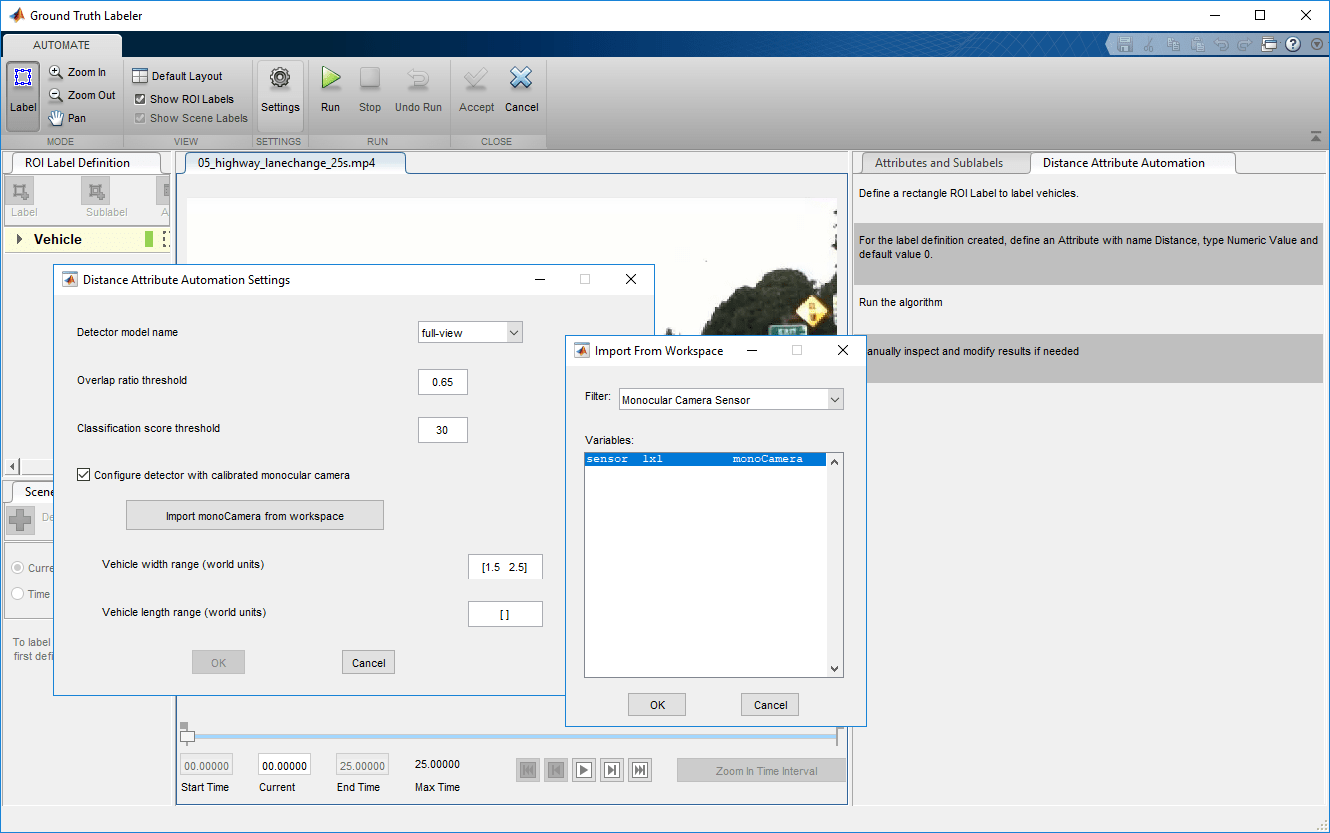
Click Run. The vehicle detection and distance computation algorithm progresses through the video. Notice that the results are not satisfactory in some of the frames.
After the run is completed, use the slider or arrow keys to scroll across the video to locate the frames where the algorithm failed.
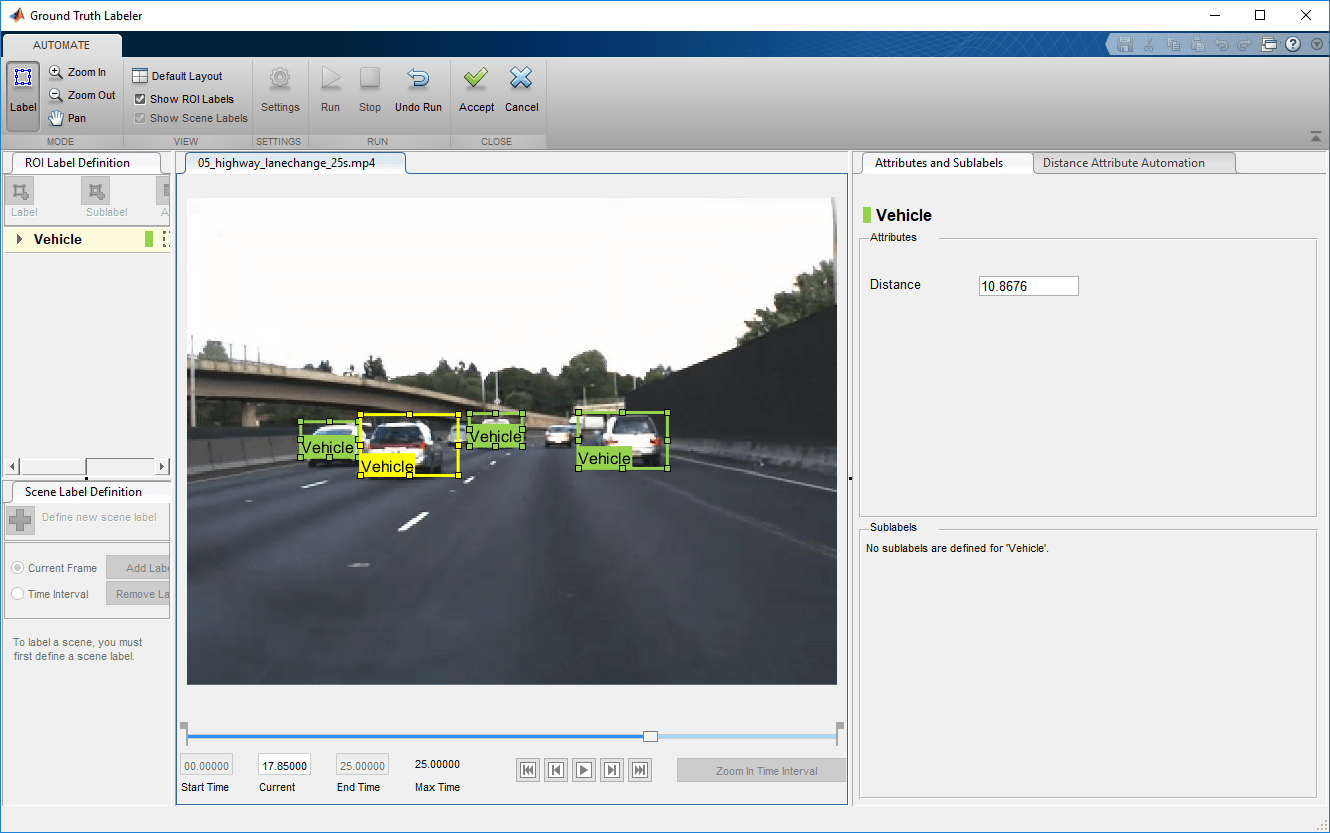
Manually tweak the results by either moving the vehicle bounding box or by changing the distance value. You can also delete the bounding boxes and the associated distance values.

Once you are satisfied with the vehicle bounding boxes and their distances for the entire video, click Accept.
The automated vehicle detection and distance attribute labeling on the video is complete. You can now label other objects of interest and set their attributes, save the session, or export the results of this labeling run.
Conclusion
This example showed the steps to incorporate a vehicle detection and distance attribute estimation automation algorithm into the Ground Truth Labeler app. You can extend this concept to other custom algorithms to extend the functionality of the app.