Control Playback of Signal Frames for Labeling
The Ground Truth Labeler app enables you to label multiple image or lidar point cloud signals simultaneously. When playing the signals or navigating between frames, you can control which frames display for each signal by changing the frame rate at which the signals display.
Signal Frames
The signals that you label are composed of frames. Each frame has a discrete timestamp associated with it, but the app treats each frame as a duration of [t0, t1), where:
t0 is the timestamp of the current frame.
t1 is the timestamp of the next frame.
When you label a frame that displays in the app, the label applies to the duration of that frame.
The intervals between frames are units of time, such as seconds. This time range is
the frame rate of the signal. Specify the timestamps for a signal
as a duration vector. Each timestamp
corresponds to the start of a frame.
Main Signal
When you load multiple signals into a new app session, by default, the app designates the signal with the highest frame rate as the main signal. When you play back signals or navigate between frames, the app displays all frames from the main signal.
In the app, you can label signals only from within the time range of the main signal. When you view a frame from the main signal, the app displays the frames from all other signals that are at that timestamp. In this scenario, when navigating between frames, frames from signals with lower frame rates are sometimes repeated.
Consider an app session containing two signals: a video, v, and a lidar point cloud sequence, pc.
The video has a frame rate of 4 frames per second, with a 0.25-second duration per frame. This signal is the main signal.
The point cloud sequence has a frame rate of 2.5 frames per second, with a 0.4-second duration per frame.
This figure shows the frames that display over the first second in this scenario.
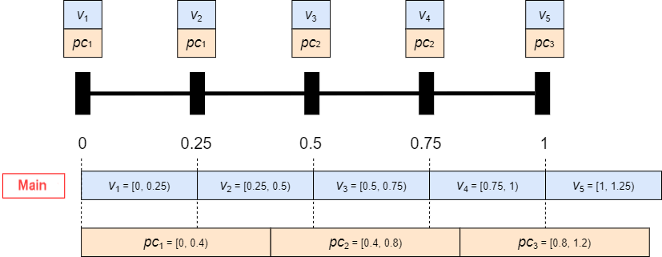
At time 0, the app displays the initial frame for each signal: v1 for the video and pc1 for the point cloud sequence. When you click the Next Frame button, the time skips to 0.25 seconds.
For the video, the app displays the next frame, v2.
For the point cloud sequence, the app displays pc1 again.
The app repeats the point cloud frame because the next point cloud frame, pc2, does not start until 0.4 seconds. To display this frame, you must either set the Current Time parameter to 0.4 seconds or click the Next Frame button again to navigate to a time of 0.5 seconds.
Keep the signal with the highest frame rate as the main signal when you want to display and label all frames for all signals.
Change Main Signal
After loading signals, you can change the main signal from the Playback Control
Settings dialog box. To open this dialog box, below the slider, click the clock settings
button ![]() . Then, select Main signal and
change the main signal to a different signal loaded into the app. When you change the
main signal to a signal with a lower frame rate, frames from signals with higher frame
rates are sometimes skipped.
. Then, select Main signal and
change the main signal to a different signal loaded into the app. When you change the
main signal to a signal with a lower frame rate, frames from signals with higher frame
rates are sometimes skipped.
Consider the app session described in the previous section, except with the point cloud sequence as the main signal.

When you skip from pc2 to pc3, the app skips over v3 entirely. You can see v3 only if you set Current Time to a time in the range [0.5, 0.75).
Designate the signal with the lowest frame rate as the main signal when you want to label signals only at synchronized times.
Changing the main signal after you begin labeling can affect existing scene labels. For example, suppose you apply a scene label to the entire time range of the main signal. If you change the main signal, the time range changes. If the new main signal has a longer duration, then the scene label no longer applies to the entire time range.
If you load a new signal into an app session that has a higher frame rate than the existing signals, the app does not automatically designate the new signal as the main signal. The app chooses a main signal only the first time you load signals into a session. To designate the new signal as the main signal, select that signal from the Main signal list in the Playback Control Settings dialog box.
Display All Timestamps
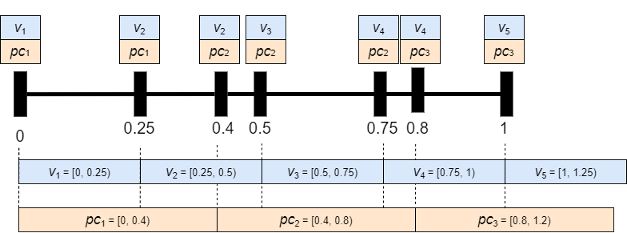
In the Playback Control Settings dialog box, you can select All timestamps to display all signals. Choose this option to verify and visualize the loaded frames. Do not select this option for labeling. When you display all timestamps, the navigation between frames is uneven and the frames of multiple signals are repeated.
Consider the app session described in the previous sections, except with all timestamps displaying. This figure shows the frames that display.
Specify Timestamps
You can specify your own timestamp vector and use those timestamps as the ones that
the app uses to navigate between frames. In the Playback Control Settings dialog box,
select Timestamps from workspace, click the From
Workspace button, and specify a duration vector from
the MATLAB® workspace.
Frame Display and Automation
When you select multiple signals for automation, by default, the app displays all
timestamps for the signals in the automation session. To configure the automation
session to play back signal frames based on a main signal, click the clock settings
button ![]() and select Main
signal. You can select a main signal only from among the signals that you
selected for automation. This main signal selection applies only for the duration of the
automation session. When you exit the automation session, the main signal changes back
to the main signal that applies to the entire labeling session.
and select Main
signal. You can select a main signal only from among the signals that you
selected for automation. This main signal selection applies only for the duration of the
automation session. When you exit the automation session, the main signal changes back
to the main signal that applies to the entire labeling session.
See Also
duration | groundTruthMultisignal