Truck Platooning with RoadRunner Scenario
This example shows how to simulate a platooning application, designed in Simulink®, with RoadRunner Scenario. The platooning system contains vehicle-to-vehicle (V2V) communication, tractor-trailer dynamics, longitudinal controller, and lateral controller components.
Introduction
RoadRunner Scenario is an interactive editor that enables you to design scenarios for simulating and testing automated driving systems. You can place vehicles, define their paths and interactions in the scenario, and then simulate the scenario in the editor. RoadRunner Scenario supports in-editor playback for scenario visualization and connecting to other simulators, such as MATLAB® and Simulink, for cosimulation.
Platooning is the coordinated travel by two or more autonomous vehicles, with each following vehicle maintaining a consistent distance from the preceding vehicle. The vehicle at the front of the line serves as the platoon leader. As the movement of the platoon leader changes, the vehicles behind it respond and adjust. The vehicles use V2V communication and automated driving systems for effective platooning. Vehicles traveling in tightly spaced platoons can improve traffic flow, safety, and fuel economy. This example builds on the Truck Platooning Using Vehicle-to-Vehicle Communication example, which shows the design of a longitudinal controller for the follower vehicles. This example adds a lateral controller, which enables you to test the platooning application on curved road scenarios. This example also shows how to cosimulate the platooning test bench model with RoadRunner Scenario and Simulink.
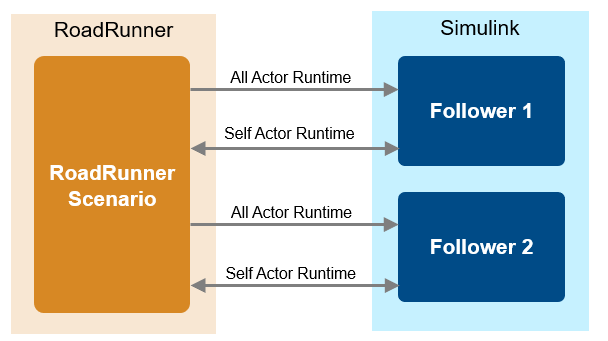
This figure shows an overview of the information exchanged between RoadRunner Scenario and two Simulink models for platoon followers. Both the models run simultaneously. Each model reads all actor runtime and self actor runtime from RoadRunner Scenario, and writes back updated positions of the platoon follower to RoadRunner Scenario.
In this example, you:
Set Up Environment — Configure MATLAB to interact with RoadRunner Scenario.
Explore RoadRunner Scenario — Explore the RoadRunner scene and scenario used to simulate the platooning system.
Explore Test Bench Model — Explore the Simulink models for each platoon follower, which each contain an interface for RoadRunner Scenario and other components such as V2V communication, decision logic, a controller, and vehicle dynamics.
Model Platooning Controller — Explore the platooning controller in each follower model that specifies the lateral and longitudinal controls for the vehicle. The longitudinal control enables the platoon follower to keep a constant distance from its preceding vehicle while following the lead vehicle. The lateral control enables the platoon follower to stay within the lane, even at curves, by adjusting the steering of the vehicle.
Simulate Scenario — Simulate the platooning scenario and inspect the longitudinal and lateral controller performance results for each platoon follower.
Explore Other Scenarios — Test the system in other scenarios under additional conditions.
This example requires the Automated Driving Toolbox™ Interface for Unreal Engine® Projects support package. For more information on downloading and installing support packages, see Get and Manage Add-Ons.
pathToRRScene = fullfile(
    matlabshared.supportpkg.getSupportPackageRoot,
    "toolbox","shared","sim3dprojects","spkg","roadrunner",
    "RoadRunnerProject","Scenes","CurvedRoad.rrscene");
    pathToAssets = fullfile( ...
    matlabshared.supportpkg.getSupportPackageRoot, ...
    "toolbox","shared","sim3dprojects","spkg","roadrunner",
    "RoadRunnerProject","Assets","Markings","*.rrmeta");
Set Up Environment
This section shows how to set up the environment to cosimulate the platooning system with RoadRunner Scenario.
Specify the path to your local RoadRunner installation folder. This code shows the path for the default installation location on Windows®.
rrAppPath = "C:\Program Files\RoadRunner " + ...
    matlabRelease.Release + ...
    "\bin\win64";
Specify the path to your RoadRunner project. This code shows the path to a sample project folder on Windows.
rrProjectPath = "C:\RR\MyProjects";
To update the path for the RoadRunner installation folder, get the root object within the settings hierarchical tree. For more information, see SettingsGroup.
s = settings;
s.roadrunner.application.InstallationFolder.TemporaryValue = rrAppPath;
Open RoadRunner using the specified path to your project.
rrApp = roadrunner(rrProjectPath);
The rrApp RoadRunner object enables you to interact with RoadRunner from the MATLAB workspace. You can open the scenario and update scenario variables using this object. For more information on this object, see roadrunner.
Open a working copy of the files for the PlatooningWithRRScenario project. MATLAB copies the files to an example folder so you can edit them.
openProject("PlatooningWithRRScenario");
Copy the RoadRunner scene, scenario, and behavior files to the RoadRunner project.
PlatooningWithRRScenarioProject = currentProject;
projectPath = convertStringsToChars( ...
PlatooningWithRRScenarioProject.RootFolder);
projectRootFolder = projectPath(1:find(projectPath=='\',1,'last')-1);

copyfile(pathToRRScene,fullfile(rrProjectPath,"Scenes"))

copyfile(pathToAssets, fullfile(rrProjectPath,"Assets/Markings"))

copyfile(fullfile( ...
    projectRootFolder, ...
    "PlatooningTestScenarios/RoadRunner/Scenarios"), ...
    fullfile(rrProjectPath,"Scenarios"),"f")

copyfile(fullfile( ...
    projectRootFolder, ...
    "PlatooningWithRRScenario/TestBench/" + ...
    "Follower1.rrbehavior.rrmeta"), ...
    fullfile(rrProjectPath,"Assets","Behaviors"),"f")

copyfile(fullfile( ...
    projectRootFolder, ...
    "PlatooningWithRRScenario/TestBench/" + ...
    "Follower2.rrbehavior.rrmeta"), ...
    fullfile(rrProjectPath,"Assets","Behaviors"),"f")

copyfile(fullfile( ...
    projectRootFolder, ...
    "PlatooningTestScenarios/RoadRunner/Vehicles/" + ...
    "TrailerLoad.rrvehicle.rrmeta"), ...
    fullfile(rrProjectPath,"Assets","Vehicles"),"f")
Explore RoadRunner Scenario
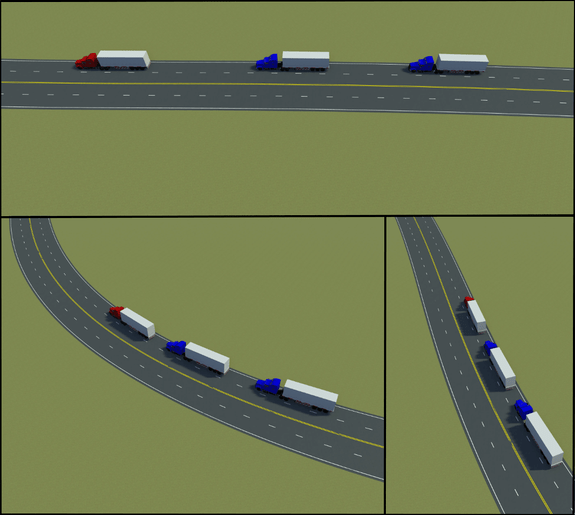
The scene contains a two-way, four-lane, curved highway road. The road centers and lane markings in this scene closely match the curved road scene included with the Unreal Engine simulation environment. Open the scene.
openScene(rrApp,"CurvedRoad.rrscene")

Open the scenario scenario_Platooning_01_CurvedRoad.rrscenario.
openScenario(rrApp,"scenario_Platooning_01_CurvedRoad.rrscenario");

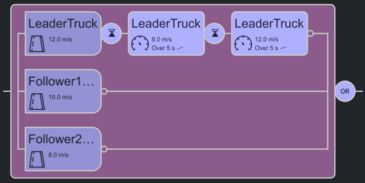
The scenario contains three tractors and their trailers, which travel on a curved road. The lead vehicle follows the built-in behavior of RoadRunner Scenario. This example specifies custom behaviors for the two follower vehicles using two Simulink models Follower1.slx and Follower2.slx. The lead vehicle starts traveling at a speed of 12 m/s. The first and second follower vehicles start traveling at speeds of 10 m/s and 8 m/s, respectively. The initial spacing between the lead vehicle and the first follower is 40 m, and the initial spacing between the first and second follower is 30 m.
To simulate the scenario, specify a custom behavior for each follower vehicle.

Connect to the RoadRunner Scenario server for cosimulation by using the createSimulation function, and enable data logging.
rrSim = createSimulation(rrApp);
set(rrSim,Logging="on")
Connection status: 1
Connected to RoadRunner Scenario server on localhost:40339, with client id {d0c1d973-7ce9-4b90-9fa9-ff51f2f7eda9}
rrSim is a ScenarioSimulation object. Use this object to set variables and to read the scenario and map-related information. Set the platooning simulation to run at a step size of 0.05.
Ts = 0.05;
set(rrSim,StepSize=Ts)
Explore Test Bench Model
In this example, you specify identical custom behaviors for the two platoon follower vehicles using two distinct Simulink models, which run concurrently when you simulate the scenario.
Open the Follower1 test bench model.
open_system("Follower1")

Open the Follower2 test bench model.
open_system("Follower2")

The test bench model contains RoadRunner Scenario blocks, which configure, read from, and write to RoadRunner Scenario. It also contains these modules:
Get Target Actors and Ego Trailer ID— System object™ that gets poses of target actors and outputs them using theBusTargetActorsInfostructure. This System object also finds the trailer ID of the follower. ThePack Actor Posessubsystem uses the trailer ID to update the trailer pose.V2V Transmitter— TheHelperV2VTransmitterSystem object implements the transmitters of all the vehicles in the scenario and broadcasts actor information using basic safety messages (BSMs).V2V Receiver— TheHelperV2VReceiverSystem object implements the receiver for each platoon followers. It takes BSMs, ego information, and the scene origin as input. The V2V Receiver uses precomputed channel characteristics to receive the transmitted BSM.Decision Logic— Subsystem reference block, which extracts the necessary information about the platoon leader and the preceding vehicle based on their actor IDs, specified through the mask.Controller— Reference model that implements the longitudinal and lateral controls of each follower vehicle.6DOF Vehicle Dynamics— Implements a model of a three-axle tractor towing a three-axle trailer through a hitch. The tractor, trailer, and hitch are of six degrees of freedom (DOF). The tractor and trailer both have individual models for their vehicle body, wheels, and suspension. For more details about the vehicle dynamics model, see the Three-Axle Tractor Towing a Three-Axle Trailer (Vehicle Dynamics Blockset) example.Pack Actor Poses— Packs the output from the vehicle dynamics model into the format that RoadRunner requires.
RoadRunner Scenario Blocks
The RoadRunner Scenario blocks consist of:
RoadRunner Scenario— Defines the interface for an actor model.Ego— RoadRunner Scenario Reader block that reads the tractor pose of the modeled vehicle.All Actor Runtime— RoadRunner Scenario Reader block that reads the poses of target actors.Tractor Runtime— RoadRunner Scenario Writer block that writes the updated tractor pose back to RoadRunner Scenario.Trailer Runtime— RoadRunner Scenario Writer block that writes the updated trailer pose back to RoadRunner Scenario.
Model Platooning Controller
The platooning controller specifies the longitudinal and lateral controls for the follower vehicles. In the Follower1 model, open the PlatooningController reference model.
open_system("PlatooningController")
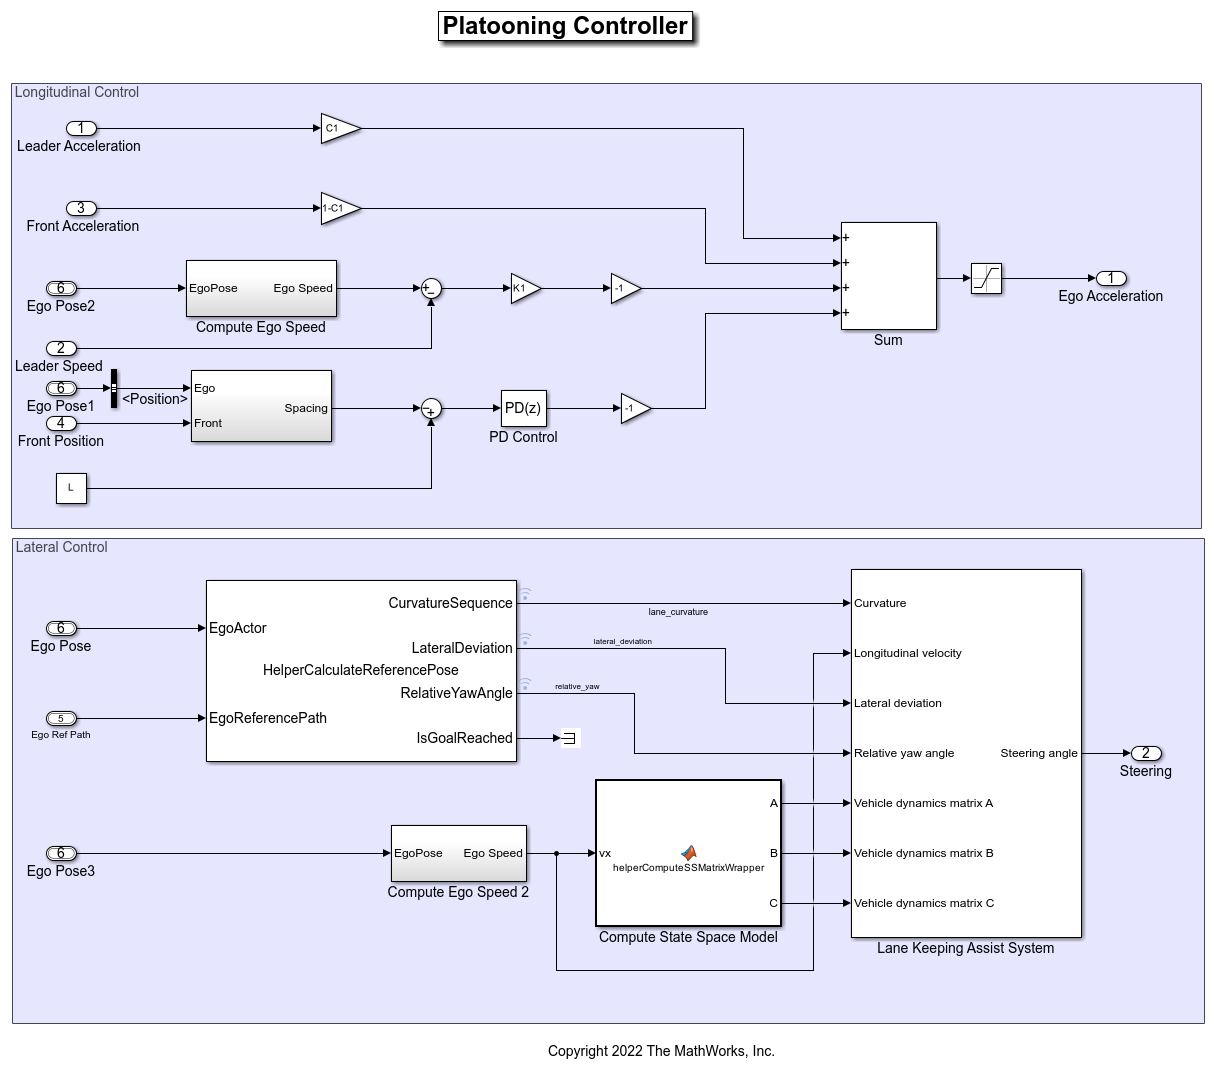
The platooning controller has two sections:
Longitudinal Control— Adjusts the acceleration such that the modeled vehicle follows the lead vehicle and maintains the specified distance from its preceding vehicle. To measure the spacing of tractor-trailer actor groups, this example uses the Euclidean distance between the origins of each pair of tractors. For more information about the design of the longitudinal controller and its tuning, see the Design Controller for Vehicle Platooning (Simulink Control Design) example.Lateral Control— Keeps the vehicle within the lane. TheHelperCalculateReferencePoseSystem object takes the current tractor pose and the reference path to compute the lane curvature, lateral deviation of the vehicle, and the relative yaw angle parameters. Using these parameters and the longitudinal velocity of the vehicle, the Lane Keeping Assist System (Model Predictive Control Toolbox) block computes the required steering angle to keep the vehicle within the lane. ThehelperConputeSSMatrixWrapperMATLAB function block computes the approximate state-space model of the tractor-trailer, which the Lane Keeping Assist System (Model Predictive Control Toolbox) block uses as the predictive model.
Simulate Scenario
Disable the MPC update messages.
mpcverbosity("off");
This example uses the helperSLPlatooningWithRRSetup helper function to set up the initial poses and actor profiles for the follower vehicles. These values are scenario-dependent and can change based on the selected scenario.
helperSLPlatooningWithRRSetup( ...
    rrApp, ...
    rrSim, ...
    scenarioFileName="scenario_Platooning_01_CurvedRoad")
The follower models can take a few minutes to update and generate code files for the reference models when you compile them for the first time. Update these models before running the simulation.
set_param("Follower1",SimulationCommand="update");
set_param("Follower2",SimulationCommand="update");
Simulate the scenario.
set(rrSim,SimulationCommand="Start")
while strcmp(rrSim.get("SimulationStatus"),"Running")
    pause(1)
end
Get the simulation log and plot the results
rrSimLog = get(rrSim,"SimulationLog");
hFig = helperPlotPlatooningResults( ...
    rrSimLog, ...
    followers, ...
    platoonLeaderID, ...
    Follower1SimOut, ...
    Follower2SimOut);
Examine the simulation results.
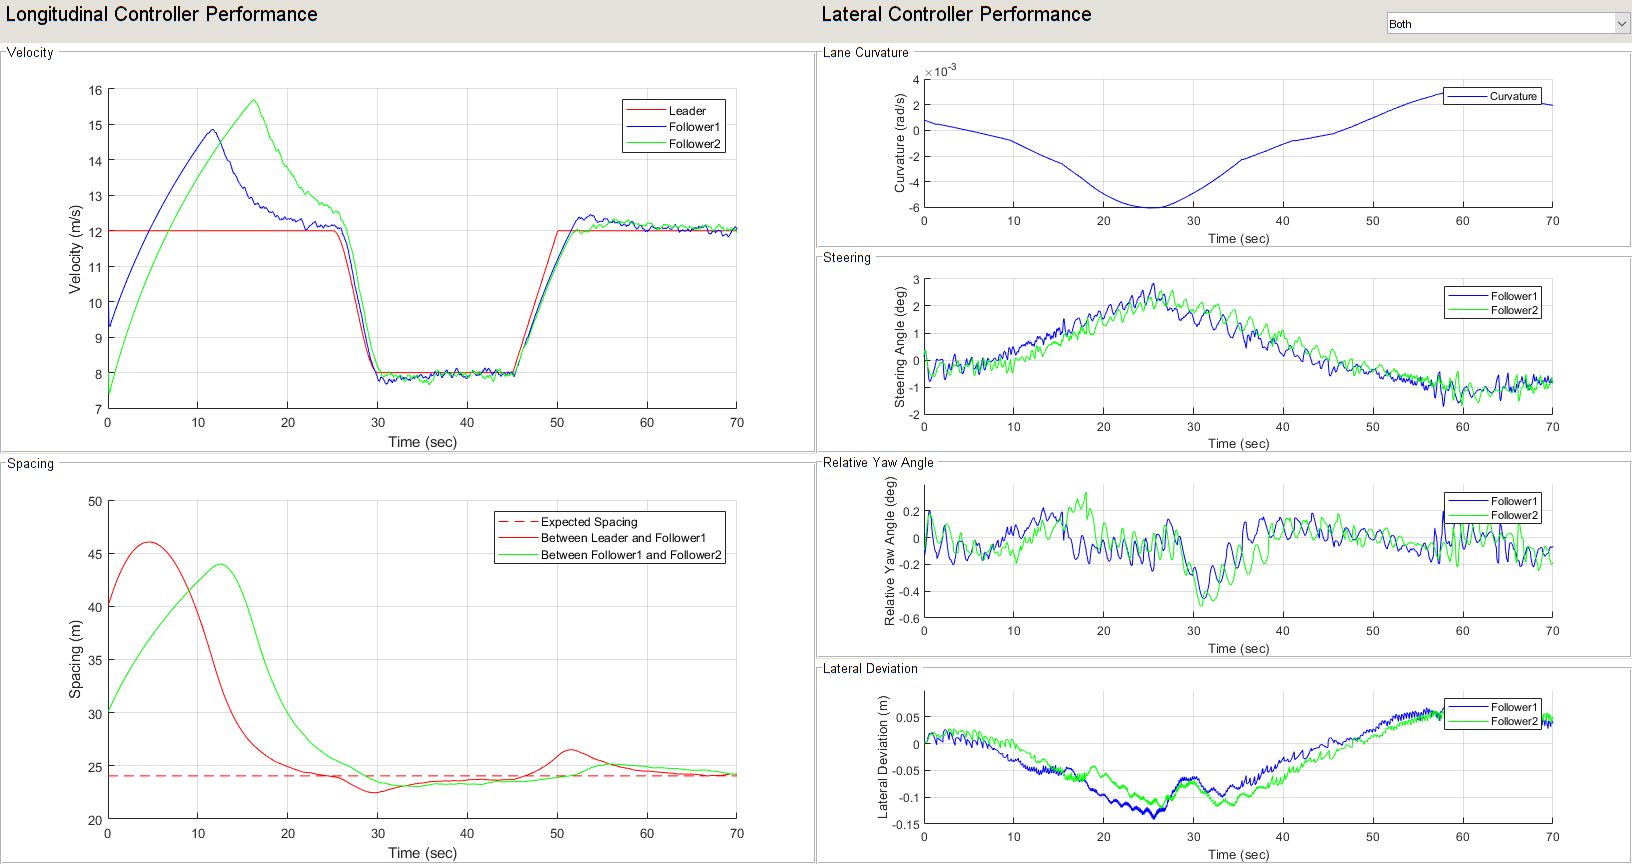
The plots display the longitudinal controller and lateral controller performances.
Longitudinal Controller Performance
The Velocity plot shows the velocity of each vehicle in the platoon. Notice that the platoon followers closely follow the lead vehicle during its acceleration and deceleration phases.
The Spacing plot shows the spacing between the vehicles in the platoon. Notice that the spacing converges to the expected spacing after some time, when the velocity of the lead vehicle reaches a constant value.
Lateral Controller Performance
The Lane Curvature plot shows the curvature of the lane in which the platoon followers travel.
The Lateral Deviation plot shows the lateral deviation of each follower vehicle from the centerline of the lane. Units are in meters.
The Relative Yaw Angle plot shows the relative yaw angle between each follower and the centerline of the lane. Units are in degrees.
The Steering Angle plot shows the steering angle of each follower vehicle. Units are in degrees. Notice that the steering angle changes significantly when there are sharp changes in lane curvature.
Close the figure.
close(hFig)
Explore Other Scenarios
In this example, you have explored the behaviors of platoon followers for the scenario_Platooning_01_CurvedRoad.rrscenario scenario. To test the platooning application in different conditions, you can explore these additional scenarios, which also use the CurvedRoad.rrscene scene.
scenario_Platooning_02_HighCurvature— Platoon vehicles travel on a highly curved road.scenario_Platooning_03_DecelAndStop— The platoon leader encounters a stationary vehicle, causing it to decelerate and come to rest to avoid collision.scenario_Platooning_04_CutInFrontOfLeader— A target vehicle cuts in front of the platoon leader, which must decelerate to avoid a collision.
You can explore these scenarios in RoadRunner. For example, to open the scenario_Platooning_02_HighCurvature.rrscenario scenario, enter this command.
openScenario(rrApp,"scenario_Platooning_02_HighCurvature.rrscenario")
You can configure the follower models to simulate these scenarios using the helperSLPlatooningWithRRSetup function. For example, to configure the model to run the scenario_Platooning_02_HighCurvature.rrscenario scenario, enter this command.
helperSLPlatooningWithRRSetup(rrApp,rrSim,scenarioFileName="scenario_Platooning_02_HighCurvature")
Enable the MPC update messages.
mpcverbosity("on");
See Also
Blocks
Related Topics
- Truck Platooning Using Vehicle-to-Vehicle Communication
- Lane-Keeping System for Self-Driving Trucks
- Design Controller for Vehicle Platooning (Simulink Control Design)
- Intersection Movement Assist Using Vehicle-to-Vehicle Communication
- Three-Axle Tractor Towing a Three-Axle Trailer (Vehicle Dynamics Blockset)
- Highway Lane Change Planner with RoadRunner Scenario
- Autonomous Emergency Braking with RoadRunner Scenario
- Highway Lane Following with RoadRunner Scenario
You can also select a web site from the following list
Americas
- América Latina (Español)
- Canada (English)
- United States (English)
Europe
- Belgium (English)
- Denmark (English)
- Deutschland (Deutsch)
- España (Español)
- Finland (English)
- France (Français)
- Ireland (English)
- Italia (Italiano)
- Luxembourg (English)
- Netherlands (English)
- Norway (English)
- Österreich (Deutsch)
- Portugal (English)
- Sweden (English)
- Switzerland
- United Kingdom (English)
Asia Pacific
- Australia (English)
- India (English)
- New Zealand (English)
- 中国
- 日本Japanese (日本語)
- 한국Korean (한국어)