Main Content

Simulate and Verify C Code

In this step of the tutorial, you verify that when executed, the code is numerically equivalent to the algorithm modeled in Simulink®. You use a test harness model to simulate RollAxisAutopilot in normal mode and in SIL mode, then compare the simulations by using the Simulation Data Inspector.

To test generated code, you can run software-in-the-loop (SIL) and processor-in-the-loop (PIL) simulations. A SIL simulation compiles and runs the generated code on your development computer. A PIL simulation cross-compiles source code on your development computer. The PIL simulation then downloads and runs the object code on a target processor or an equivalent instruction set simulator. You can use SIL and PIL simulations to:

  • Verify the numeric behavior of your code.

  • Collect code coverage and execution-time metrics.

  • Meet IEC 61508, IEC 62304, ISO 26262, EN 50128, or DO-178 certification objectives.

This tutorial shows you how to use test harness RollAxisAutopilotHarness to verify whether simulation and code execution results for component model RollAxisAutopilot are equivalent. However, if you have a Simulink Test™ license, you can use the Test Manager to create a test harness from the component model. See Create or Import Test Harnesses and Select Properties (Simulink Test).

Inspect and Configure Test Harness Model

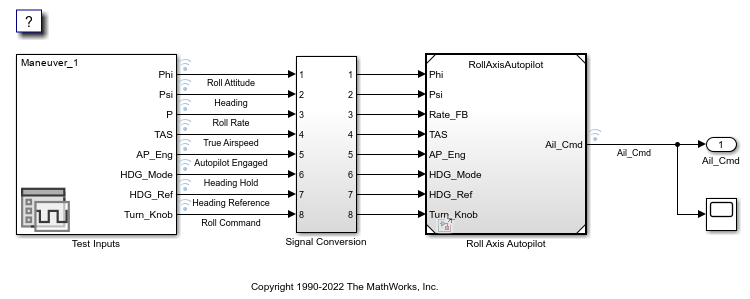
Model RollAxisAutopilotHarness references the model-under-test, RollAxisAutopilot, through a Model block. The harness model generates test inputs for the referenced model. You can easily switch the Model block between the normal, SIL, or PIL simulation modes.

  1. Save copies of models RollAxisAutopilot and RollAxisAutopilotHarness in your current working folder.

  2. Open the model RollAxisAutopilotHarness.

    openExample('RollAxisAutopilotHarness');

  3. Open the model RollAxisAutopilot.

    openExample('RollAxisAutopilot')
  4. In the RollAxisAutopilotHarness model, right-click the Model block and select Subsystem & Model Reference > Refresh Selected Model Block.

  5. For both models, adjust these model configuration parameter settings:

    • On the Code Generation pane, clear Generate code only.

    • on the Hardware Implementation pane, expand Device details. Select Support long long.

  6. Click OK. Then, save the models.

Simulate the Model in Normal Mode

Run the harness model in normal mode and capture the results in the Simulation Data Inspector.

  1. In the RollAxisAutopilotHarness model, open the Model Data Editor. On the Modeling tab, click Model Data Editor.

  2. In the Model Data Editor, select the Signals tab.

  3. Set the Change view list to Instrumentation.

  4. In the data table, select all rows.

  5. To configure signals to log simulation data to the Simulation Data Inspector, select a cleared check box in the Log Data column. When you are finished, make sure that all of the check boxes in the column are selected.

  6. Right-click the Model block, Roll Axis Autopilot. From the context menu, select Block Parameters.

  7. In the Block Parameters dialog box, for Simulation mode, verify that the Normal option is selected. Click OK.

  8. Simulate RollAxisAutopilotHarness.

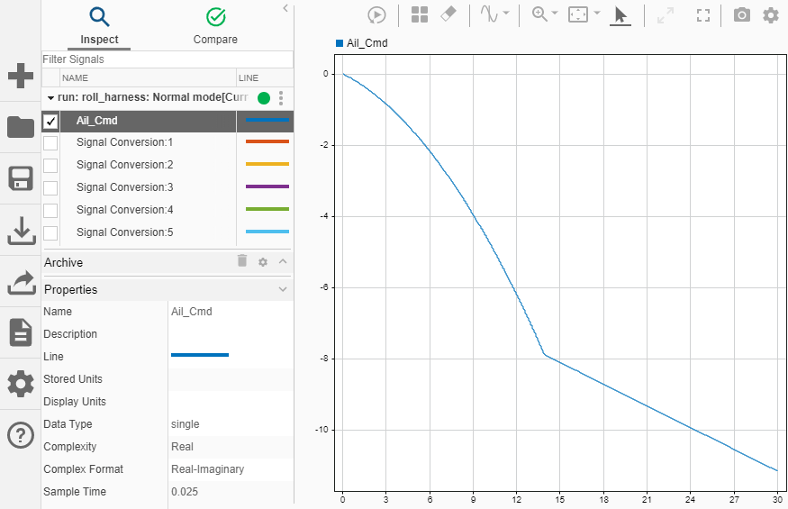
  9. When the simulation is done, view the simulation results in the Simulation Data Inspector. If the Simulation Data Inspector is not already open, on the Simulation tab, click Data Inspector.

  10. For the most recent (current) run, double-click the run name field and rename the run: roll_harness: Normal mode.

  11. Select Ail_Cmd to plot the signal.

Simulate the Model in SIL Mode

The SIL simulation generates, compiles, and executes code on your development computer. The Simulation Data Inspector logs results.

  1. In the RollAxisAutopilotHarness model window, right-click the Roll Axis Autopilot model block and select Block Parameters.

  2. In the Block Parameters dialog box, set Simulation mode to Software-in-the-loop (SIL) and Code Interface to Top model. Click OK.

  3. Exclude external code files from the build process. In the Configuration Parameters dialog box for model RollAxisAutopilot, set Code Generation > Custom Code > Code information > Source files to the default value, which is empty. Save the model.

  4. Simulate the RollAxisAutopilotHarness model.

    Minimize the code generation report window for exploration later in this tutorial.

  5. In the Simulation Data Inspector, double-click the run name field and rename the new run as roll_harness: SIL mode.

  6. Select Ail_Cmd to plot the signal.

  7. Reconfigure the build process for model RollAxisAutopilot to include the external source files roll_input_data.c and roll_heading_mode.c. In the Model Configuration Parameters dialog box, set Code Generation > Custom Code > Code information > Source files to roll_input_data.c roll_heading_mode.c. Click Apply, close the dialog box, and save the model.

Compare Simulation Results

In the Simulation Data Inspector:

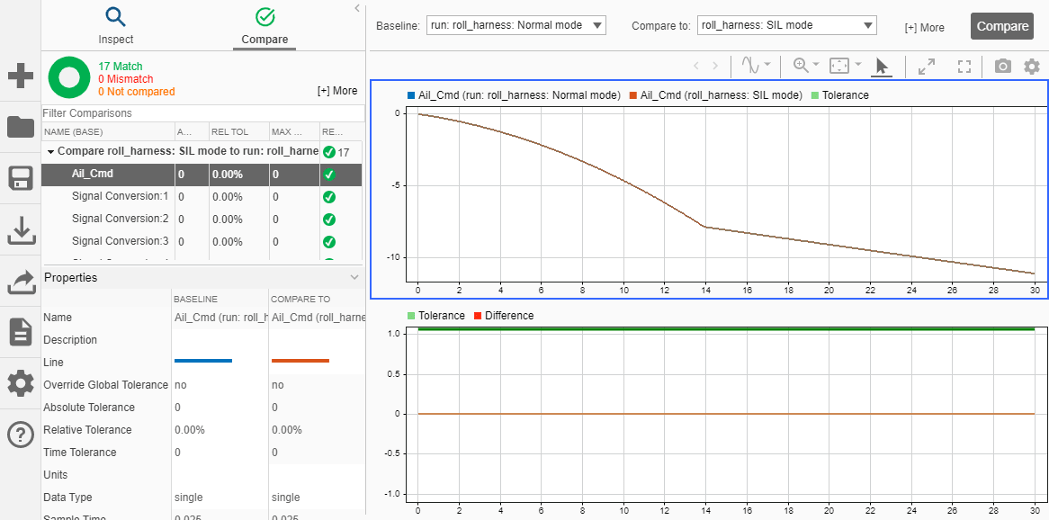
  1. Click the Compare tab.

  2. In the Baseline field, select roll_harness: Normal mode.

  3. In the Compare To field, select roll_harness: SIL mode.

  4. Click Compare.

The Simulation Data Inspector shows that the normal mode and SIL mode results match. Comparing the results of normal mode simulation with SIL and PIL simulations can help you verify that the generated application performs as expected.

Alternatively, you can use the SIL/PIL Manager app for a simplified workflow of verifying code generated from a model.

Next, explore ways that you can deploy generated code.