Set Up Virtual Linux Target Device
R2026bAfter completing Configure Development Computer for Real-Time Linux, set up a Debian® 11 or Debian 13 virtual machine as a Linux target device to use with Simulink® Real-Time™.
Note
Running Simulink Real-Time models on a virtual machine cannot match the performance of running them natively on hardware.
Windows Hyper-V Linux Target Device
Use the Hyper-V Manager or other virtual machine tool to configure a virtual Linux target device.
Install Hyper-V by using the instructions from Install Hyper-V in Windows and Windows Server | Microsoft Learn.
Download the Debian 11 (Bullseye) or Debian 13 (Trixie) CD/DVD image from:
On the Hyper-V Manager click New > Virtual Machine.
Name your virtual machine.
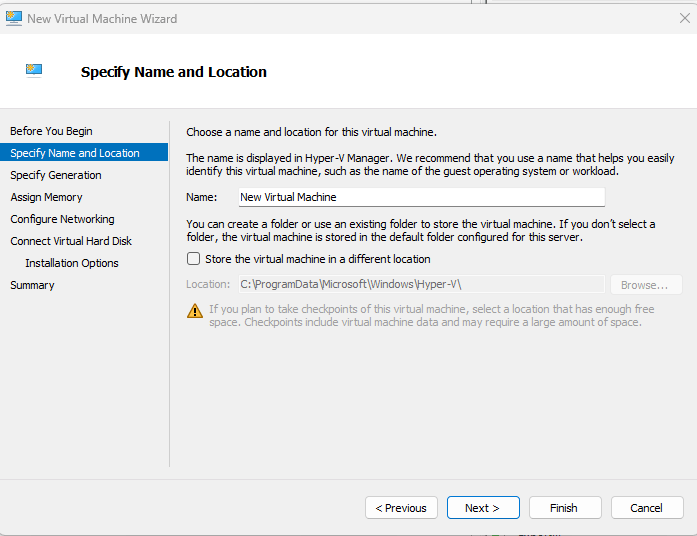
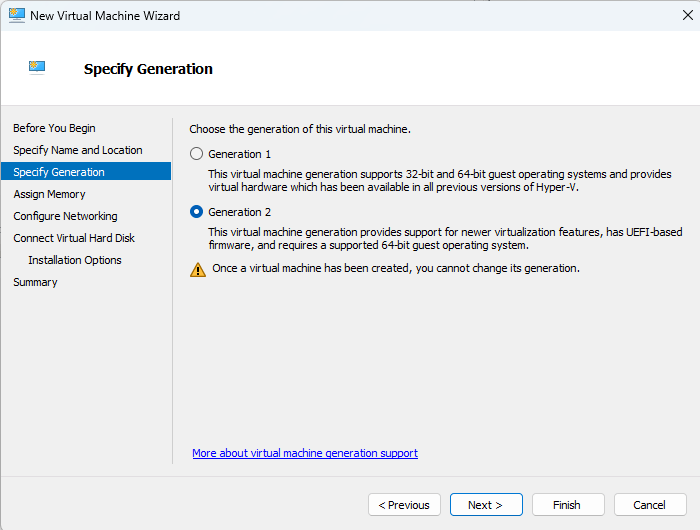
Use the Generation 2 setting in the next step.
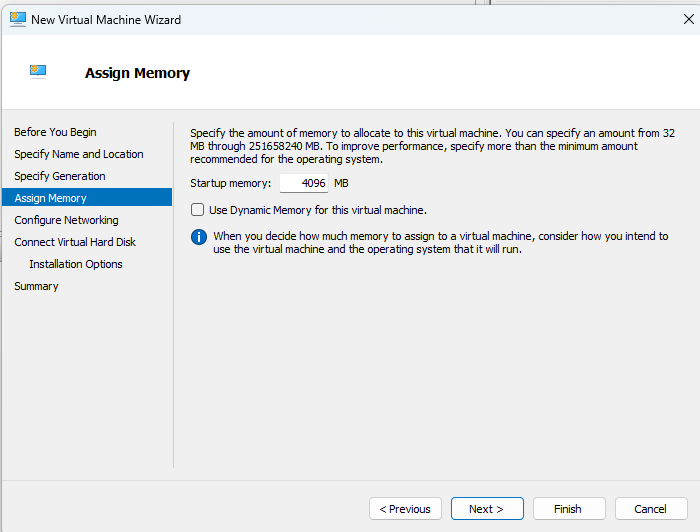
Clear Use Dynamic Memory for this virtual machine.
Use the designated virtual switch (set up separately) for the Connection setting. For information about switch setup, see Create and configure a virtual switch with Hyper-V at
https://learn.microsoft.com.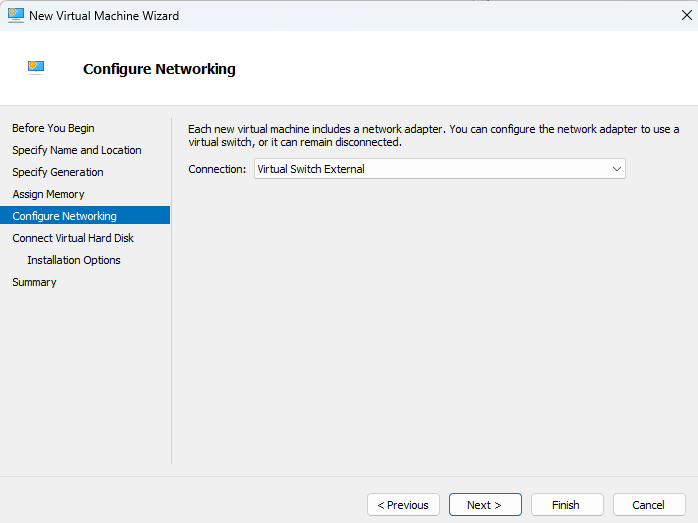
Select the boot-up image according to your choice. This configuration uses a bootable image file for Debian 11 or Debian 13.
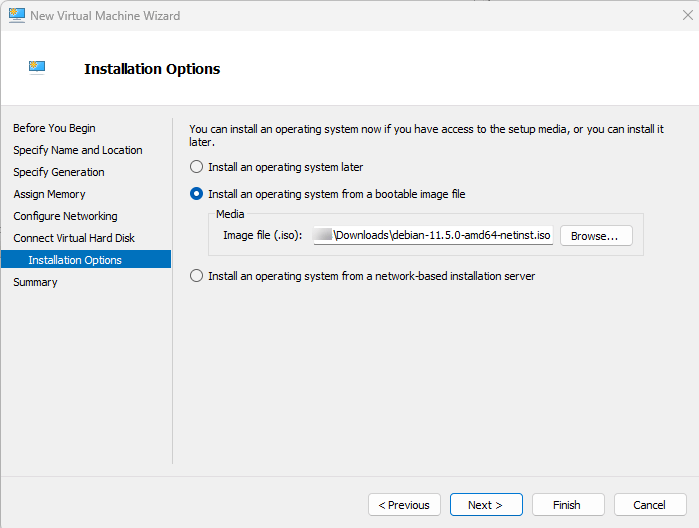
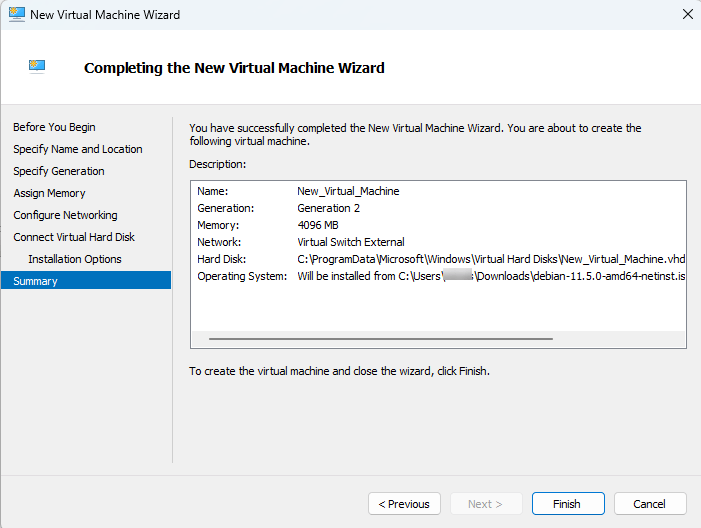
Finish the setup in the wizard.
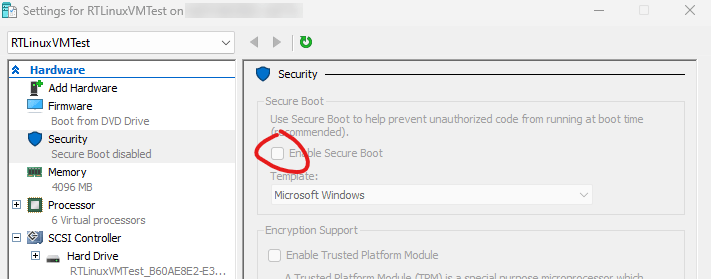
Make sure to clear Enable Secure Boot before launching the VM target.
Launch and set up your virtual machine target by following the on-screen instructions.
Install the SSH server by running:
sudo apt update
sudo apt install openssh-server
You can SSH into the virtual machine by using its IP address. Obtain the IP address by running:
hostname -I
To set up support package software on the Linux target device, see Target Device Configuration for Real-Time Linux.
Set Up Window WSL Target Device
You can use Windows Subsystem for Linux (WSL) as a soft real-time target for deploying Simulink Real-Time models. A WSL target lets you rapidly prototype and test models in a virtualized Linux environment directly on your Windows PC, without requiring dedicated target computer hardware.
WSL targets use Debian 13 running inside WSL2. While less performant than dedicated hardware or full virtual machines, WSL provides an easier setup experience.
Requirements
Windows 10 or later
Simulink Real-Time
Simulink Real-Time Linux Target Support Package
Internet connection (for initial setup)
Set Up WSL Target Device in Simulink Real-Time Explorer
Open the Simulink Real-Time Explorer.
Navigate to the Support Package tab.
Click Setup WSL Target.
In the WSL Target Settings dialog, enter a name for your target.
Click OK. The setup process automatically:
Verifies your Windows version is compatible
Installs WSL2 if not already present (may trigger a UAC elevation prompt)
Ensures WSL2 is set as the default version
Installs the Debian 13 distribution under the name "SLRT"
Configures SSH access and creates the
slrtuser accountLaunches the WSL instance and retrieves its IP address
Creates the target with the specified name
When setup completes, the new target appears in the Explorer target tree.
Set Up a WSL Target from Command Window
In the MATLAB Command window, type:
tg = slrtlinux.wsl.setupTarget('myWSLTarget');This command performs the same setup as the Setup WSL Target button in Simulink Real-Time Explorer and returns a target object. Progress messages are printed to the MATLAB Command window during setup.
To verify that a WSL target has been configured, in the MATLAB Command window, type:
slrtlinux.wsl.isTargetSetup()
This command returns true if WSL has been properly configured for
Simulink Real-Time, and it returns false if setup is still
needed.
What the Setup Process Does
The slrtlinux.wsl.setupTarget function orchestrates the full
configuration workflow:
Checks that a target with the given name does not already exist.
Calls
slrtlinux.wsl.configureto install and configure WSL if needed.Launches the WSL instance with
slrtlinux.wsl.launch.Retrieves the WSL IP address with
slrtlinux.wsl.getIPAddress.Creates the Simulink Real-Time target with the WSL network settings.
The WSL distribution is created with these default credentials:
| Account | Username | Password |
|---|---|---|
| Root | root | root |
| SLRT user | slrt | slrt |
Isolation from Existing WSL Installations
The Simulink Real-Time WSL setup creates a distribution named SLRT
that is separate from any other WSL distributions on your machine. It does not modify or
interfere with pre-existing WSL installations or configurations.
Manage and Connect to Windows WSL Target Device
You can manage and connect to a WSL target by using Simulink Real-Time Explorer or by using functions in the MATLAB Command window.
Launch a WSL Target Using Simulink Real-Time Explorer
In the Simulink Real-Time Explorer, navigate to the Support Package tab.
Click Launch WSL Instance.
If WSL has not been set up, you are prompted to run setup first.
A command window opens with a shell session connected to the SLRT WSL distribution, logged in as the
slrtuser in/home/slrt.
Launch and Connect Using MATLAB Commands
Launch the WSL instance: This command opens a new command window
with a shell session connected to the SLRT distribution. The WSL target must have been
previously set up with slrtlinux.wsl.setupTarget.
slrtlinux.wsl.launch()
Check if the WSL instance is running: This command returns
true if the SLRT WSL distribution is currently running,
false otherwise.
slrtlinux.wsl.isRunning()
Get the WSL target IP address: This command returns the IPv4 address of the running SLRT WSL instance. The instance must be running.
ipaddr = slrtlinux.wsl.getIPAddress()
Update the target status: This command refreshes the target object with the current state of the running instance.
tg.update()
Connect to the target: This command establishes a connection to the running WSL target for model deployment and execution.
tg.connect()
Shut Down a WSL Target
Shut down the entire WSL VM (all distributions): This command stops all running WSL distributions on the machine.
slrtlinux.wsl.shutdown()
Terminate only the SLRT distribution: This command stops only the specified distribution, leaving other WSL distributions running.
slrtlinux.wsl.shutdown('SLRT')Typical Command-Line Workflow
% One-time setup
tg = slrtlinux.wsl.setupTarget('myWSLTarget');

% Subsequent sessions
slrtlinux.wsl.launch();
tg.update();
tg.connect();

% Check target status
slrtlinux.wsl.isRunning()   % returns true

% Get target IP if needed
ipaddr = slrtlinux.wsl.getIPAddress();

% ... deploy and run models ...

% When finished
slrtlinux.wsl.shutdown('SLRT');
Verifying Target State
You can query the WSL target state at any time:
| Query | Function | Returns |
|---|---|---|
| Is WSL configured for SLRT? | slrtlinux.wsl.isTargetSetup() | true / false |
| Is the SLRT instance running? | slrtlinux.wsl.isRunning() | true / false |
| What is the target IP address? | slrtlinux.wsl.getIPAddress() | IP address string |
See Also
slrtlinux.setupTarget | slrtlinux.wsl.configure | slrtlinux.wsl.getIPAddress | slrtlinux.wsl.isRunning | slrtlinux.wsl.isTargetSetup | slrtlinux.wsl.launch | slrtlinux.wsl.setupTarget | slrtlinux.wsl.shutdown | CAN Receive | CAN Transmit

