用 SIL 和 PIL 仿真测试生成的代码
使用软件在环 (SIL) 和处理器在环 (PIL) 仿真,测试模型组件与您从组件生成的生产代码之间的数字等效性。
使用 SIL 仿真,在您的开发计算机上测试源代码。使用 PIL 仿真,您可在实际目标硬件或指令集仿真器上运行将要进行产品部署的编译后目标代码来测试这些目标代码。要确定模型组件与生成的代码是否在数值上等效,请将 SIL 和 PIL 结果与普通模式结果进行比较。
此示例显示了三种运行 SIL 和 PIL 仿真的方法。您可以使用顶层模型、Model 模块,或从子系统创建的 SIL 和 PIL 模块。请参阅选择 SIL 或 PIL 方法。
PIL 的目标连接配置
在运行 PIL 仿真之前,必须配置目标连接。通过目标连接配置,PIL 仿真能够:
编译目标应用程序。
在目标上下载、启动和停止应用程序。
支持 Simulink 与目标之间的通信。
要生成目标连接配置,您可以使用提供的目标连接 API。有关详细信息,请参阅为 Simulink 创建 PIL 目标连接配置。
对于支持的硬件,可以使用目标支持包。有关详细信息,请参阅Embedded Coder 支持的硬件。
对顶层模型运行 SIL 或 PIL 仿真
通过运行顶层模型 SIL 或 PIL 仿真测试生成的模型代码。使用这种方法:
测试从顶层模型生成的代码,它使用独立代码接口。
配置模型以从 MATLAB 工作区加载测试向量或激励输入。
在顶层模型的普通、SIL 和 PIL 仿真模式之间轻松切换。
打开一个简单的计数器顶层模型。
model='SILTopModel';
close_system(model,0)
open_system(model)
要专注于数值等效性测试,请关闭以下报告:
模型覆盖率
代码覆盖率
执行时间探查
set_param(gcs, 'RecordCoverage','off');
coverageSettings = get_param(model, 'CodeCoverageSettings');
coverageSettings.CoverageTool='None';
set_param(model, 'CodeCoverageSettings',coverageSettings);
set_param(model, 'CodeExecutionProfiling','off');
配置输入激励数据。
[ticks_to_count, reset, counter_mode, count_enable] = ...
    SILTopModelData(T);
配置模型的日志记录选项。
set_param(model, 'LoadExternalInput','on');
set_param(model, 'ExternalInput','ticks_to_count, reset, counter_mode, count_enable');
set_param(model, 'SignalLogging', 'on');
set_param(model, 'SignalLoggingName', 'logsOut');
set_param(model, 'SaveOutput','on')
运行普通模式仿真。
set_param(model,'SimulationMode','normal')
sim_output = sim(model,10);
yout_normal = [sim_output.yout.signals(1).values sim_output.yout.signals(2).values];
运行顶层模型 SIL 仿真。
set_param(model,'SimulationMode','Software-in-the-Loop (SIL)')
sim_output = sim(model,10);
### Searching for referenced models in model 'SILTopModel'.
### Total of 1 models to build.
### Starting build procedure for: SILTopModel
### Successful completion of build procedure for: SILTopModel

Build Summary

Top model targets:

Model        Build Reason                                         Status                        Build Duration
==============================================================================================================
SILTopModel  Information cache folder or artifacts were missing.  Code generated and compiled.  0h 0m 13.129s

1 of 1 models built (0 models already up to date)
Build duration: 0h 0m 13.724s
### Preparing to start SIL simulation ...
Building with 'gcc'.
MEX completed successfully.
### Updating code generation report with SIL files ...
### Starting SIL simulation for component: SILTopModel
### Application stopped
### Stopping SIL simulation for component: SILTopModel
yout_sil = [sim_output.yout.signals(1).values sim_output.yout.signals(2).values];
如果模型有新的改动,则会重新生成并编译代码。生成的代码在您的计算机上作为单独的进程运行。
绘制并比较普通和 SIL 仿真的结果。观察结果是否匹配。
fig1 = figure;
subplot(3,1,1), plot(yout_normal), title('Counter Output for Normal Simulation')
subplot(3,1,2), plot(yout_sil), title('Counter Output for SIL Simulation')
subplot(3,1,3), plot(yout_normal-yout_sil), ...
    title('Difference Between Normal and SIL');

清空仿真结果。
close_system(model,0);
if ishandle(fig1), close(fig1), end
clear fig1
simResults = {'yout_sil','yout_normal','model','T',...
              'ticks_to_count','reset'};
save([model '_results'],simResults{:});
clear(simResults{:},'simResults')
对 Model 模块运行 SIL 或 PIL 仿真
通过使用在 SIL 模式下运行 Model 模块的测试框架模型来测试生成的模型代码。使用这种方法:
测试从顶层模型或引用模型生成的代码。从顶层模型生成的代码使用独立的代码接口。从引用模型生成的代码使用模型引用代码接口。有关详细信息,请参阅SIL 和 PIL 的代码接口。
您可以使用测试框架模型或系统模型来提供测试向量或激励输入。
您可以在 Model 模块的普通、SIL 和 PIL 仿真模式之间轻松切换。
打开示例模型,其中包含两个引用同一模型的 Model 模块。在仿真中,您在 SIL 模式下运行一个 Model 模块,在普通模式下运行另一个 Model 模块。
model='SILModelBlock';
open_system(model);
关闭以下报告:
代码覆盖率
执行时间探查
coverageSettings = get_param(model, 'CodeCoverageSettings');
coverageSettings.CoverageTool='None';
set_param(model, 'CodeCoverageSettings',coverageSettings);
open_system('SILModelBlock')
set_param('SILModelBlock', 'CodeExecutionProfiling','off');
open_system('SILCounter')
set_param('SILCounter', 'CodeExecutionProfiling','off');
currentFolder=pwd;
save_system('SILCounter', fullfile(currentFolder,'SILCounter.slx'))
为模型配置状态日志记录。
set_param('SILCounter', 'SaveFormat','Dataset');
save_system('SILCounter', fullfile(currentFolder,'SILCounter.slx'))
set_param(model, 'SaveFormat','Dataset');
set_param(model, 'SaveState','on');
set_param(model, 'StateSaveName', 'xout');
测试顶层模型代码
对于 SIL 模式下的 Model 模块,指定使用独立代码接口生成顶层模型代码。
set_param([model '/CounterA'], 'CodeInterface', 'Top model');
运行测试框架模型的仿真。
out = sim(model,20);
### Searching for referenced models in model 'SILModelBlock'.
### Total of 1 models to build.
### Searching for referenced models in model 'SILCounter'.
### Total of 1 models to build.
### Starting build procedure for: SILCounter
### Successful completion of build procedure for: SILCounter

Build Summary

Top model targets:

Model       Build Reason                                         Status                        Build Duration
=============================================================================================================
SILCounter  Information cache folder or artifacts were missing.  Code generated and compiled.  0h 0m 11.695s

1 of 1 models built (0 models already up to date)
Build duration: 0h 0m 12.331s
### Preparing to start SIL simulation ...
Building with 'gcc'.
MEX completed successfully.
### Updating code generation report with SIL files ...
### Starting SIL simulation for component: SILCounter
### Application stopped
### Stopping SIL simulation for component: SILCounter
SIL 模式下的 Model 模块在您的计算机上作为单独的进程运行。在工作文件夹中,如果不存在之前编译生成的代码,则会为引用模型生成独立代码。
比较普通和 SIL 模式下 Model 模块的行为。结果是匹配的。
yout = out.logsOut;
yout_sil = yout.get('counterA').Values.Data;
yout_normal = yout.get('counterB').Values.Data;
fig1 = figure;
subplot(3,1,1), plot(yout_normal), title('Counter Output for Normal Simulation')
subplot(3,1,2), ...
    plot(yout_sil), title('Counter Output for Model Block SIL (Top-Model) Simulation')
subplot(3,1,3), plot(yout_normal-yout_sil), ...
    title('Difference Between Normal and SIL');

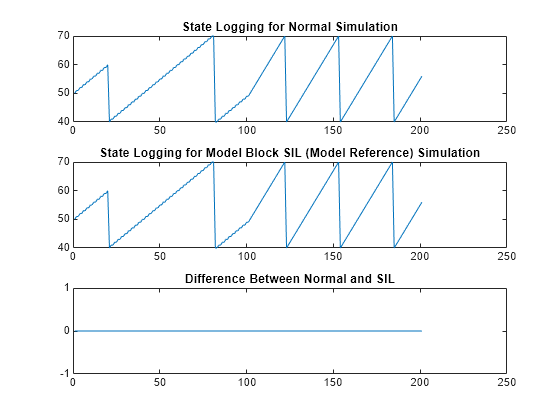
比较在普通模式仿真和 SIL 模式仿真中记录的 Model 模块的状态。
xout = out.xout;
xout_sil = xout{1}.Values.Data;
xout_normal = xout{2}.Values.Data;
fig1 = figure;
subplot(3,1,1), plot(xout_sil), title('State Logging for Normal Simulation')
subplot(3,1,2), ...
    plot(xout_normal), title('State Logging for Model Block SIL (Top-Model) Simulation')
subplot(3,1,3), plot(xout_normal-xout_sil), ...
    title('Difference Between Normal and SIL');
测试模型引用代码
对于 SIL 模式下的 Model 模块,指定使用模型引用代码接口生成引用模型代码。
set_param([model '/CounterA'], 'CodeInterface', 'Model reference');
运行测试框架模型的仿真。
out2 = sim(model,20);
### Searching for referenced models in model 'SILModelBlock'.
### Total of 1 models to build.
### Starting serial code generation build.
### Starting build procedure for: SILCounter
### Successful completion of build procedure for: SILCounter

Build Summary

Model reference code generation targets:

Model       Build Reason                          Status                        Build Duration
==============================================================================================
SILCounter  Target (SILCounter.c) did not exist.  Code generated and compiled.  0h 0m 7.6558s

1 of 1 models built (0 models already up to date)
Build duration: 0h 0m 8.4134s
codeInterfacePackaging: Nonreusable function
codeInterfacePackaging: NonReusable
### Preparing to start SIL simulation ...
Building with 'gcc'.
MEX completed successfully.
### Updating code generation report with SIL files ...
### Starting SIL simulation for component: SILCounter
### Application stopped
### Stopping SIL simulation for component: SILCounter
SIL 模式下的 Model 模块在您的计算机上作为单独的进程运行。在工作文件夹中,如果不存在之前编译生成的代码,则会为引用模型生成独立代码。
比较普通和 SIL 模式下 Model 模块的行为。结果是匹配的。
yout2 = out2.logsOut;
yout2_sil = yout2.get('counterA').Values.Data;
yout2_normal = yout2.get('counterB').Values.Data;
fig1 = figure;
subplot(3,1,1), plot(yout2_normal), title('Counter Output for Normal Simulation')
subplot(3,1,2), ...
    plot(yout2_sil), title('Counter Output for Model Block SIL (Model Reference) Simulation')
subplot(3,1,3), plot(yout2_normal-yout2_sil), ...
   title('Difference Between Normal and SIL');

比较在普通模式仿真和 SIL 模式仿真中记录的 Model 模块的状态。
xout2 = out.xout;
xout2_sil = xout2{1}.Values.Data;
xout2_normal = xout2{2}.Values.Data;
fig1 = figure;
subplot(3,1,1), plot(xout2_sil), title('State Logging for Normal Simulation')
subplot(3,1,2), ...
    plot(xout2_normal), title('State Logging for Model Block SIL (Model Reference) Simulation')
subplot(3,1,3), plot(xout2_normal-xout2_sil), ...
    title('Difference Between Normal and SIL');
清空仿真结果。
close_system(model,0);
if ishandle(fig1), close(fig1), end, clear fig1
simResults={'out','yout','yout_sil','yout_normal', ...
            'out2','yout2','yout2_sil','yout2_normal', ...
            'SilCounterBus','T','reset','ticks_to_count','Increment'};
save([model '_results'],simResults{:});
clear(simResults{:},'simResults')
SIL 或 PIL 模块仿真
通过在仿真中使用 SIL 或 PIL 模块测试生成的子系统代码。使用这种方法:
测试从子系统生成的代码,这些代码使用独立的代码接口。
提供测试框架或系统模型,以提供测试向量或激励输入。
使用生成的 SIL 或 PIL 模块替换原始子系统。
打开一个简单模型,它由闭环形式的控制算法和被控对象模型组成。控制算法调节被控对象的输出。
model='SILBlock';
close_system(model,0)
open_system(model)
运行普通模式仿真
out = sim(model,10);
yout_normal = out.yout;
clear out
配置编译过程以创建 SIL 模块进行测试。
set_param(model,'CreateSILPILBlock','SIL');
要测试在生产硬件上的行为,请指定一个 PIL 模块。
要创建 SIL 模块,请为控制算法子系统生成代码。您在编译过程结束时会看到 SIL 模块。其输入和输出端口与控制算法子系统的对应项匹配。
close_system('untitled',0);
slbuild([model '/Controller'])
### Searching for referenced models in model 'Controller'.
### Total of 1 models to build.
### Starting build procedure for: Controller
### Successful completion of build procedure for: Controller
### Creating SIL block ...
Building with 'gcc'.
MEX completed successfully.

Build Summary

Top model targets:

Model       Build Reason                                         Status                        Build Duration
=============================================================================================================
Controller  Information cache folder or artifacts were missing.  Code generated and compiled.  0h 0m 10.347s

1 of 1 models built (0 models already up to date)
Build duration: 0h 0m 19.497s
您也可以右键点击子系统并选择 C/C++ 代码 > 编译此子系统。在打开的对话框中,点击编译。
要执行闭环形式的控制器和被控对象模型的 SIL 仿真,请使用新 SIL 模块替换原始控制算法。为避免丢失原始子系统,请勿以此状态保存模型。
controllerBlock = [model '/Controller'];
blockPosition = get_param(controllerBlock,'Position');
delete_block(controllerBlock);
add_block('untitled/Controller',[controllerBlock '(SIL)'],...
          'Position', blockPosition);
close_system('untitled',0);
clear controllerBlock blockPosition
运行 SIL 仿真。
out = sim(model,10);
### Preparing to start SIL block simulation: SILBlock/Controller(SIL) ...
### Starting SIL simulation for component: SILBlock
### Application stopped
### Stopping SIL simulation for component: SILBlock
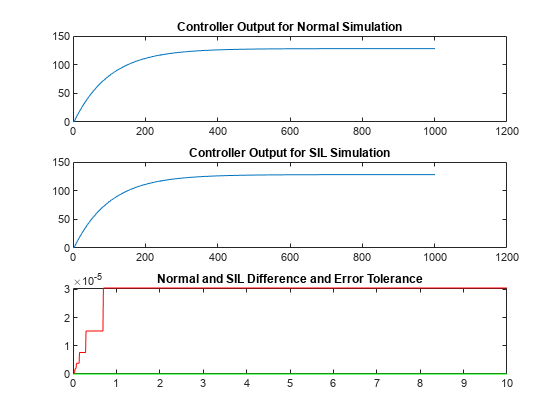
控制算法使用单精度浮点算术运算。SIL 和普通仿真之间差异的量级可能接近单精度数据的计算机精度。
定义 SIL 仿真结果的误差容限,该误差容限基于单精度普通仿真结果的计算机精度。
machine_precision = eps(single(yout_normal));
tolerance = 4 * machine_precision;
比较普通和 SIL 仿真结果。在第三个绘图中,仿真之间的差异全部在定义的误差容限内。
yout_sil = out.yout;
tout = out.tout;
fig1 = figure;
subplot(3,1,1), plot(yout_normal), title('Controller Output for Normal Simulation')
subplot(3,1,2), plot(yout_sil), title('Controller Output for SIL Simulation')
subplot(3,1,3), plot(tout,abs(yout_normal-yout_sil),'g-', tout,tolerance,'r-'), ...
    title('Normal and SIL Difference and Error Tolerance');

清空仿真结果。
close_system(model,0);
if ishandle(fig1), close(fig1), end
clear fig1
simResults={'out','yout_sil','yout_normal','tout','machine_precision'};
save([model '_results'],simResults{:});
clear(simResults{:},'simResults')
硬件实现设置
当您运行 SIL 仿真时,您必须配置硬件实现设置(原生字长等特性),以允许针对开发计算机进行编译。这些设置可能不同于针对生产硬件编译模型时使用的硬件实现设置。为避免在 SIL 和 PIL 仿真之间更改硬件实现设置,请启用可移植字长。有关详细信息,请参阅配置硬件实现设置。