Code Generation for Deep Learning Networks by Using cuDNN
With GPU Coder™, you can generate optimized code for prediction of a variety of trained deep
learning networks from Deep Learning Toolbox™. The generated code implements the deep convolutional neural network (CNN) by
using the architecture, the layers, and parameters that you specify in the input SeriesNetwork (Deep Learning Toolbox) or
DAGNetwork (Deep Learning Toolbox) object.
The code generator takes advantage of NVIDIA®
CUDA® deep neural network library (cuDNN) for NVIDIA GPUs. cuDNN is a GPU-accelerated library of primitives for deep neural networks.
The generated code can be integrated into your project as source code, static or dynamic
libraries, or executables that you can deploy to a variety of NVIDIA GPU platforms.
Generate code for convolutional networks by using one of the methods:
The standard
codegenfunction that generates CUDA code from a MATLAB® entry-point function.The GPU Coder app that generates CUDA code from a MATLAB entry-point function.
Note
In previous releases you could target the cuDNN library by using the cnncodegen
function. From R2021a onwards, the cnncodegen function generates C++
code and make files for only the ARM® Mali GPU processor.
Generate Code and Classify Images by Using GoogLeNet
In this example, you use GPU Coder to generate CUDA code for the pretrained googlenet (Deep Learning Toolbox) deep
convolutional neural network and classify an image. GoogLeNet has been trained on over a
million images and can classify images into 1000 object categories (such as keyboard, coffee
mug, pencil, and animals). The network has learned rich feature representations for a wide
range of images. The network takes an image as input, and then outputs a label for the
object in the image together with the probabilities for each of the object categories. This
example shows you how to generate code for the pretrained network by using the
codegen command and the GPU Coder app.
Requirements
Required
This example generates CUDA MEX that has the following additional requirements.
Deep Learning Toolbox.
Deep Learning Toolbox Model for GoogLeNet Network support package.
GPU Coder Interface for Deep Learning support package.
CUDA enabled NVIDIA GPU and a compatible driver. For 8-bit integer precision, the CUDA GPU must have a compute capability of 6.1 or higher.
Optional
For non-MEX builds such as static, dynamic libraries, or executables, this example has the following additional requirements.
CUDA Toolkit and cuDNN libraries. For information on the supported versions of the compilers and libraries, see Installing Prerequisite Products.
Environment variables for the compilers and libraries. For more information, see Set Environment Variables.
Load Pretrained Network
Load the pretrained GoogLeNet network. You can choose to load a different pretrained network for image classification. If you do not have the required support packages installed, the software provides a download link.
net = googlenet;
The object
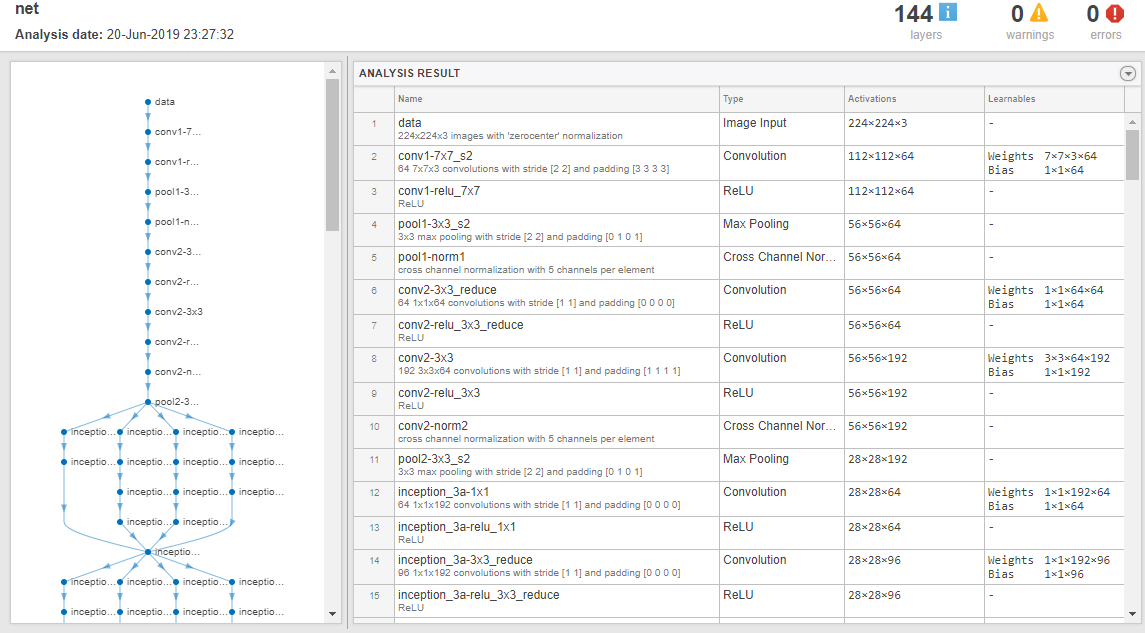
netcontains theDAGNetworkobject. Use theanalyzeNetwork(Deep Learning Toolbox) function to display an interactive visualization of the network architecture, to detect errors and issues in the network, and to display detailed information about the network layers. The layer information includes the sizes of layer activations and learnable parameters, the total number of learnable parameters, and the sizes of state parameters of recurrent layers.analyzeNetwork(net);

The image that you want to classify must have the same size as the input size of the network. For GoogLeNet, the size of the
imageInputLayer(Deep Learning Toolbox) is 224-by-224-by-3. TheClassesproperty of the outputClassificationOutputLayer(Deep Learning Toolbox) contains the names of the classes learned by the network. View 10 random class names out of the total of 1000.classNames = net.Layers(end).Classes; numClasses = numel(classNames); disp(classNames(randperm(numClasses,10)))
    'speedboat'
    'window screen'
    'isopod'
    'wooden spoon'
    'lipstick'
    'drake'
    'hyena'
    'dumbbell'
    'strawberry'
    'custard apple'
For more information, see List of Deep Learning Layers (Deep Learning Toolbox).
Create an Entry-Point Function
Write an entry-point function in MATLAB that:
Uses the
coder.loadDeepLearningNetworkfunction to load a deep learning model and to construct and set up a CNN class. For more information, see Load Pretrained Networks for Code Generation.Calls
predict(Deep Learning Toolbox) to predict the responses.
For example:
function out = googlenet_predict(in) %#codegen

persistent mynet;

if isempty(mynet)
    mynet = coder.loadDeepLearningNetwork('googlenet');
end

% pass in input
out = predict(mynet,in);
A persistent object
mynetloads theDAGNetworkobject. At the first call to the entry-point function, the persistent object is constructed and set up. On subsequent calls to the function, the same object is reused to callpredicton inputs, avoiding reconstructing and reloading the network object.Note
Code generation requires the network to be loaded into a persistent object.
You can also use the
activations(Deep Learning Toolbox) method to network activations for a specific layer. For example, the following line of code returns the network activations for the layer specified inlayerIdx.out = activations(mynet,in,layerIdx,'OutputAs','Channels');
You can also use the
classify(Deep Learning Toolbox) method to predict class labels for the image data ininusing the trained network,mynet.[out,scores] = classify(mynet,in);
For LSTM networks, you can also use the
predictAndUpdateState(Deep Learning Toolbox) andresetState(Deep Learning Toolbox) methods. For usage notes and limitations of these method, see the corresponding entry in the Supported Functions table.
Code Generation by Using codegen
To configure build settings such as output file name, location, and type, you create coder configuration objects. To create the objects, use the
coder.gpuConfigfunction. For example, when generating CUDA MEX using thecodegencommand, usecfg = coder.gpuConfig('mex');Other available options are:
cfg = coder.gpuConfig('lib');, to create a code generation configuration object for use withcodegenwhen generating a CUDA C/C++ static library.cfg = coder.gpuConfig('dll');, to create a code generation configuration object for use withcodegenwhen generating a CUDA C/C++ dynamic library.cfg = coder.gpuConfig('exe');, to create a code generation configuration object for use withcodegenwhen generating a CUDA C/C++ executable.
To specify code generation parameters for cuDNN, set the
DeepLearningConfigproperty to acoder.CuDNNConfigobject that you create by usingcoder.DeepLearningConfig.cfg = coder.gpuConfig('mex'); cfg.TargetLang = 'C++'; cfg.DeepLearningConfig = coder.DeepLearningConfig('cudnn'); cfg.DeepLearningConfig.AutoTuning = true; cfg.DeepLearningConfig.DataType = 'fp32';
Specify the precision of the inference computations in supported layers by using the
DataTypeproperty. When performing inference in 32-bit floats, use'fp32'. For 8-bit integer, use'int8'. Default value is'fp32'.INT8precision requires a CUDA GPU with minimum compute capability of 6.1. Use theComputeCapabilityproperty of theGpuConfigobject to set the compute capability value.Note
Code generation for
INT8data type does not support multiple deep learning networks in the entry-point function.When performing inference in
INT8precision using cuDNN version 8.1.0, issues in the NVIDIA library may cause significant degradation in performance.Run the
codegencommand. Thecodegencommand generates CUDA code from thegooglenet_predict.mMATLAB entry-point function.codegen -config cfg googlenet_predict -args {ones(224,224,3)} -report
The
-reportoption instructscodegento generate a code generation report that you can use to debug your MATLAB code.The
-argsoption instructscodegento compile the filegooglenet_predict.mby using the class, size, and complexity specified for the input in. The value(224,224,3)corresponds to input layer size of the GoogLeNet network.The
-configoption instructscodegento use the specified configuration object for code generation.
Note
You can specify half-precision inputs for code generation. However, the code generator type casts the inputs to single-precision. The Deep Learning Toolbox uses single-precision, floating-point arithmetic for computations in MATLAB.
The code generator uses column-major layout by default. To use row-major layout pass the
-rowmajoroption to thecodegencommand. Alternatively, configure your code for row-major layout by modifying thecfg.RowMajorparameter in the code generation configuration object.When code generation is successful, you can view the resulting code generation report by clicking View Report in the MATLAB Command Window. The report is displayed in the Report Viewer window. If the code generator detects errors or warnings during code generation, the report describes the issues and provides links to the problematic MATLAB code. See Code Generation Reports.
Code generation successful: View report
Generated Code
The DAG network is generated as a C++ class containing an array of 78 layer classes.
The code generator reduces the number of layers by using layer fusion optimization of
convolutional and ReLU layers. A snippet of the class declaration from
googlenet_predict_types.h file is shown.

googlenet_predict_types.h File
The
setup()method of the class sets up handles and allocates memory for each layer of the network object.The
predict()method invokes prediction for each of the 78 layers in the network.The
DeepLearningNetwork.cufile contains the definitions of the object functions for theb_googlenet_0class.
Binary files are exported for layers with parameters such as fully connected and
convolution layers in the network. For instance, files
cnn_googlenet_conv*_w and cnn_googlenet_conv*_b
correspond to weights and bias parameters for the FusedConvReLU layers
in the network. The code generator places these binary files in the
codegen folder.
By default, the generated application looks for the weight files in the
codegen folder. If you are relocating the generated application and
weight files to a different location such as an embedded board, create an environment
variable called CODER_DATA_PATH, whose value is the location of the
relocated weight files. The generated application will then look for the weight files in
this location.
Note
On Windows® systems, some antivirus software such as Bit Defender can incorrectly identify some weight files as infected and delete them. These cases are false positives and the files can be marked as safe in your antivirus program.
In the generated code file googlenet_predict.cu, the entry-point
function googlenet_predict() constructs a static object of b_googlenet_0 class type and invokes setup and predict on this
network object.
Generate Code by Using the App
First, specify the entry-point function and input types using the app. See Generate Code by Using the GPU Coder App.
To configure the GPU Coder app to use cuDNN:
In the toolstrip, set the Output Type to MEX.
In the toolstrip, click Settings to open the MEX Code Generation Settings dialog box. In the left pane, click Deep Learning. In the right pane, set Deep learning library to
cuDNN.Close the settings window. To generate CUDA code, click Generate Code and Build.
Generated Makefile
For 'lib', 'dll', and 'exe'
targets, the code generator creates the *_rtw.mk make file in the
codegen folder. In this make file, the location of the generated code
is specified by using the START_DIR variable found in the
MACROS section. By default, this variable points to the path of the
current working folder where the code is generated. If you plan to move the generated files
and use the makefile to build, replace the generated value of START_DIR
with the appropriate path location.
Run the Generated MEX
The image that you want to classify must have the same size as the input size of the network. Read the image that you want to classify and resize it to the input size of the network. This resizing slightly changes the aspect ratio of the image.
im = imread("peppers.png");
inputLayerSize = net.Layers(1).InputSize;
im = imresize(im,inputLayerSize(1:2));
Call GoogLeNet predict on the input image.
predict_scores = googlenet_predict_mex(im);
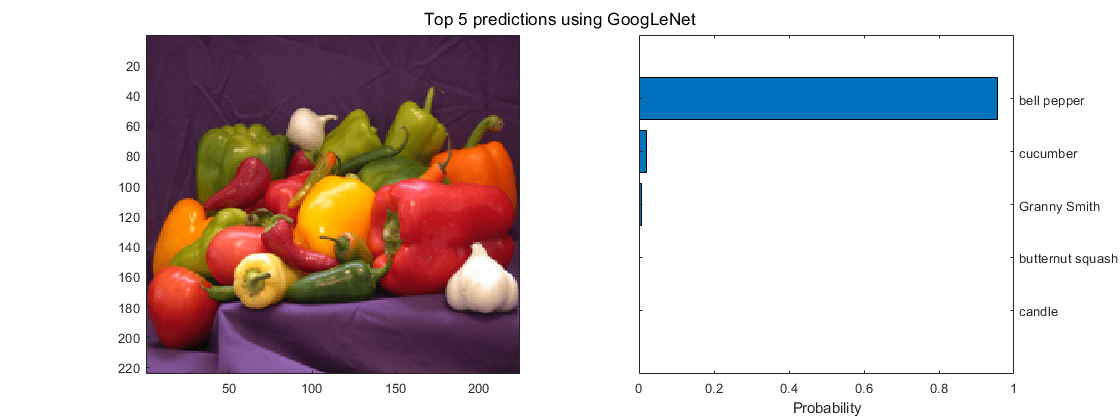
Display the top five predicted labels and their associated probabilities as a histogram. Because the network classifies images into so many object categories, and many categories are similar, it is common to consider the top-five accuracy when evaluating networks. The network classifies the image as a bell pepper with a high probability.
[scores,indx] = sort(predict_scores, 'descend');
classNamesTop = classNames(indx(1:5));

h = figure;
h.Position(3) = 2*h.Position(3);
ax1 = subplot(1,2,1);
ax2 = subplot(1,2,2);

image(ax1,im);
barh(ax2,scores(5:-1:1))
xlabel(ax2,'Probability')
yticklabels(ax2,classNamesTop(5:-1:1))
ax2.YAxisLocation = 'right';
sgtitle('Top 5 predictions using GoogLeNet')
