Create a Space-Filling Design
Space-filling designs should be used when there is little or no information about the underlying effects of factors on responses. For example, they are most useful for a new type of engine, with little knowledge of the operating envelope. These designs do not assume a particular model form. and aim is to spread the points as evenly as possible around the operating space. Space-filling designs fill out the n-dimensional space with points that are in some way regularly spaced. These designs can be especially useful in conjunction with nonparametric models such as radial basis function (a type of neural network).
Add a new design by clicking the
 button in the toolbar or select File > New Design.
Select the node in the tree by clicking. An empty Design Table appears if you have not yet chosen a design. Otherwise, if this is a new child node the display remains the same, because child nodes inherit all the parent design's properties.
Select Design > Create Space-Filling Design, or click the Create space filling design button
 on the toolbar.
A dialog box appears if there are already points from the previous design. You must choose between replacing and adding to those points or keeping only fixed points from the design. The default is replacement of the current points with a new design. Click OK to proceed, or Cancel to change your mind.
The Space Filling Design Browser appears.
Note
As with the Classical Design Browser, you can select the types of design you can preview in the Space Filling Design Browser from the Design type drop-down in situations when you already know the type of space-filling design you want.
You can edit these settings:
Select from the Design type drop-down menu to choose a space-filling design style. The default Design type is
Sobol Sequence.Specify the Number of points by typing in the edit box or using the controls.
Observe the information displayed to see how many points are excluded by constraints.
The design editor tries to provide points as close as possible to the number of points you specified within the constraints.
Specify a value for Maximum boundary points (% of points) to identify operating points that are near the constraint boundary and exterior to the constrained operating region. In the illustration, the Exterior points to be moved are light blue. The software moves the identified points to the constraint boundary and includes them in the constrained region. In the illustration, the Boundary points moved are purple.
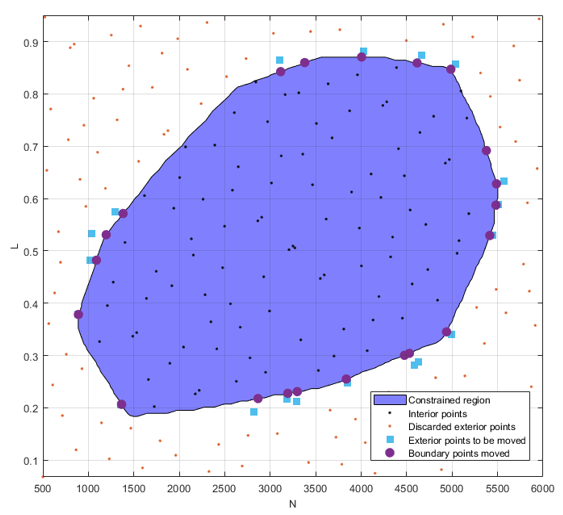
The Maximum boundary points (% of points) option limits the maximum number of boundary points as a percentage of the total number of design of experiment (DoE) points. The total number of DoE points is equal to the number of interior points plus boundary points. For example:
If you set Maximum boundary points (% of points) to 100, Model-Based Calibration Toolbox™ projects all Discarded exterior points onto the constraint boundary.
If you set Maximum boundary points (% of points) to 10 and the total number of DoE points is 100, the DoE will have 90 interior points and 10 boundary points. The exact number of boundary points might be less than 10% if the software finds a sufficient number of interior points.
You can use the tabs under the display to view 2D, 3D, and 4D previews. The preview is identical to the final design.
When you edit settings for very large designs, you can clear the check box Automatically update preview to avoid waiting for the preview calculation. This check box is cleared automatically if the current design is large enough to cause preview calculation to be very slow. Click the Generate button when you want to create a preview.
You can set the ranges for each factor.
Click OK to calculate the design and return to the main Design Editor.
Tip
To preserve the space-filling sequence in case you want to add more points later, make a copy of a design before rounding or sorting points.
Sobol Sequence
Sobol sequence designs are generated from the sobolset class in the Statistics and Machine Learning Toolbox™ software. The Sobol sequence is a low-discrepancy (t,s)-sequence in base 2. For more information see the Statistics and Machine Learning Toolbox documentation.
Settings
For Sobol sequence designs, you can choose the following options:
Use the radio buttons to specify whether and how to skip initial points from the sequence:
No skip — Do not skip any points.
This property at the command line is
SkipMode 'None'.Skip initial 2^k points — Automatically chooses the smallest value for k so that 2^k is larger than the number of points requested, and then skip 2^k points.
This property at the command line is
SkipMode '2^k'.Custom skip — Enter a value to be used as the number of initial points to miss out from the sequence.
This property at the command line is
SkipMode, 'Custom', Skip,.Numberofpoints
Apply Matousek Affine Owen scramble — Performs a linear scramble of the generator matrices for the sequence using random lower-triangular matrices in base 2 and also applies a random digital shift to the points.
This property at the command line is
Scramble.
Halton Sequence
Halton Sequence designs are generated from the haltonset class in the Statistics and Machine Learning Toolbox software. The Halton sequence is a low-discrepancy point set where the coordinate values for each dimension are generated by forming the radical inverse of the point's index, using a different prime base for each dimension. For more information see the Statistics and Machine Learning Toolbox documentation.
Settings
For Halton sequence designs, you can choose the following options:
Leap sequence points using prime number — Uses only every k-th point in the Halton sequence. k is the next prime number after those used as bases in the radical inverse; i.e., this value is the (NFactors+1) prime number.
This property at the command line is
PrimeLeap.Skip zero point — Causes the first point of the sequence, which is always at the lower limit of each input factor, to be skipped. This point is often seen as unbalancing because the upper limits of each input factor can never be produced by the algorithm.
This property at the command line is
SkipZero.Apply RR2 Scramble — Sets the scramble to
'RR2', which performs a permutation of the radical inverse coefficients using the RR2 algorithm.This property at the command line is
Scramble.
Latin Hypercube Sampling
Latin Hypercube Sampling (LHS) designs are sets of design points that, for an N point design, project onto N different levels in each factor. In this design, the points are generated randomly. You choose a particular Latin Hypercube by trying several such sets of randomly generated points and choosing the one that best satisfies user-specified criteria.
Settings
For both Latin Hypercube Sampling and Stratified Latin Hypercube, you can choose the following options:
The Selection criteria drop-down menu has these options:
Maximize minimum distance(between points).Minimize maximum distance(between points)Minimize discrepancy— Minimizes the deviation from the average point densityMinimize RMS variation from CDF— This default option minimizes the Root Mean Square (RMS) variation of the Cumulative Distribution Function (CDF) from the ideal CDF.Minimize maximum variation from CDF— Minimizes the maximum variation of the CDF from the ideal CDF
The final two (CDF variation) options scale best with the number of points and it is advisable to choose one of these options for large designs.
The Enforce Symmetrical Points check box is selected by default. This creates a design in which every design point has a mirror design point on the opposite side of the center of the design volume and an equal distance away. Restricting the design in this way tends to produce better Latin Hypercubes.
Lattice
Lattice designs project onto N different levels per factor for N points. The points are not randomly generated but are produced by an algorithm that uses a prime number per factor. If good prime numbers are chosen, the lattice spreads points evenly throughout the design volume. A poor choice of prime numbers results in highly visible lines or planes in the design projections. If all the design points are clustered into one or two planes, it is likely that you cannot estimate all the effects in a more complex model. When design points are projected onto any axes, there are a large number of factor levels.
For a small number of trials (relative to the number of factors) LHS designs are preferred to Lattice designs. This is because of the way Lattice designs are generated. Lattice designs use prime numbers to generate each successive sampling for each factor in a different place. No two factors can have the same generator, because in such cases the lattice points all fall on the main diagonal of that particular pairwise projection, creating the visible lines or planes described above. When the number of points is small relative to the number of factors, the choice of generators is restricted and this can lead to Lattice designs with poor projection properties in some pairwise dimensions, in which the points lie on diagonals or double or triple diagonals. This means that Latin Hypercube designs are a better choice for these cases.
See the illustrations in the following section comparing the properties of good and poor lattices and a hypercube design.
Settings
For a Lattice space-filling design, you can choose:
The Lattice size by using the buttons or typing in the edit box.
The prime number generator by using the up/down buttons on the Prime number for X edit box.
The range for each factor.
Stratified Latin Hypercube
Stratified Latin Hypercubes separate the normal hypercube into N different levels on user-specified factors. This can be useful for situations where the preferred number of levels for certain factors might be known; more detail might be required to model the behavior of some factors than others. They can also be useful when certain factors can only be run at given levels.
The preceding example shows the different properties of a poor lattice (left) and a good lattice (right), with a similar number of points. The poorly chosen prime number produces highly visible planes and does not cover the space well.
An example of an LHS design of the same size is shown for comparison with the preceding lattice examples.
Settings
The options are the same as the Latin Hypercube Sampling settings.
Comparing Latin Hypercube and Stratified Latin Hypercube
Latin Hypercube Sampling and Stratified Latin Hypercube Sampling differ only in that with Stratified Latin Hypercube Sampling, you can restrict the number of levels available to each factor. If the number of stratifications equals the number of points in the design, then both Latin Hypercube Sampling and Stratified Latin Hypercube Sampling give the same results. However, if the number of stratifications in a given factor is less than the number of points in the design, then some points will be projected onto the same values in that factor. You can see this change by using the one-dimensional design projection view in the Design Editor.
Augmenting Space-Filling Designs
To add points to space-filling designs, you can either use Edit > Add Point, or you can edit the file properties. However the Design Properties dialog box does not contain a preview plot, so instead, use the Add Points dialog box to add to your space-filling design.
Alternatively, to use the Design Properties dialog box to augment a space-filling design:
Create a copy of your design to preserve it, then in the child design, select File > Properties.
In the Design Properties dialog box, select the Space-Filling tab.
Enter the desired new total number of points in the Number of points edit box.
Leave the other settings unchanged.
Click OK.
The Design Editor augments your original design by adding points up to the new total number of points, with the same space-filling sequence parameters as your original Halton or Sobol sequence.
Space-Filling Design Augmentation Restrictions
You can only augment Halton and Sobol sequence space-filling designs with this method that uses the original sequence settings.
You can augment any Halton sequence, but for Sobol sequences, you must use the default No skip setting.
You cannot achieve the same result by selecting any Design > Space Filling menu option and selecting the Augment points option, because doing so will keep your existing points, but will generate the additional points with a new space-filling sequence.
You cannot augment a constrained design in this way. When you add constraints, the design type changes to Custom. You can no longer access the original sequence settings. If you want to add constraints, you must create a child design and constrain it. This approach preserves the original space-filling sequence design.
You cannot use this method with Latin Hypercube or Lattice designs as they always create a completely new design.