Plan Path in Warehouse Scenario with Unseen Obstacle Avoidance
This example shows how to build a path following robot by using time elastic band (TEB) algorithm for navigation in a warehouse scenario with unseen obstacles. This example uses lidar sensor data to detect and avoid collision with unseen obstacles that are not represented in the scenario map. TEB algorithm generates time-optimal, smooth trajectories that follow the robot's kinematic constraints.
In this example, you will
Create a warehouse scenario map with a storage area and a packaging area by using the
exampleHelperCreateScenariohelper function. Additionally, you will add movable pallets to the scenario to carry goods from storage area to the packaging area.Add a mobile robot with lidar sensor to the scenario.
Define waypoints and actions for the mobile robot and generate a reference path for the robot by using hybrid A* star algorithm.
Create a TEB controller by using the
controllerTEBfunction to enable the robot to move from a start location to goal location by following the reference path.Use lidar sensor data to detect unseen obstacles along the reference path. Accordingly, update the controller parameters to tune the local path of the robot in order to avoid collision with the detected obstacles.
The rest of the example explains the steps involved.
Create Warehouse Scenario
Create an empty robot simulation scenario. Specify the simulation update rate and the maximum number of frames of platform poses to store in the scenario.
updateRate = 10;
scenario = robotScenario(UpdateRate=updateRate,HistoryBufferSize=320);
Add storage area, packaging area and add movable pallets and boxes to the robot simulation scenario by using the exampleHelperCreateScenario helper function. The helper adds the movable pallets with boxes as robotPlatform objects. This example generates body mesh for the movable pallets by modifying a pallet model download from aws-robomaker-small-warehouse-world. The pallet model is stored as .mat file.
scenario = exampleHelperCreateScenario(scenario)
scenario =
  robotScenario with properties:

           UpdateRate: 10
             StopTime: Inf
    HistoryBufferSize: 320
    ReferenceLocation: [0 0 0]
         MaxNumFrames: 50
          CurrentTime: 0
            IsRunning: 0
        TransformTree: [1×1 transformTree]
       InertialFrames: ["ENU"    "NED"]
               Meshes: {[1×1 extendedObjectMesh]  [1×1 extendedObjectMesh]}
      CollisionMeshes: {1×0 cell}
            Platforms: [1×17 robotPlatform]
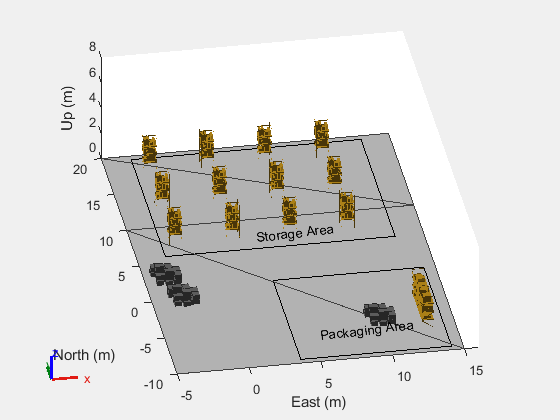
Visualize the scenario by using show3D function. Mark the storage and the packaging area for display purpose. Additionally, you can adjust the view angles for generating new views.
figure
show3D(scenario);

rectangle(Position=[3.7 -9.5 10.5 11])
t = text(5.5,-7,0.3,"Packaging Area");
t.Rotation = 7;
rectangle(Position=[-3 6 16 13.5])
t = text(3.5,7,0.3,"Storage Area");
t.Rotation = 7;

view(-10,30)
axis([-5 16,-10 20,0 8])
light

Add Mobile Robot to Scenario
Load the rigid body tree model for a clearpath Jackal mobile robot. The Jackal robot has a differential-drive mobile base and the external dimension of the robot is 508 mm430 mm250 mm.
[jackalRBT,jackalRBTInfo] = loadrobot("clearpathJackal");Read the kinematic motion model of the robot. The Jackal robot follows differential-drive kinematic motion model.
robotKinematics = copy(jackalRBTInfo.MobileBaseMotionModel)
robotKinematics =
  differentialDriveKinematics with properties:

      VehicleInputs: 'WheelSpeeds'
         TrackWidth: 0.3765
        WheelRadius: 0.0650
    WheelSpeedRange: [-2 2]
This example uses kinematic motion model to simulate the robot. The TEB controller computes an optimal trajectory for the robot by using its current pose and its current linear and angular velocities. The controller uses the computed velocities to find the next pose of the robot. Hence, set the VehicleInputs property of the differential-drive vehicle model to VehicleSpeedHeadingRate.
robotKinematics.VehicleInputs = "VehicleSpeedHeadingRate"; Set the vehicle wheel speed range to [-34 34];
robotKinematics.WheelSpeedRange = [-34 34];
Specify the initial position of robot body in the scenario.
robotInitLoc = [0,0,0];
Create a robot platform and add it to the scenario. Specify the rigid body tree model, initial base position and base orientation for the robot platform as inputs.
robot = robotPlatform("MobileRobot",scenario, ...
    RigidBodyTree=jackalRBT, ...
    InitialBasePosition=robotInitLoc, ...
    InitialBaseOrientation = eul2quat([0 0 0]));
Mount Lidar Sensor on Robot
Create a lidar sensor model and generate organized point cloud data by using the robotLidarPointCloudGenerator function. Specify these parameters for the lidar sensor model.
Set maximum distance range for the lidar sensor to 12 m.
Set azimuth angle limits of lidar sensor to [-120 120]. Units for azimuth limits are in degrees.
Set azimuth resolution to 0.2. Units in degrees.
Set update rate of lidar sensor to the simulation update rate of the robot scenario.
Set elevation angle limits of lidar sensor to [0 30]. Units are in degrees.
Set elevation resolution to 1. Units are in degrees.
The parameters for the lidar sensor model are chosen experimentally to suit the robot scenario.
maxRange = 12;
lidarConfig = struct(angleLower=-120, ...
    angleUpper=120, ...
    angleStep=0.2, ...
    maxRange=maxRange, ...
    updateRate=updateRate);

lidarmodel = robotLidarPointCloudGenerator(...
    AzimuthResolution=lidarConfig.angleStep, ...
    AzimuthLimits=[lidarConfig.angleLower,lidarConfig.angleUpper], ...
    ElevationLimits=[0 30], ...
    ElevationResolution=1, ...
    MaxRange=lidarConfig.maxRange, ...
    UpdateRate=lidarConfig.updateRate, ...
    HasOrganizedOutput=true);
Add the lidar sensor to the robot scenario by using the robotSensor function.
lidar = robotSensor("Lidar",robot,lidarmodel,MountingBodyName="front_fender_link", ...
    MountingLocation=[0.25 0.1 0.2]);
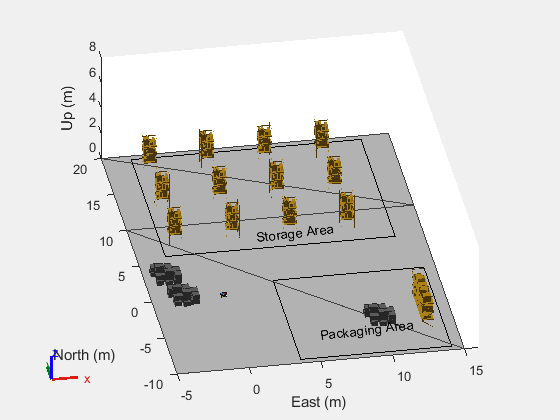
Visualize the scenario with the robot.
figure
show3D(scenario);

rectangle(Position=[3.7 -9.5 10.5 11])
t = text(5.5,-7,0.3,"Packaging Area");
t.Rotation = 7;
rectangle(Position=[-3 6 16 13.5])
t = text(3.5,7,0.3,"Storage Area");
t.Rotation = 7;

view(-10,30)
axis([-5 16,-10 20,0 8])
light

Defining Waypoints and Actions for Robot
Create a binary occupancy map from the robot scenario.
mapOrig = binaryOccupancyMap(scenario,MapHeightLimits=[0 5], ...
    GridOriginInLocal=[-5 -10], ...
    MapSize=[20 30]);
Mark the boundary of the map as occupied locations to prevent the robot from moving outside the map region. Use the exampleHelperDefineMapBoundary helper function to mark the map boundaries as occupied regions. In this example, the map region within 1 m of the map limits is considered as map boundary and is marked as occupied regions.
globalMap = exampleHelperDefineMapBoundary(mapOrig);
Display the occupancy map to inspect the occupied regions of the map. You can notice that along with the boundaries, the shelves in the packaging area are also marked as occupied locations. The locations of the movable pallets in the map are not marked as occupied locations. The movable pallets and other objects in the map regions are temporary obstacles that the robot must detect and avoid during navigation.
figure
show(globalMap)
![Figure contains an axes object. The axes object with title Occupancy Grid, xlabel X [meters], ylabel Y [meters] contains an object of type image.](../../examples/nav_robotics/win64/PlanAPathAndAvoidUnseenObstaclesInAWarehouseExample_03.png)
Specify the initial position and the final position for the robot.
robotInitPose = robotInitLoc;
robotFinalPose = [6 8 pi/2];
Specify the pick-up and drop location for a pallet to be moved.
palletPickLoc = [2 13 pi/2];
palletDropLoc = [6 -7 0];
The robot has to make a turn in order to move from the pallet pick location to the drop location. Specify the location of the robot after making the turn. In this example, the robot rotates 180 degrees to make a turn.
robotLocAfterTurn = [2 13 -pi/2];
Specify the waypoints for the robot to pick-up the pallet and navigate from its initial position to the final position.
robotWaypoints = [robotInitPose; palletPickLoc; ... % Robot motion from start to the pallet pickup location
    robotLocAfterTurn; palletDropLoc; ... % Robot taking pallet to the drop location
    robotFinalPose]; % Robot motion to the final location
Create a boolean array to specify at which waypoint the robot should pick the pallet. Set the value as true for the waypoint where the robot needs to pick the pallet.
pickPallet = [false;false;true;false;false];
Create a boolean array to specify at which waypoint the robot should make a turn. Set the value as true for the waypoint where the robot has to make 180 degree turn.
rotateRobotInPlace = [false;true;false;false;false];
Find Reference Path using Global Planner
Set the seed value to ensure you generate the same results.
rng("default")Validate states in the input map and compute a reference path between two consecutive waypoints by using the hybrid A* planning algorithm.
validator = validatorOccupancyMap(stateSpaceSE2,Map=globalMap);
validator.ValidationDistance = 0.1;
planner = plannerHybridAStar(validator);

numMotionSeq = size(robotWaypoints,1)-1;
refPath = cell(1,numMotionSeq);

for i=1:numMotionSeq
    start = robotWaypoints(i,:);
    goal = robotWaypoints(i+1,:);
    if rotateRobotInPlace(i)
        refPath{i} = [start;start;goal];
    else
        path = plan(planner,start,goal);
        refPath{i} = path.States;
    end
end
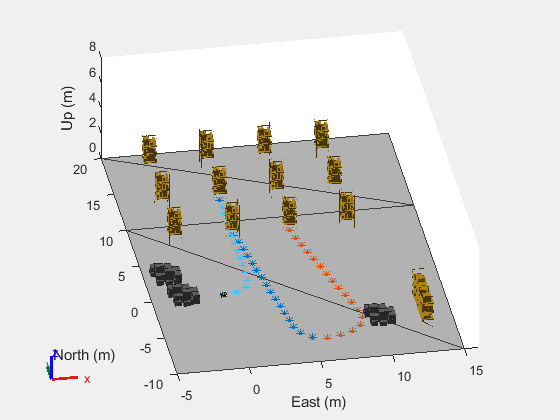
Display the scenario. Plot the reference paths computed for each start and goal pair.
figure
show3D(scenario);
view(-10,30)
axis([-5 16,-10 20,0 8])
light
hold on
for i=1:numMotionSeq
    plot(refPath{i}(:,1),refPath{i}(:,2),'*')
end
hold off

Create TEB Controller and Initialize Controller Parameters
Create an occupancy map to define the local field of view of the robot. The width and the height of the local field is set to 15 m.
localMap = occupancyMap(15,15,globalMap.Resolution);
Specify the first start and goal pair between which the robot must navigate. Read the reference path computed for the specified start and goal pair.
waypointIdx = 1;
referencePath = refPath{waypointIdx};
Create a TEB controller object to compute the linear and angular velocity commands for the robot to follow the specified reference path.
teb = controllerTEB(referencePath,localMap);
Specify these controller parameters.
Linear velocity limit and angular velocity limit for the mobile robot.
Look ahead time. Select this value based on the maximum range of the sensor and the controller execution frequency. The controller generates velocity commands and optimizes the trajectory until the controller reaches the look-ahead time. A higher look-ahead time generates velocity commands further into the future. This enables the robot to react earlier to unseen obstacles, but increases the controller execution time. Conversely, a shorter look-ahead time reduces the available time to react to new, unknown obstacles, but enables the controller to run at a faster rate. Units are in seconds.
Obstacle safety margin. Units are in meters.
Goal tolerance.
teb.MaxVelocity = [2 1];
teb.LookAheadTime = 3;
teb.ObstacleSafetyMargin = 0.1;
teb.GoalTolerance = [0.2 0.2 0.2];
Simulate Robot Navigation
Set the robot scenario for simulation. For initialization, set the current pose of the robot to the initial pose.
setup(scenario)
currentPose = robotInitPose;
Specify the controller execution frequency as 0.5, so that the planner executes every 0.5 seconds of simulation time.
controllerExecutionFreq = 0.5;
During simulation, the global map computed using the hybrid A* algorithm is given as reference path to the controller. If temporary obstacles are detected along the robot's path, their positions are marked as occupied locations in the global map. This will allow the controller to compute an alternate path around the obstacles. Consequently, the global map is updated and synced with the local map.
Specify the dimension of the robot and the pallet in meters. The dimensions of the pallet are slightly inflated to prevent it from moving too close to obstacles.
palletDimension = [0.88 0.8];
robotSize = [.508 .43];
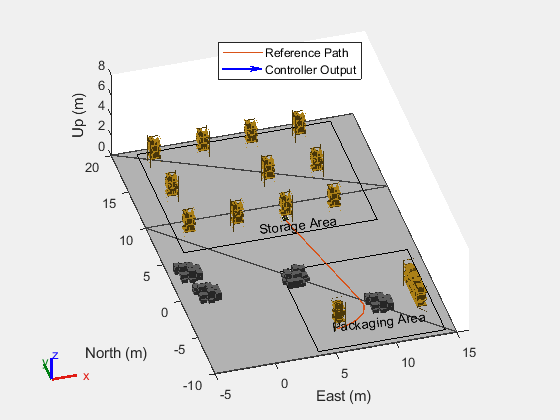
Display the scenario with the robot body placed at the location [0, 0, 0]. Use the drop-down list to select a camera view angle. The exampleHelperSetScenarioView helper function displays the robot scenario based on the chosen camera view. For a clear visualization of collision avoidance during robot navigation, you can select the top view.
figure [ax,plotFrames] = show3D(scenario); rectangle(Position=[3.7 -9.5 10.5 11]) t = text(5.5,-7,0.3,"Packaging Area"); t.Rotation = 7; rectangle(Position=[-3 6 16 13.5]) t = text(3.5,7,0.3,"Storage Area"); t.Rotation = 7; view(-10,30) axis([-5 16,-10 20,0 8]) light cameraView ="Default View"; exampleHelperSetScenarioView(ax,cameraView);
Simulate the robot navigation by using these steps:
Step 1: Given a waypoint, check if the robot must pick the pallet.
If yes, set the
RobotInformationproperty of thecontrollerTEBobject to pallet's dimension. Also, set theObstacleSafetyMarginproperty of thecontrollerTEBobject to 0.4. A larger safety margin helps avoid collisions by maintaining a greater buffer zone around the robot.If no, set the
RobotInformationproperty of thecontrollerTEBobject to robot's dimension. Also, set theObstacleSafetyMarginproperty of thecontrollerTEBobject to 0.1. A smaller safety margin allows the robot to navigate closer to obstacles, optimizing path planning and movement efficiency.
Step 2: Initialize the TEB controller parameters. Set velocity commands, time stamp, and current velocity to zero. Specify the reference path for the given waypoint as input to the TEB controller.
Step 3: Update the local view of the controller as the robot moves along the reference path. Use the current pose of the robot and the local map limits to shift the local view.
Step 4: Read lidar sensor data and detect any unknown obstacles along the reference path by using the exampleHelperUpdateMapWithLidarReading helper function. Mark the location of detected obstacles as occupied locations and update the local map with the new data.
Step 5: Check if the robot can continue moving towards its next goal without making a turn and if the simulation time is a multiple of the controller execution frequency. If yes, compute velocity commands and optimal trajectory for subsequent time steps by using TEB controller.
Step 6: Given the waypoint, check if the robot is carrying the pallet and has reached the goal. If yes, detach the robot from the pallet. Check if the robot's trajectory is valid. If not valid, use the exampleHelperTEBRecovery helper function to generate valid path and commands. If the robot is not carrying the pallet, go to Step 7.
Step 7: Check if the robot must turn 180-degrees at the current waypoint. If yes, use exampleHelperRotateRobot helper function to calculate the necessary commands to achieve the desired orientation before proceeding to the next waypoint. If the robot does not have to make a turn, go to Step 8.
Step 8: Compute the next pose and velocity of the robot by using the exampleHelperGetRobotCurrentPose helper function. The helper function uses the derivative (Robotics System Toolbox) function to compute the next pose and velocity from the instantaneous velocity and kinematics of the robot.
Step 9: Move the robot platform in the scenario to the next pose. Update the current pose value to the next pose.
At each time step during simulation, check if the robot has reached a goal location.
If the robot has reached the goal location and is carrying the pallet, detach the pallet from the robot and navigate it to the next waypoint using steps 1 to 9.
If the robot has reached the goal location but is not carrying the pallet, navigate it to the next waypoint using steps 1 to 9.
If the robot has not reached the goal location, continue navigating it along the reference path using steps 3 to 9.
Continue running the simulation until the robot has covered all the waypoints.
continueSimulation = true;
while continueSimulation
    %---- STEP 1 ----%
    if pickPallet(waypointIdx)
        % Modify the dimension of the robot to include the pallet dimension
        robotInfo = struct(Dimension=palletDimension,Shape="Rectangle");
        attach(robot,"rack2b","mid_mount","ChildToParentTransform",eul2tform([pi/2 0 0]));
        teb.ObstacleSafetyMargin = 0.4;
    else
        robotInfo = struct(Dimension=robotSize,Shape="Rectangle");
        teb.ObstacleSafetyMargin = 0.1;
    end
    %---Add robot information to TEB controller---%
    teb.RobotInformation = robotInfo;

    %---- STEP 2 ----%
    %---Initialize TEB controller parameters---%
    velcmds = zeros(1,2); % velocity commands [linear velocity, angular velocity]
    tstamps = 0;
    validTimeStamp = 0;
    currentVel = [0 0];
    %---Add reference path to TEB controller---%
    referencePath = refPath{waypointIdx};
    teb.ReferencePath = referencePath;

    %---Navigate robot along the reference path---%
    robotTaskInProgress = true;
    while robotTaskInProgress
        %---- STEP 3 ----%
        %---Shift local map view as the robot moves---%
        moveMapBy = currentPose(1:2)-localMap.XLocalLimits(end)/2;
        move(localMap,moveMapBy);

        %---Update local map with data from global map---%
        syncWith(localMap,globalMap);

        %---Read data from lidar sensor---%
        [isUpdated,~,pointCloudA] = read(lidar);
        %---- STEP 4 ----%
        %--Update the local map based on lidar sensor readings---%
        robotDimension = teb.RobotInformation.Dimension;
        exampleHelperUpdateMapWithLidarReading(lidarConfig,pointCloudA,localMap,currentPose,robotDimension,palletDimension);

        %---- STEP 5 ----%
        runPlanner = ~rotateRobotInPlace(waypointIdx)&&(mod(scenario.CurrentTime,controllerExecutionFreq) == 0);
        if runPlanner
            [velcmds,tstamps,currentPath,info] = step(teb,currentPose,currentVel);
            robotTaskInProgress = ~info.HasReachedGoal;

            if ~robotTaskInProgress && pickPallet(waypointIdx)
                detach(robot); % Detach the pallet when the robot has reached the goal
            end
            %---- STEP 6 ----%
            % If timestamps are inconsistent or there is a collision along the trajectory
            % and if only a small part of it is valid, then find a new reference path.
            if any(diff(tstamps) < 0) || info.ExitFlag == 1
                % Do recovery when output from controllerTEB is invalid.
                [velcmds,tstamps,currentPath] = exampleHelperTEBRecovery(teb,velcmds,tstamps,currentPath,info,planner);
            end
            if ~isempty(velcmds)
                validTimeStamp = tstamps + scenario.CurrentTime;
            end
            [hndl1,hndl2] = exampleHelperPlotPath(ax,teb.ReferencePath,currentPath);
        end
         %---- STEP 7 ----%
        % Check if the robot needs to be rotated by 180 degrees at the same
        % position
        if rotateRobotInPlace(waypointIdx)
            goalPose = robotWaypoints(waypointIdx+1,:);
            [velcmds,tstamps,isRotated] = exampleHelperRotateRobot(currentPose,goalPose,teb.MaxVelocity);
            if isRotated
                robotTaskInProgress = false;
            end
            validTimeStamp = tstamps + scenario.CurrentTime;
        end
        %---- STEP 8 ----%
        %---Compute next pose and velocity for the robot---%
        velcmd = velocityCommand(velcmds,validTimeStamp,scenario.CurrentTime);
        timeStep = 1/updateRate;
        [currentPose,currentVel] = exampleHelperGetRobotCurrentPose(robotKinematics,currentPose,velcmd,timeStep);

        %---Display the scenario with updated robot position---%
        show3D(scenario,FastUpdate=true,Parent=ax);
        legend([hndl1,hndl2],"Reference Path","Controller Output",Location="North")
        % Refresh all plot data and visualize
        refreshdata
        drawnow limitrate
        %---- STEP 9 ----%
        %---Move robot platform in the scenario to the next pose---%
        move(robot,"base",[currentPose(1),currentPose(2),0, ...
            zeros(1,6),eul2quat([currentPose(3),0,0]), ...
            zeros(1,3)]);

        %--- Advance scenario simulation time---%
        advance(scenario);
        % Update all sensors in the scenario
        updateSensors(scenario);
    end
    if waypointIdx == numMotionSeq
        continueSimulation = false;
    end
    waypointIdx = waypointIdx + 1;
end

See Also
controllerTEB | robotScenario (Robotics System Toolbox) | loadrobot (Robotics System Toolbox) | robotPlatform (Robotics System Toolbox) | robotSensor (Robotics System Toolbox) | robotLidarPointCloudGenerator (Robotics System Toolbox) | binaryOccupancyMap | validatorOccupancyMap | plannerHybridAStar | occupancyMap | show3D (Robotics System Toolbox)
