Control a Simulated UAV Using ROS 2 and PX4 Bridge
This example demonstrates how to receive sensor readings and autopilot status from a simulated UAV with PX4® autopilot, and send control commands to navigate the simulated UAV.
Set Up Simulation Environment
To run this example, you are required to:
Generate and register custom messages for px4_msgs package in MATLAB®. The 'custom.zip' file contains the required custom messages. Make sure the message definitions in the
px4_msgspackage must be compatible with the ROS 2 version used. This example is tested with PX4 v1.14 in ROS 2 Jazzy Jalisco. For other compatible versions, see ROS 2 Message Definitions for PX4. You can add this to an existing custom message folder and regenerate it, or generate them in this example folder. Run the following command to generate the custom message, this can take some time, as there are a large number of messages to generate.
unzip("custom.zip")
ros2genmsg("custom")
Set up Docker® in your host environment and create a Docker image. For more information on how to configure Docker, see Install and Set Up Docker for ROS, ROS 2, and Gazebo.
Start Docker Container
With the prerequisites set up and the Docker image created, the first step is to launch an instance of Docker container.
To start a Docker container, run the following command in WSL/Linux®/Mac terminal:
$ docker run -it --net=host -v /dev/shm:/dev/shm --name ros2_px4 <image-name>
Here, 'ros2_px4' is the name of the Docker container.
and replace the <image-name> with the name of the Docker image created in the prerequisite section.
Start PX4 and Gazebo Simulator
Once the container is running, the next step is to start the PX4 and Gazebo simulator inside the Docker container.
Open a terminal within the Docker container by executing the following command in the WSL/Linux/Mac terminal:
$ docker exec -it ros2_px4 /bin/bash
Here, 'ros2_px4' is the name of Docker container.
In the Docker container terminal, launch the PX4 and Gazebo by running the following command:
$ source start-px4-sitl.sh
To view the Gazebo world, open a web browser on your host machine and connect to the URL <docker-ip-address>:8080. If Docker is running on your host machine, you can simply use localhost:8080. You can now visualize and interact with the Gazebo world directly in your web browser.

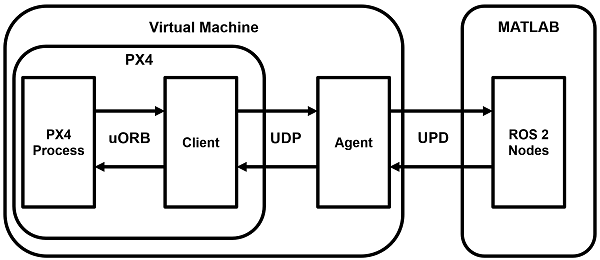
This also brings up the Agent half of the microRTPS bridge. The Client half of the communication is included in the PX4 Autopilot packages, and launches with the simulator.
You can enter PX4 commands on the another Docker terminal corresponding to the Gazebo simulation, but that is not required for this example.
Set Up ROS 2 Network
Launch MATLAB on your host machine and view the available topics that are broadcast by the bridge Agent. Notice the convention it uses to indicate the topics it is publishes to (out) and those it is subscribing to (in).
ros2 topic list
/fmu/in/actuator_motors
/fmu/in/actuator_servos
/fmu/in/arming_check_reply
/fmu/in/aux_global_position
/fmu/in/config_control_setpoints
/fmu/in/config_overrides_request
/fmu/in/distance_sensor
/fmu/in/goto_setpoint
/fmu/in/manual_control_input
/fmu/in/message_format_request
/fmu/in/mode_completed
/fmu/in/obstacle_distance
/fmu/in/offboard_control_mode
/fmu/in/onboard_computer_status
/fmu/in/register_ext_component_request
/fmu/in/sensor_optical_flow
/fmu/in/telemetry_status
/fmu/in/trajectory_setpoint
/fmu/in/unregister_ext_component
/fmu/in/vehicle_attitude_setpoint
/fmu/in/vehicle_command
/fmu/in/vehicle_command_mode_executor
/fmu/in/vehicle_mocap_odometry
/fmu/in/vehicle_rates_setpoint
/fmu/in/vehicle_thrust_setpoint
/fmu/in/vehicle_torque_setpoint
/fmu/in/vehicle_trajectory_bezier
/fmu/in/vehicle_trajectory_waypoint
/fmu/in/vehicle_visual_odometry
/fmu/out/battery_status
/fmu/out/estimator_status_flags
/fmu/out/failsafe_flags
/fmu/out/manual_control_setpoint
/fmu/out/position_setpoint_triplet
/fmu/out/sensor_combined
/fmu/out/timesync_status
/fmu/out/vehicle_attitude
/fmu/out/vehicle_control_mode
/fmu/out/vehicle_global_position
/fmu/out/vehicle_gps_position
/fmu/out/vehicle_land_detected
/fmu/out/vehicle_local_position
/fmu/out/vehicle_odometry
/fmu/out/vehicle_status
/parameter_events
/rosout
Create a node to handle the sensor input and control feedback for the UAV. Create subscribers for sensors and information of interest, and publishers to direct the UAV in offboard control mode.
node = ros2node("/control_node");

% General information about the UAV system
controlModePub = ros2publisher(node,"fmu/in/offboard_control_mode","px4_msgs/OffboardControlMode");
statusSub = ros2subscriber(node,"/fmu/out/vehicle_status","px4_msgs/VehicleStatus","Reliability","besteffort");
timeSub = ros2subscriber(node,"/fmu/out/timesync_status","px4_msgs/TimesyncStatus","Reliability","besteffort");

% Sensor and control communication
odomSub = ros2subscriber(node,"/fmu/out/vehicle_odometry","px4_msgs/VehicleOdometry","Reliability","besteffort");
setpointPub = ros2publisher(node,"fmu/in/trajectory_setpoint","px4_msgs/TrajectorySetpoint");
cmdPub = ros2publisher(node,"/fmu/in/vehicle_command","px4_msgs/VehicleCommand");
Get the system and component IDs from the UAV status. These help direct the commands to the UAV. This also ensures the UAV is up and running before moving into the control phase.
timeLimit = 5;
statusMsg = receive(statusSub,timeLimit);
receive(odomSub,timeLimit);
receive(timeSub,timeLimit);
Test MATLAB Communication with Gazebo instance
Use the previously created publisher and subscriber to instruct the UAV to take off, fly to a new point, and then land. To perform offboard control, the UAV requires control messages to be flowing regularly (at least 2 Hz). Starting the control messages before engaging offboard mode is the easiest way to achieve this.
% Start flow of control messages
tStart = tic;
xyz = uint16([0 0 -1]); % NED coordinates - negative Z is higher altitude
while toc(tStart) < 1
    publishOffboardControlMode(timeSub,controlModePub,"position")
    publishTrajectorySetpoint(timeSub,setpointPub,xyz)
    pause(0.1)
end

% Instruct the UAV to accept offboard commands
% Arm the UAV so it allows flying
engageOffboardMode(timeSub,cmdPub)
arm(timeSub,cmdPub)

% Navigate to a nearby location and hover there
while toc(tStart) < 21
    publishOffboardControlMode(timeSub,controlModePub,"position")
    publishTrajectorySetpoint(timeSub,setpointPub,xyz)
    pause(0.1)
end

% Land once complete
land(timeSub,cmdPub)
Control UAV from Simulink
You can also control the UAV using the Simulink® model ControlUAVUsingROS2. The Simulink model includes four main subsystems: Arm, Offboard, Takeoff, and Waypoint following with obstacle avoidance.
open_system("ControlUAVUsingROS2.slx");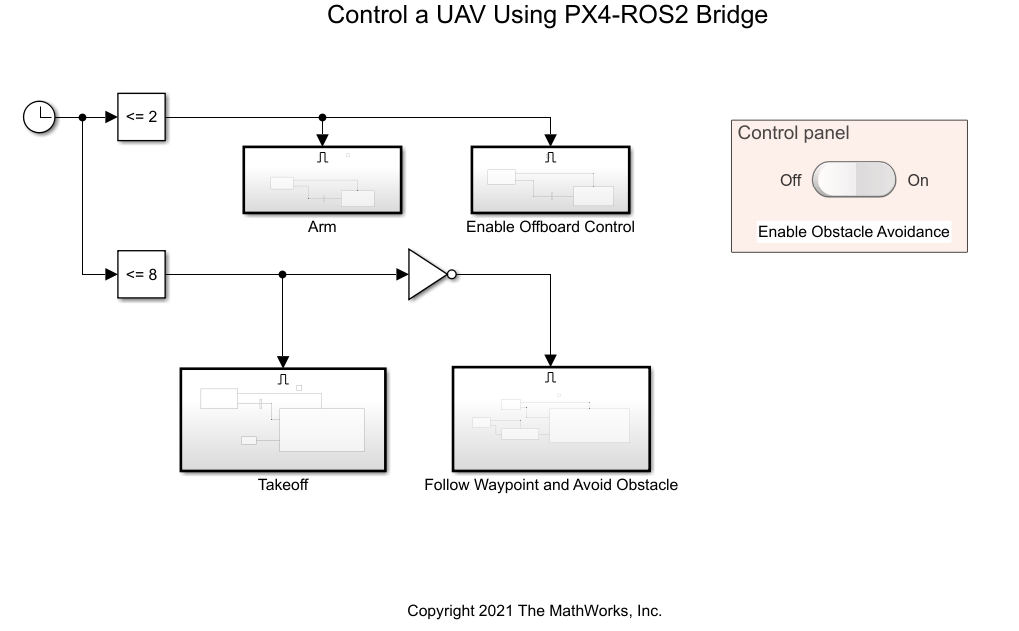
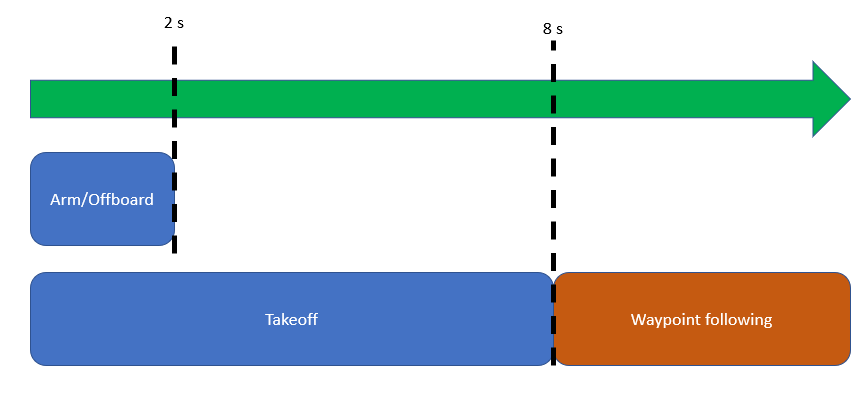
A Clock block triggers different UAV activity according to the simulation time. The model arms and enables the offboard control mode on the PX4 autopilot for the first 2 seconds. It sends out a takeoff command to bring the UAV to 1 meter above the ground for the first 8 seconds, then it engages in waypoint-following behavior.
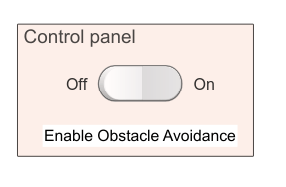
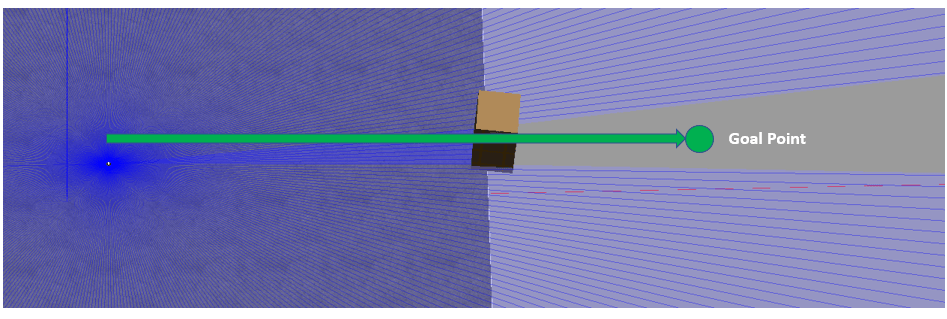
You can use the control panel to enable or disable the obstacle avoidance behavior.
If obstacle avoidance is turned off, the UAV flies towards the goal point behind the obstacle box on a straight path, resulting in a collision. If obstacle avoidance is turned on, the UAV tries to fly above the obstacle based on the lidar sensor readings.
Once you start a fresh PX4-SITL and Gazebo instance in the Docker, you can run the model and observe the flight behavior of the UAV.
Helper Functions
function arm(timeSub,cmdPub)
% Allow UAV flight
    cmdMsg = ros2message(cmdPub);
    cmdMsg.command = uint32(cmdMsg.VEHICLE_CMD_COMPONENT_ARM_DISARM);
    cmdMsg.param1 = single(1);
    publishVehicleCommand(timeSub,cmdPub,cmdMsg)
end

function land(timeSub,cmdPub)
% Land the UAV
    cmdMsg = ros2message(cmdPub);
    cmdMsg.command = uint32(cmdMsg.VEHICLE_CMD_NAV_LAND);
    publishVehicleCommand(timeSub,cmdPub,cmdMsg)
end

function engageOffboardMode(timeSub,cmdPub)
% Allow offboard control messages to be utilized
    cmdMsg = ros2message(cmdPub);
    cmdMsg.command = uint32(cmdMsg.VEHICLE_CMD_DO_SET_MODE);
    cmdMsg.param1 = single(1);
    cmdMsg.param2 = single(6);
    publishVehicleCommand(timeSub,cmdPub,cmdMsg)
end

function publishOffboardControlMode(timeSub,controlModePub,controlType)
% Set the type of offboard control to be used
% controlType must match the field name in the OffboardControlMode message
    modeMsg = ros2message(controlModePub);
    modeMsg.timestamp = timeSub.LatestMessage.timestamp;
    % Initially set all to false
    modeMsg.position = false;
    modeMsg.velocity = false;
    modeMsg.acceleration = false;
    modeMsg.attitude = false;
    modeMsg.body_rate = false;
    % Override desired control mode to true
    modeMsg.(controlType) = true;
    send(controlModePub,modeMsg)
end

function publishTrajectorySetpoint(timeSub,setpointPub, xyz)

    setpointMsg = ros2message(setpointPub);
    setpointMsg.timestamp = timeSub.LatestMessage.timestamp;
    setpointMsg.x = single(xyz(1));
    setpointMsg.y = single(xyz(2));
    setpointMsg.z = single(xyz(3));
    send(setpointPub,setpointMsg)
end

function publishVehicleCommand(timeSub,cmdPub,cmdMsg)
    cmdMsg.timestamp = timeSub.LatestMessage.timestamp;
    cmdMsg.target_system = uint8(1);
    cmdMsg.target_component = uint8(1);
    cmdMsg.source_system = uint8(1);
    cmdMsg.source_component = uint16(1);
    cmdMsg.from_external = true;
    send(cmdPub,cmdMsg)
end