在 MATLAB 和 Simscape 中构建电池模组的简单模型
此示例说明了如何在 Simscape™ Battery™ 中创建和构建电池模组的 Simscape™ 系统模型。电池模组是用于电动自行车应用的 48 V 电池。要创建电池模组的系统模型,必须先创建构成电池模组的 Cell 和 ParallelAssembly 对象,然后使用 buildBattery 函数。
下图显示了以自下而上的方式创建电池模组对象的整个过程:
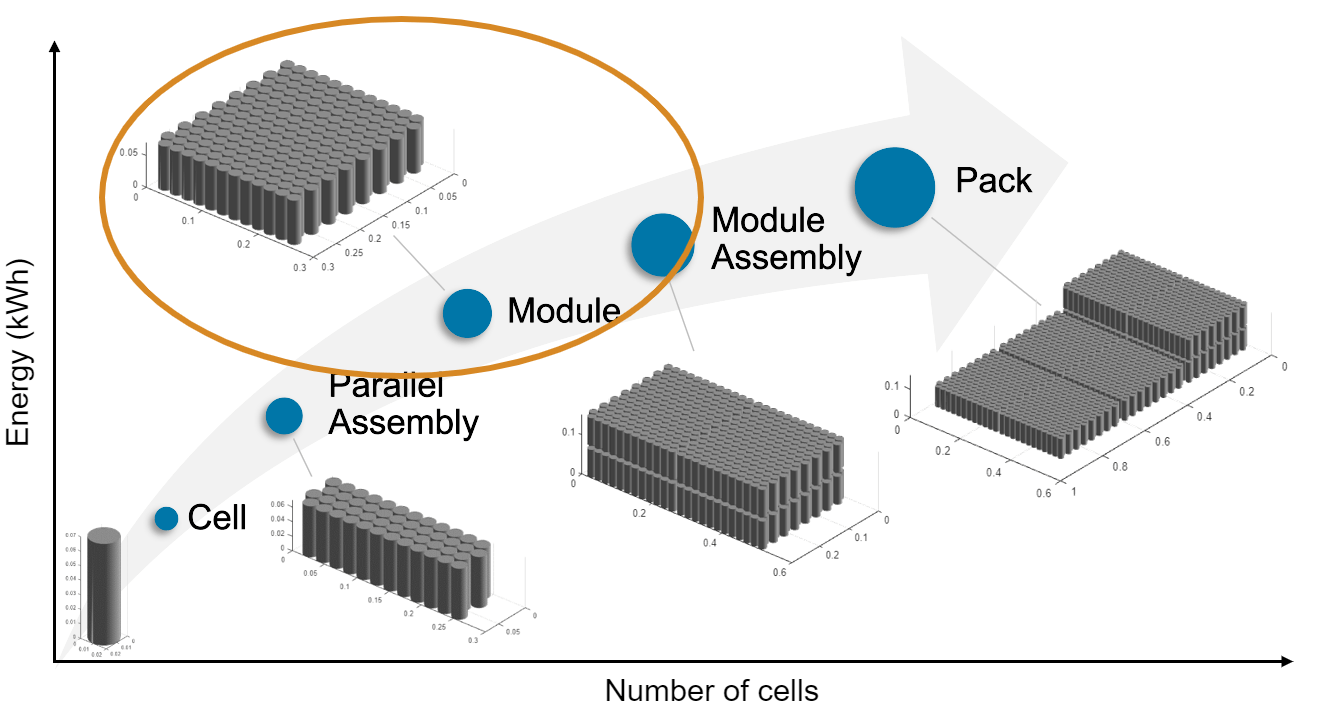
电池模组由多个并联组件组成。这些并联组件又由许多电池电芯组成,这些电池电芯在特定的拓扑结构或几何排列下并联连接。
创建电池模组对象后,buildBattery 函数会在工作文件夹中创建一个库,该库包含电池模组的系统模型模块。您可以在仿真中将此系统模型用作参考。这些模型的运行时间参数(如电池电芯阻抗或电池开路电压)在模型创建后定义,因此不包含在电池包构建器类中。要定义运行时参数,您可以在生成的 Simscape 模型模块封装中指定这些参数,或使用 MaskParameters 函数的 buildBattery 参量。
在 MATLAB 中创建电池 Module 对象
本节介绍如何通过编程方式从 MATLAB® 命令行窗口生成电池 Module 对象。
创建 Cell 对象
要创建电池 Module 对象,首先创建一个圆柱形的 Cell 对象。通过 CylindricalGeometry 对象,可以定义电池电芯的圆柱形几何排列。要创建 CylindricalGeometry 对象,请使用 batteryCylindricalGeometry 函数,将电芯高度作为第一个参量,将半径作为第二个参量。
cylindricalGeometry = batteryCylindricalGeometry(simscape.Value(0.07,"m"),...
    simscape.Value(0.0105,"m"));
有关电池电芯可能的几何排列的更多信息,请参阅 PouchGeometry 和 PrismaticGeometry 文档页。
现在,使用此 CylindricalGeometry 对象创建一个圆柱形电池电芯。
cylindricalCell = batteryCell(cylindricalGeometry)
cylindricalCell =
  Cell with properties:

            Geometry: [1×1 simscape.battery.builder.CylindricalGeometry]
    CellModelOptions: [1×1 simscape.battery.builder.CellModelBlock]
                Mass: 0.1000 (kg)
            Capacity: 5 (A*hr)
              Energy: 50 (W*hr)

Show all properties
有关更多信息,请参阅Cell文档页。
Cell 对象允许您使用简单的一维模型仿真电池电芯的热效应。要仿真电池电芯的热效应,请在 BlockParameters 对象的 CellModelOptions 属性的 Cell 属性中,将 thermal_port 参数设置为 "model"。
cylindricalCell.CellModelOptions.BlockParameters.thermal_port = "model";创建 ParallelAssembly 对象
并联组件包括多个电池电芯,这些电池电芯在特定的拓扑配置或几何排列下电连接成并联。在本示例中,您将创建一个并联组件,它由四个圆柱形电芯以正方形拓扑结构分四排堆叠而成。
要创建 ParallelAssembly 对象,请使用 batteryParallelAssembly 函数。将 Cell 对象定义为第一个参量,并将并联电芯数定义为第二个参量。要指定附加并联组件属性,请使用名称-值参量 Rows 和 Topology。
parallelAssembly = batteryParallelAssembly(cylindricalCell,...
    4, ...
    Rows=4, ...
    Topology="Square", ...
    ModelResolution="Detailed");
有关更多信息,请参阅ParallelAssembly文档页。
创建 Module 对象
现在,您已经拥有创建电池模组的所有基本元素。电池模组由多个串联的并联组件组成。在此示例中,您将创建一个由 13 个并联组件组成的电池模组,每个组件之间的间隙为 0.005 米。您还可以定义模组的模型分辨率,并添加环境热边界条件。
要创建 Module 对象,请使用 batteryModule 函数。将 ParallelAssembly 对象定义为第一个参量,并将串联的并联组件数定义为第二个参量。要指定附加模组属性,请使用名称-值参量 InterParallelAssemblyGap、ModelResolution 和 AmbientThermalPath。
module = batteryModule(parallelAssembly,...
    13, ...
    InterParallelAssemblyGap=simscape.Value(0.005,"m"), ...
    ModelResolution="Detailed", ...
    AmbientThermalPath="CellBasedThermalResistance")
module =
  Module with properties:

    NumSeriesAssemblies: 13
       ParallelAssembly: [1×1 simscape.battery.builder.ParallelAssembly]
        ModelResolution: "Detailed"
         SeriesGrouping: [1 1 1 1 1 1 1 1 1 1 1 1 1]
       ParallelGrouping: [4 4 4 4 4 4 4 4 4 4 4 4 4]

Show all properties
有关更多信息,请参阅Module文档页。
可视化电池模组并检查模型分辨率
要获得用于包仿真使用的 Simscape Battery(Table-based) 模块的数量,请使用 NumModels 对象的 Module 属性。
disp(module.NumModels);
52
要在构建系统模型之前可视化电池模组并查看其模型分辨率,请使用 BatteryChart 对象。在您想要可视化电池模组的位置创建图形。
f = figure(Color="w",Position=[0 0 1000 500]);
tl = tiledlayout(1,2,Parent=f,TileSpacing="Compact",Padding="tight");
然后使用 batteryChart 函数可视化电池模组。要查看模组的模型分辨率,请将名称-值参量 SimulationStrategyVisible 定义为 "On"。
nexttile(tl)
moduleChart1 = batteryChart(tl,module);
nexttile(tl)
moduleChart2 = batteryChart(tl,module,SimulationStrategyVisible="On");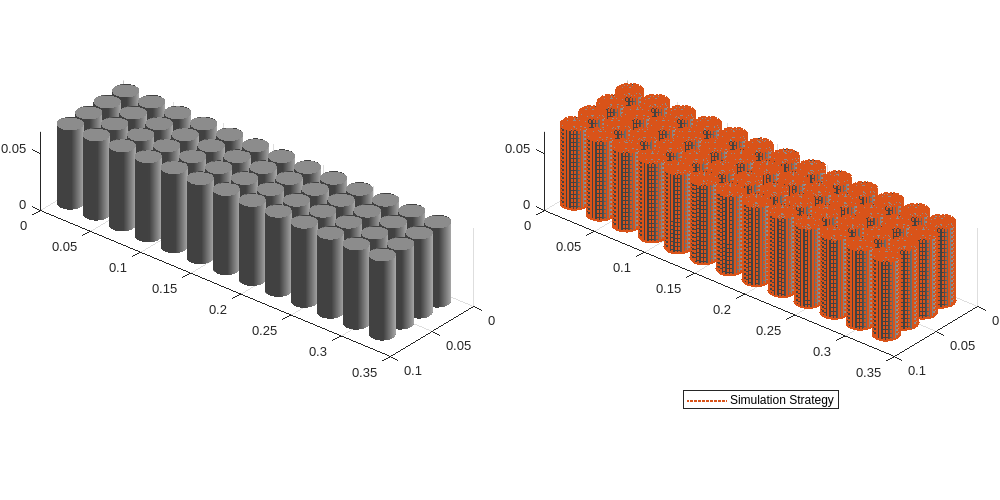
有关更多信息,请参阅batteryChart文档页。
为电池模组对象构建 Simscape 模型
创建电池对象后,需要将其转换为 Simscape 模型,以便在模块图中使用。然后,您可以将这些模型作为参考,用于系统集成和需求评估、冷却系统设计、控制策略开发、硬件在环等许多应用。
要创建一个包含此示例中 Module 对象的 Simscape Battery 模型的库,请使用 buildBattery 函数。
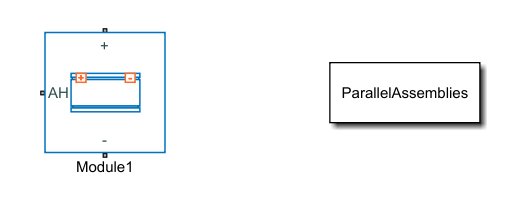
buildBattery(module,LibraryName="moduleLibrary",Verbose="off");
此函数在工作目录中创建一个名为 moduleLibrary_lib 的库。该库包含 Module 和 ParallelAssembly 对象的 Simscape 模型。
要构建电池包模型,请参阅 在 MATLAB 和 Simscape 中构建电池包的简单模型 示例。
在电池构建器中探索电池模组并构建模型
在此示例中,您通过在 MATLAB 命令行窗口中调用相关对象和函数,以编程方式创建了电池模组及其所有子组件。另外,如果您喜欢互动性和可视化性更强的方法,也可以使用 电池构建器。使用此 App,您可以交互式地导入现有的电池对象或从头构建电池对象,探索和编辑属性,以及查看电池层次结构和三维可视化。然后,您就可以构建对象的 Simscape 系统模型,并将其用作仿真中的参考。您还可以导出工作区中的对象。要了解如何使用电池构建器生成电池对象和构建 Simscape 模型,请参阅 电池构建器快速入门 示例。
探索您在本例中创建的电池模组。打开电池构建器。在 App 选项卡的 Simscape 下,点击“电池构建器”图标。您也可以从命令行打开该 App:
batteryBuilder
从 moduleLibrary MAT 文件中导入电池模组对象。在电池构建器选项卡下,在工具条的导入部分中,点击导入。然后点击从 MAT 文件导入,并加载 moduleLibrary MAT 文件。
电池构建器现在由一个 Module 对象及其每个子组件组成。
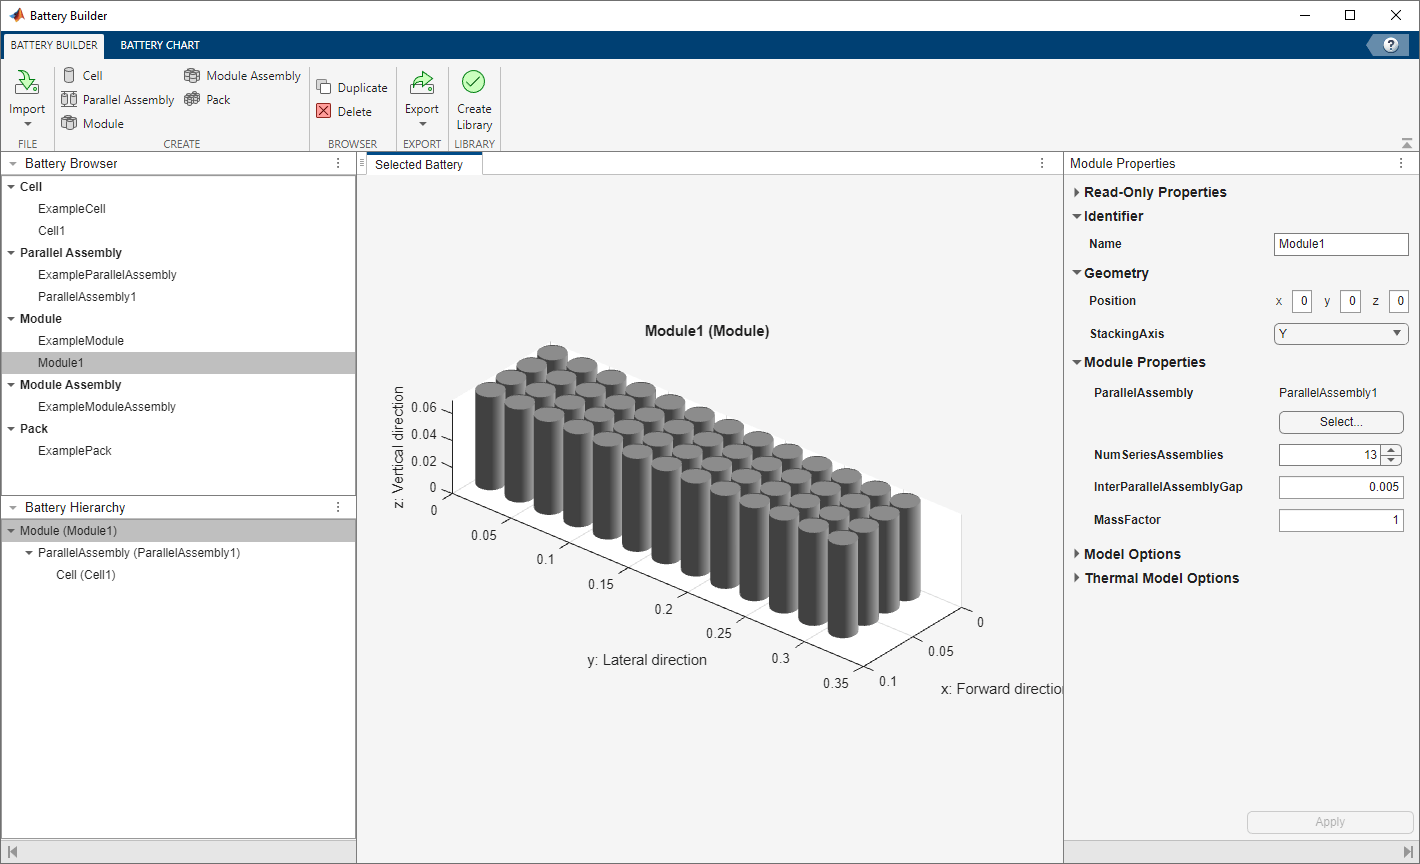
应用左侧的电池浏览器面板包含应用当前活动会话中的所有电池对象。您可以选择一个对象,在已选电池选项卡中将其可视化,在电池层次结构面板中检查其层次结构和子对象,并在 App 右侧的属性面板中编辑其属性。
您可以在电池图选项卡下编辑图的属性,如坐标轴标签、坐标轴方向、图的标题和灯光。您还可以检查所选电池对象的当前仿真策略和模型分辨率。要在图中可视化仿真策略,请在工具条的仿真策略部分选中可见框。
最后,如果您修改了电池对象,并希望创建更新后的 Module 对象的库模型,请在工具条的电池构建器选项卡下的库部分中,点击创建库。在新窗口中,指定要保存库的文件夹、库名称,以及是否使用数字值或变量名称作为封装参数和封装初始目标。

点击创建库,在指定文件夹中生成电池对象的更新库模型。打开此模型,即可访问电池对象(作为 Simscape 模块),您可以在早期开发阶段、软件和硬件开发、系统集成和需求评估、冷却系统设计、控制策略开发、硬件在环等许多应用中,将其作为架构评估的起点。