Main Content

Bumpless Control Transfer Between Manual and PID Control

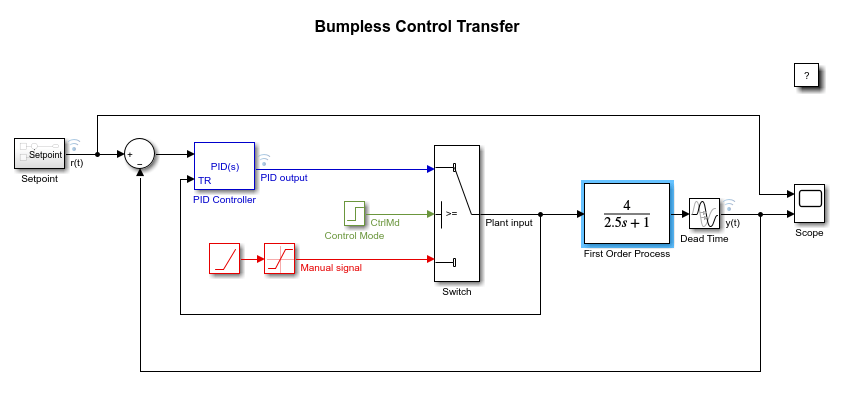
This example shows how to achieve bumpless control transfer when switching from manual control to proportional integral derivative (PID) control. The model uses the PID Controller block in Simulink® to control a first-order process with dead-time.

open_system('sldemo_bumpless');

The PID Controller is tuned with saturation ignored using the PID tuner available with Simulink® Control Design™.

The controlled plant is a first-order process with dead-time given by the equation

P(s)=42.5s+1e-s.

The example starts with open-loop control, specified by a saturated ramp signal, Manual signal. The open-loop control signal, Manual signal, is input to the plant block, First Order Process. The plant block output is a desired steady-state value of 40.

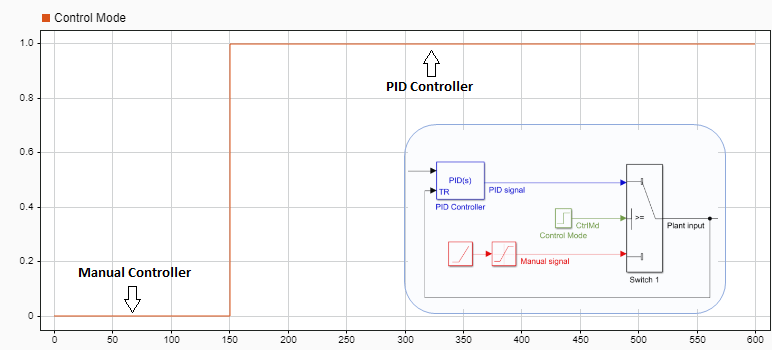
The example implements a control transfer at t = 150.

This transition between open-loop control and closed-loop control involves two control phases.

  • Manual — Saturated ramp signal input to the plant block during start-up until t = 150 (Control mode = 0).

  • Automatic — PID control after t = 150 (Control mode = 1) and must take over the process without introducing bumps at the plant input.

The transition should not introduce bumps in the control signal during the transfer from manual to automatic control.

Configure PID Controller

To support the smooth control transition, the PID Controller block supports two operating modes: tracking and control.

In control mode, the PID Controller block operates as an ordinary PID controller. In tracking mode, the block has an extra input that allows the PID block to adjust its internal state by changing its integrator output. The change allows the block output to track another signal input.

To achieve bumpless control transfer, the PID Controller block must be in:

  • Tracking mode when the plant is in manual control (open-loop)

  • Control mode when the plant is in the automatic control (closed-loop PID control)

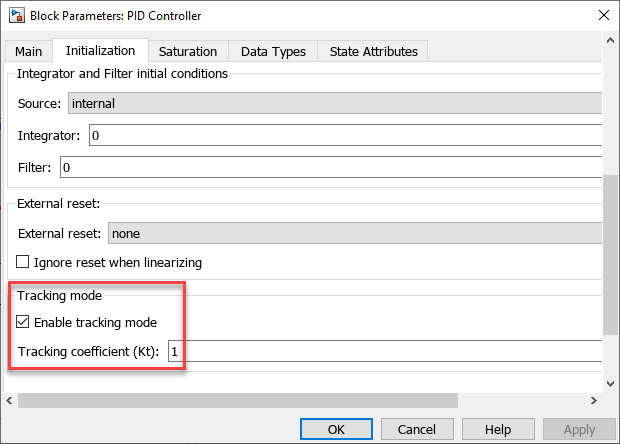
To activate signal tracking, in the Block Parameters dialog box, on the Initialization tab, select Enable tracking mode and specify the Tracking coefficient (Kt). This value is the gain. The inverse of this gain is the time constant of the tracking loop. For more information on how to choose the gain, see [1].

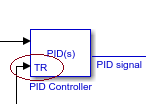
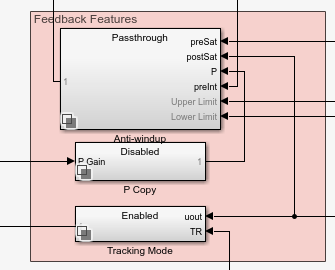
Once tracking mode is enabled, the block has a second input port, TR.

Untitled.png

To look under the mask for the PID Controller block and see how the TR port functions, use this command.

open_system('sldemo_bumpless/PID Controller','force');
Set Up Switch Mechanism

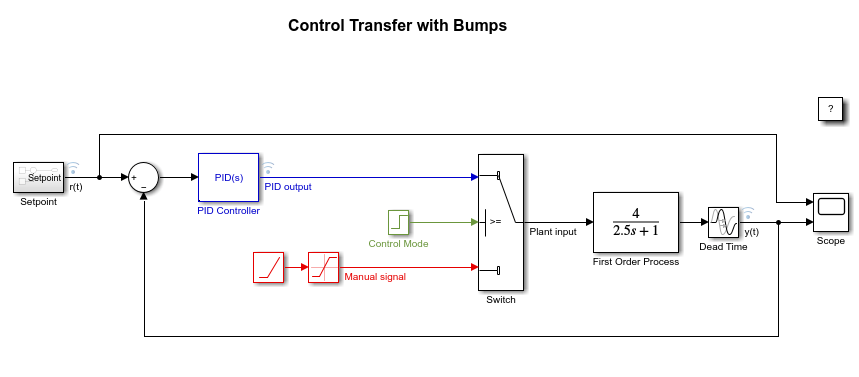
In addition to enabling tracking mode for the PID Controller block, the model uses a Switch block to implement control transfer. The Switch block determines which signal to input to the plant and the PID Controller block tracking port, TR.

At time t = 0, the Switch block sends the manual control signal to the plant input and the PID Controller block tracking port. This allows the output of the PID Controller block to track the manual control signal during the manual phase by adjusting the PID Controller integration. When control transfer occurs, therefore, the PID Controller output is approximately the same as the manual control signal.

At time t = 150, the Switch block switches, directing the PID Controller block output to the plant and the PID Controller block tracking port. The PID Controller block tracks its own output.

Untitled.png

To close the model, use these commands.

close_system('sldemo_bumpless/PID Controller');
close_system('sldemo_bumpless');

Simulate with Tracking Mode On

Simulate the bumpless control transfer. In this case, tracking mode is on.

open_system('sldemo_bumpless');
sim('sldemo_bumpless');

A plot of the Setpoint signal and system response shows that the Output signal tracks the Setpoint profile without any output bumps when control transfers from manual to automatic at t=150.

clf;
plot(logsoutBumpless{1}.Values);
grid on;
hold on; %draw on top of previous plot
plot(logsoutBumpless{3}.Values);

title('Comparison of Setpoint vs Measured Output: Tracking Mode on'); %add title to plot
xticks(0:50:600); % set x-axis ticks
ylim([0 50]); % set min and max of y-axis values
legend('Output y(t) ','Setpoint r(t)'); %specify legend
xline( 150, ':','HandleVisibility','off'); %draw a vertical line at 150s

hold off;
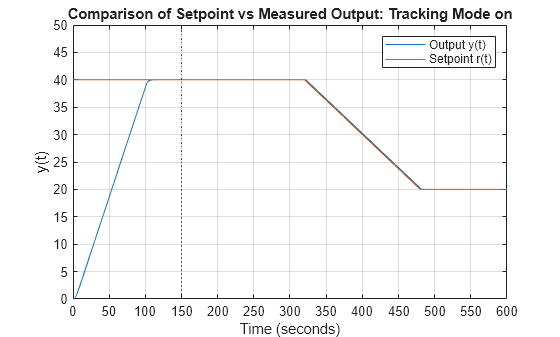
Figure contains an axes object. The axes object with title Comparison of Setpoint vs Measured Output: Tracking Mode on, xlabel Time (seconds), ylabel y(t) contains 2 objects of type line. These objects represent Output y(t), Setpoint r(t).

Simulate with Tracking Mode Off

In model sldemo_bumplessno, tracking mode is disabled. The PID Controller block does not have a tracking input port.

close_system('sldemo_bumpless');
open_system('sldemo_bumplessno');
sim('sldemo_bumplessno');
A plot of the Setpoint signal and the system response shows that the Output signal has a large transient response when control switches from manual to automatic at t=150.

%Plot Results
clf;
plot(logsoutBumplessNo{1}.Values);
grid on; 
hold on; 
plot(logsoutBumplessNo{3}.Values);

title('Comparison of Setpoint vs Measured Output: Tracking Mode off');
xticks(0:50:600);
ylim([0 600]);
legend('Output y(t) ','Setpoint r(t)');
xline( 150, ':','HandleVisibility','off' );
hold off;
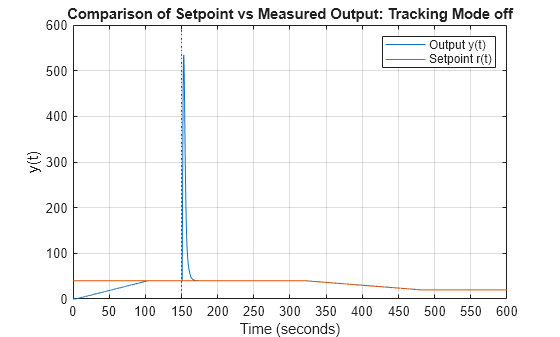
Figure contains an axes object. The axes object with title Comparison of Setpoint vs Measured Output: Tracking Mode off, xlabel Time (seconds), ylabel y(t) contains 2 objects of type line. These objects represent Output y(t), Setpoint r(t).

Compare Measured Outputs with Tracking Mode On and Off

The plot below shows that control transition from manual to automatic is smoother when tracking mode is on.

clf;
plot(logsoutBumplessNo{3}.Values(1),'r');
grid on; 
hold on;
plot(logsoutBumplessNo{1}.Values(1),'b');
plot(logsoutBumpless{1}.Values(1),'g');

title('Comparison of Measured Outputs ');
xticks(0:50:600);
ylim([0 600]);
legend('Setpoint r(t)','Output y(t), Tracking Mode:off', 'Output y(t), Tracking Mode:on');
yl= ylim;
patch([125 125 200 200],[yl(1) yl(2) yl(2) yl(1)],'k',...
    'facecolor',[0.4660 0.6740 0.5880],'edgecolor','none', ...
    'facealpha',0.1, 'HandleVisibility','off') ; % draw transparent polygon to highlight a section of plot
hold off;
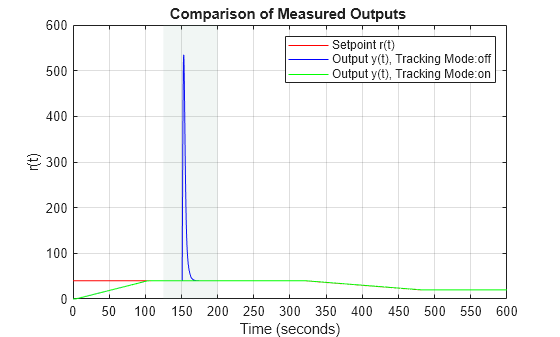
Figure contains an axes object. The axes object with title Comparison of Measured Outputs, xlabel Time (seconds), ylabel r(t) contains 3 objects of type line. These objects represent Setpoint r(t), Output y(t), Tracking Mode:off, Output y(t), Tracking Mode:on.

For bumpless control with the PID Controller block, enable tracking.

References

[1] Åström, Karl J., and Tore Hägglund. Advanced PID Control. Research Triangle Park, NC: International Society of Automation, 2006.

See Also

Related Topics