Deploying a Simulation App with Simulink Compiler
In this example, we use an app that is prepared in the App Designer and deploy it with Simulink® Compiler™.
Open and Explore Model
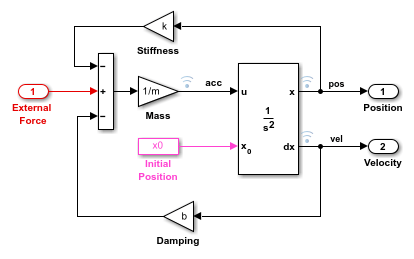
In this example, we use the model of a mass spring damper system. The mass-spring-damper model consists of discrete mass nodes distributed throughout an object and interconnected via a network of springs and dampers. This model is well-suited for modeling object with complex material properties such as non-linearity and elasticity. In this example we use the mass spring damper system. The system is parameterized by mass (m), spring stiffness (k), damping (b) and the initial position (x0). The input to the system is the applied force.
To explore this model with different values of the tunable parameters, create the following model workspace variables:
Mass - m.
Spring stiffness - k.
Damping - b.
Initial position - x0.
open_system('MassSpringDamperModel');

Create the App in App Designer
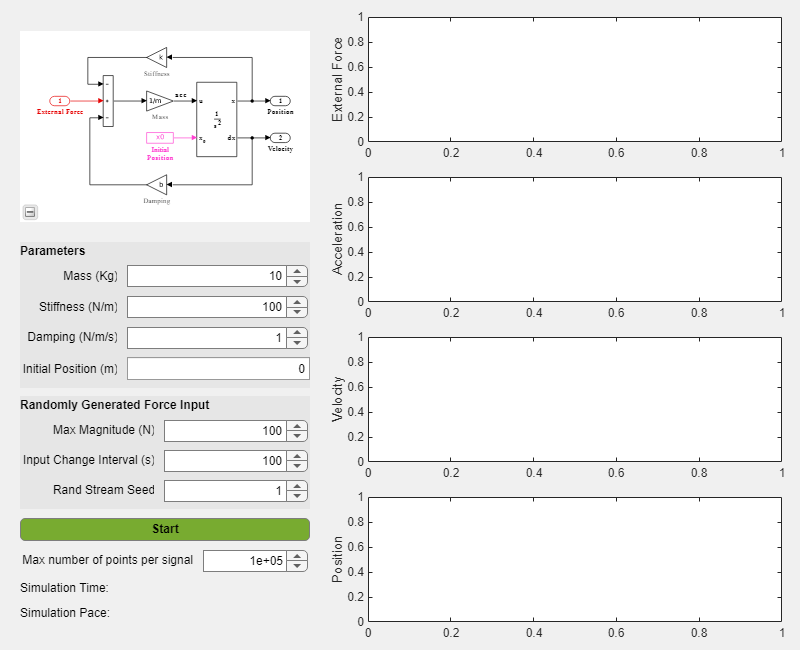
Use the MATLAB App Designer to create an app to simulate the model with different parameter values and input signals. To learn more about how to create an app using the App Designer, see Create and Run a Simple App Using App Designer Use the MassSpringDamperApp.mlapp file to use the app.
MassSpringDamperApp

App Details
The main part for the app is the simulate button callback function. It has the following salient parts: setup the SimulationInput object, configure it for deployment, simulate, and plot the simulation results.
The functionality of the application to change and experiment with the tunable parameters is defined in the callback function SimulateButtonPushed. This callback function enables you to change, experiment and analyze different simulations by modifying the values in the app designer.
Callback Functions
This section explains the code written to create the app, MassSpringDamperApp. The code for the MassSpringDamperApp uses many callback functions. You can inspect the code by opening the MassSpringDamperApp,mlapp file in the App Designer. The createSimulationInput and modifyParameterDuringSim functions help set the values while also updating the simulation values in the app. We use the Simulink.SimulationInput object to set the variables to the model and use these variables to change the values and analyze the model.
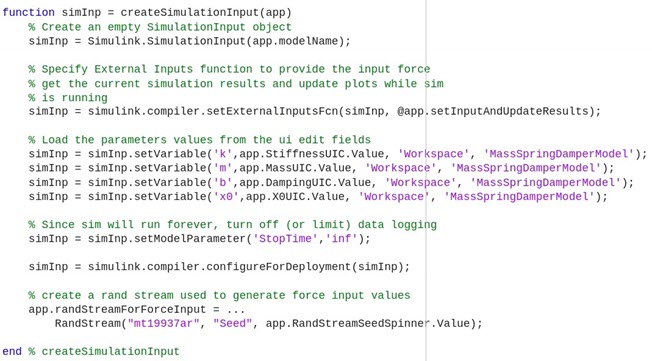
Create the Simulink.SimulationInput Object in the createSimulationInput Function
In the following function, create a SimulationInput object, SimInp for the model MassSpringDamperModel. Use the setVariable method on the SimulationInput object to load the parameter values into the variables k, m, b, and x0. Now that we have assigned all the values to the variables and set the input signal, the Simulink.SimulationInput object is required to be configured for deployment. Use the simulink.compiler.configureForDeployment function of Simulink Compiler. This function handles all the settings required for the script to be compatible for deployment by setting the simulation mode to rapid accelerator, and by setting the parameter RapidAcceleratorUpToDateCheck to off.

Modify Parameters During Simulation
To allow modification of the parameters during the simulation, use the
function |modifyParameterDuringSim|. This function gets the current
simulation status and then if the simulation is running or paused,
enables you to modify the values for the simulation.

Simulate and Plot the Results
Use the configured Simulink.SimulationInput object to run the simulation with the designed app. The addPoints function plots and traces the simulation results as the app is running.

Test Out the Application in App Designer
Before deploying the application, ensure that the app runs in the App Designer. Click the Simulate button on the app to verify that the application works by simulating the model for different values.
Compile Script for Deployment
To compile the app, use the mcc command, followed by the script name.
mcc -m MassSpringDamperApp.mlapp