Main Content

Author Requirements in MATLAB or Simulink

In Requirements Toolbox™, you organize your requirements in groups called requirement sets. In each requirement set, you can create additional levels of hierarchy if you need to further describe a requirement's details.

In this tutorial, you use the Requirements Editor to create a requirement set, organize related requirements, and add requirements to the set. If you have Simulink®, you can also use the Requirements Perspective to author requirements without leaving the Simulink Editor. For more information about using the Requirements Perspective, see View and Link Requirements in Simulink.

Suppose that you are writing requirements for a controller model of an automobile cruise control system. You develop these requirements using your company’s numbering standard (R1, R2, and so on).

ID and DescriptionRationale
R1: The maximum input throttle is 100%The maximum value of the throttle from the acceleration pedal can be no greater than 100%.
R2: Cruise control has a speed operation rangeCruise control has a minimum and maximum operating speed.
R2.1: The vehicle speed must be at least 40 km/hThe speed of the vehicle must be at least 40 km/h for the cruise control system to engage.
R2.2: The vehicle speed cannot be greater than 100 km/hThe maximum operational speed of the cruise control system for the vehicle is 100 km/h.

These requirements capture functionality modeled in a model called crs_controller.

  1. Open the CruiseRequirementsExample project that includes the model and supporting files. At the MATLAB® command prompt, enter:

    openExample("slrequirements/CruiseRequirementsExample")
  2. Open the requirement set crs_req in the Requirements Editor. At the command prompt, enter:

    slreq.open("crs_req")
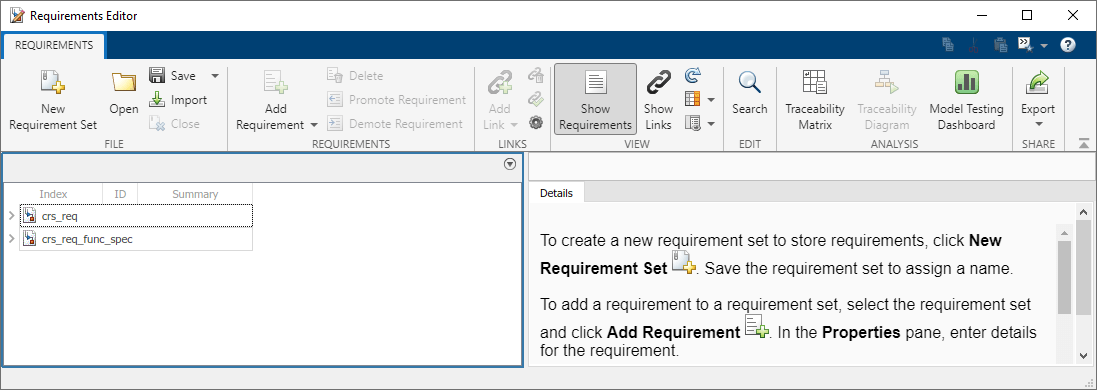
  3. The Requirements Editor displays the requirements arranged by requirement set. The project has two requirement sets: crs_req_func_spec and crs_req.

    Requirements Editor with Show Requirements selected. The crs_req_func_spec and crs_req requirement sets are collapsed.

  4. Add a requirement set. From the Requirements Editor toolstrip, click New Requirement Set.

  5. Save the requirement sets to external files. Save your requirement set to a writable location and name it cruise_control_reqset.slreqx.

  6. Add a requirement to your requirement set by selecting the requirement set and clicking Add Requirement.

  7. In the right pane, under Properties, enter the details for the requirement. Enter the details for the requirement:

    • Custom ID: R1

    • Summary: Max input throttle %

    • Description: The maximum input throttle is 100%.

    If you do not specify a custom ID, the Requirements Editor numbers requirements in order. Custom IDs enable you to use your company standards for labeling requirements and to set the numeric order. (Custom IDs cannot contain a # character.) You can also use an ID to help locate a requirement when searching. Keywords aid in searching for a requirement.

  8. Create the requirement R2. Click Add Requirement. Enter the details for the requirement:

    • Custom ID: R2

    • Summary: Cruise control speed operation range

    • Description: Cruise control has a minimum and maximum operating speed.

  9. Create child requirements for R2 by selecting R2 and clicking Add Requirement > Add Child Requirement. Enter the details for the requirement:

    • Custom ID: R2.1

    • Summary: Minimum vehicle speed

    • Description: The speed of the vehicle must be at least 40 km/h for the cruise control system to engage.

    Open requirement sets in the Requirements Editor. The cruise_control_reqset is expanded and includes three requirements.

    Repeat this step to add other child requirements to R2.

You can rearrange the hierarchy by using Promote Requirement or Demote Requirement.

You can also rearrange the hierarchy by clicking and dragging requirements. To move a requirement to the same hierarchy level as other requirements, drag between the other requirements until a black line appears. To add the requirement as a child, drag over the desired parent until black lines surround the parent.

Author and Edit Requirements Content by Using Microsoft Word

To author and edit the Description and Rationale fields of your requirements, open Microsoft® Word from within the Requirements Editor or the Requirements Perspective View.

Note

This functionality is available only on Microsoft Windows® platforms.

Using Microsoft Word to edit rich text requirements enables you to:

On the Edit field toolbar, in either the Description or Rationale fields, click the icon. Save the changes to your requirements content within Microsoft Word to see them reflected in Requirements Toolbox.

If you import requirements that you previously edited using Microsoft Word, you lose the formatting elements. For example, equations become non-editable images.

Customize Requirements Browser View

You can view or hide columns in the Requirements Editor when you click Columns > Select Attributes. Add, remove, and reorder attribute columns in the Column Selector. The view configuration is saved across sessions. You can export view settings to a MAT-file by using the slreq.exportViewSettings function and import them by using the slreq.importViewSettings function. You can reset view configurations by using the slreq.resetViewSettings function.

Filter Requirements Content

You can search requirements content by clicking Search. You can find specific requirements within loaded requirement sets based on requirement attributes and descriptions.

Specify Filter Text Strings — As you enter text in the Search text box, the Requirements Browser performs a dynamic search and displays the results. The search operation applies only to attributes you choose to display in the Requirements Browser.

The text strings you enter must be consistent with the guidelines described in the following sections.

Case Sensitivity — By default, the Requirements Browser ignores case as it filters.

If you want the Requirements Browser to respect case sensitivity, place double quotes around the text.

Specify Attributes and Attribute Values — To restrict the filtering to requirements with a specific attribute, type the attribute name, followed by a colon. The Requirements Browser displays only the requirements that have that attribute.

To filter for requirements for which a specific attribute has a specific value, type the attribute name, followed by a colon (:), then the value. For example, to filter the contents to display only the requirements where the Summary attribute has a value that includes Aircraft, enter Summary: Aircraft. Alternatively, place the string in double quotes to enforce case sensitivity.

Wildcards and MATLAB Expressions Are Not Supported — The Requirements Browser does not recognize wildcard characters, such as *. For example, searching fuel* returns no results, even if requirements contain the text string fuel.

Also, if you specify a MATLAB expression in the Search text box, the Requirements Browser interprets that string as literal text, not as a MATLAB expression.

See Also

Apps

Related Topics