Define Custom Document Interface for Direct Linking to Requirements
If you want to create a direct link to a requirement in a third-party application that Requirements Toolbox™ does not provide built-in support for, you can define a custom document interface. To define a custom document interface, you create a function that specifies the interface properties and callback functions to use when you create or navigate the direct link. For more information about direct linking, see Link Directly to Requirements in Third-Party Applications.
Note
If you want to use Requirements Toolbox analysis tools such as implementation status, verification status, change tracking, and traceability matrices, you must import your third-party requirements. For more information, see Differences Between Importing and Direct Linking. If Requirements Toolbox does not provide built-in import support for your third party application, you can import the requirements from a ReqIF™ file, or you can define a custom document interface to import those requirements. For more information, see Define Custom Document Interface for Importing Requirements.
Define Custom Document Interface
To define and use a custom document interface for direct linking:
Open the
myCustomDocInterface.mfile by executing this code at the MATLAB® command line:Theopen(fullfile(matlabroot,"toolbox","slrequirements","slrequirements","linktype_examples","myCustomDocInterface.m"))
docInterfacevariable represents the document interface object.function docInterface = myCustomDocInterface docInterface = ReqMgr.LinkType;Save a copy of
myCustomDocInterface.mon the MATLAB path. In MATLAB, in the Editor tab, click Save > Save Copy As. Save the file with your desired name in your desired location.Define these properties for the document interface object:
Name Description Value Types Example Value RegistrationRequirement document interface name, specified as a character vector. The value of this property must be the same as the document interface function name. You can use the mfilenamefunction to specify the value.Character vector
mfilenameLabelLabel for the custom document type in the Outgoing Links Editor, specified as a character vector. Character vector
'My Custom Document Interface'IsFileIndicator for the file-based requirement documents, specified as a
logical1(true) or0(false). Set the value to1if your requirement document is file-based, or0if your requirement document is not file-based.Logical1(true) or0(false)1ExtensionsAllowed file type extensions for file-based requirement documents, specified as a cell array of character vectors. Leave this property empty for requirement documents that are not file-based. Cell array of character vectors {'.ppt','.pptx'}LocDelimetersCharacters that specify the supported types of location identifiers in the requirement document, specified as a character array that is a combination of one or more of these characters:
?: Used to search for text in the document@: Used as a named item such as a requirement ID#: Page number or item number>: Item number or line number$: Cell address in spreadsheet
This property is optional.
Character array containing one or more of these characters: ?,@,#,>,$'?@#'SelectionLinkLabelContext menu label for creating direct links to selection. This property is required if you define a callback for SelectionLinkFcn, otherwise it is optional.Character vector
'Link to Selection in My Custom
                                                Document'
Determine which callback functions your document interface object needs.
Callback Summary Required or Optional? Function Syntax and Description NavigateFcnFunction that navigates from the linked item in MATLAB or Simulink® to requirement in third-party application Required NavigateFcn(document,id)opens the requirement document specified bydocumentto the requirement specified byidin the third-party application.ContentsFcnFunction that gets the table of contents of the requirement document or requirements collection in the third-party application. The function displays the table of contents in the Document Index tab of the Outgoing Links Editor. Optional [labels,depths,ids] = ContentsFcn(document)returns requirements information as cell arrays for the requirement document specified bydocument.labelscontains one line requirement summaries,idscontains requirements identifiers, anddepthscontains the level of the requirement in the hierarchy.BrowseFcnFunction that executes when you click the Browse button in the Outgoing Links Editor. This function is not required for file-based requirements domains. Optional for non-file-based requirement documents, but if you do not define this function you have to manually enter the name of the document in the Outgoing Links Editor.
Not needed if the
IsFileproperty is set to1.
BrowseFcnopens the browser for requirement documents.SelectionLinkFcnFunction that enables creating direct link to selection from context menu Optional. If you define this function, you must define the SelectionLinkLabelproperty.linkTargetInfo = SelectionLinkFcn(callerObject,make2way)returns a structure with information about the current selected requirement in the external requirement document. The inputcallerObjectis the MATLAB or Simulink object for which theSelectionLinkFcnfunction was called. The function gets the value ofrmipref("BiDirectionalLinking")and uses it as themake2wayargument. Ifmake2wayistrue, the call instructs the callback function to insert a backlink to navigate from the current selected requirement in the external requirement document to the object specified bycallerObjectin MATLAB or Simulink. For compatibility with interfaces for linking to requirements in third-party application that were developed prior to R2017b, the fields for thelinkTargetInfostructure must be:docidlinkeddescriptionkeywordsreqsys
Use the
rmi("createempty")function to create the structure with the required fields, then fill in the values according to current selection in your custom document. Requirements Toolbox stores the value of thedocandidfields as the link destination and passes the values to theNavigateFcncallback function when you use the link to navigate from MATLAB or Simulink to the requirement in the external requirement document.DetailsFcnFunction that gets requirements content to include in requirements reports for specified requirement Optional. Not required for link creation and navigation. [depths,info] = DetailsFcn(document,location,level)returns related requirement contents for the locationlocationfrom the requirement documentdocument. The function gets the value ofrmipref("ReportDocDetails")and uses it as thelevelargument to allow control for the amount of requirements content returned. For example, you may choose for this method to return only the label iflevelis 0, return the first lines whenlevelis 1, and return the entire content whenlevelis 2. Theinfooutput returns information about the requirement as a cell array. Thedepthsoutput returns information about how to display the requirement information in the hierarchy.CreateURLFcnFunction that gets hyperlink to navigate to linked requirement in requirements reports Optional. Not required for link creation and navigation. url = CreateURLFcn(document,documentURL,id)returns the URL for the requirement specified by the identifieridin the external requirement document specified bydocumentor the document URLdocumentURL.UrlLabelFcnFunction that gets the hyperlink text for the requirement navigation URL in requirements reports Required if you define a callback for CreateURLFcnlabel = UrlLabelFcn(document,id)returns a label for the requirement specified by the identifieridin the external requirement document specified bydocument.IsValidDocFcnFunction that checks that the requirement document exists. Use this function for consistency checking. Optional tf = IsValidDocFcn(document,~)returnstrueif the external requirement document specified bydocumentexists and is valid for the document interface.IsValidIdFcnFunction that checks that the ID of the linked requirement exists in the requirement document. Use this function for consistency checking. Optional tf = IsValidIdFcn(document,id)returnstrueif the requirement specified by the identifieridexists in the external requirement document specified bydocument.IsValidDescFcnFunction that checks that the stored Descriptionproperty of the direct link matches the current content in the requirement document. Use this function for consistency checking.Optional [tf,newDesc] = IsValidDescFcn(document,id,currDesc)checks if the current value of theDescriptionproperty of the linked requirement,currDesc, matches the text found at the location of the external requirement specified byid, in the external requirement document specified bydocument.BacklinkCheckFcnFunction that checks if backlink exists in external requirement document. For more information about backlinks, see Manage Navigation Backlinks in External Requirements Documents. Optional [linkExists,newLinkURL] = BacklinkCheckFcn(mwArtifactName,mwItemId,extDoc,extReq)checks whether the external requirementextReqin the external requirement documentextDochas a backlink to the linkable item in MATLAB or Simulink specified bymwItemIdin the artifactmwArtifactName.If the backlink exists,
linkExistsreturnstrueandnewLinkURLreturns empty.If the backlink does not exist,
linkExistsreturnsfalseandnewLinkURLcontains the URL to insert as a backlink.
BacklinkInsertFcnFunction that inserts backlinks in external requirement document. For more information about backlinks, see Manage Navigation Backlinks in External Requirements Documents. Required if you define a callback function for BacklinkCheckFcn[navCmd,dispText] = BacklinkInsertFcn(extDoc,extReq,mwSourceArtifact,mwItemId,mwDomain)inserts a backlink from the external requirement specified byextReqin the external requirement documentextDocto the linkable item in MATLAB or Simulink specified bymwItemIdin the artifact specified bymwSourceArtifactwith the artifact document interfacemwDomain. The function returns the navigation command that the backlink uses,navCmd, and the displayed hyperlink text for the backlink,dispText.BacklinksCleanupFcnFunction that checks for stale backlinks in external requirement document. For more information about backlinks, see Manage Navigation Backlinks in External Requirements Documents. Optional, but if this function is not defined, the Update Backlinks context menu option in the Requirements Editor cannot check for and delete stale backlinks [countRemoved,countChecked] = BacklinksCleanupFcn(extDoc,mwSourceArtifact,mwLinksDataMap)checks the backlinks in the external requirement documentextDocthat point to linkable items in the MATLAB or Simulink artifactmwSourceArtifactand deletes backlinks that do not have a corresponding forward link in the Requirements Toolbox link map specified bymwLinksDataMap.[countRemoved,countChecked] = BacklinksCleanupFcn(extDoc,mwSourceArtifact,mwLinksDataMap,saveBeforeCleanup)saves the requirement document before deleting the backlinks.
BacklinkDeleteFcnFunction that deletes backlinks in external requirement document. For more information about backlinks, see Manage Navigation Backlinks in External Requirements Documents. Optional success = BacklinkDeleteFcn(extDoc,extReq,mwSourceArtifact,mwItemId)deletes the backlink from the external requirement specified byextReqin the external requirement documentextDocthat points to the linkable item in MATLAB or Simulink specified bymwItemIdin the artifact specified bymwSourceArtifact.GetResultFcnFunction that gets test results for the verification status when you link to external test cases or test results. Use this function to verify requirements that have outgoing links with the Confirmlink type.Optional result = GetResultFcn(link)returns the verification status result for the test case or test result that is linked to bylink. Theresultoutput is a structure that contains these fields:status(required): Verification status (Passed,Failed,Unexecuted)timestamp(optional): Date and time of most recent verification status. Value must be adatetimeobject.
Author the callback functions that your document interface needs as local functions in the main function. Comment out or delete callback functions that you do not need.
The
myCustomDocInterface.massigns the callback function handles to the corresponding properties of the custom document interface object. If there are callback functions that you did not use or deleted, comment out or delete the lines that assign those callback function handles to the custom document interface object properties.Register the custom document interface by using the
rmifunction. Specify the custom document interface name as the second argument.rmi register myCustomDocInterface
You can unregister the custom document interface by using the
rmi
function.
rmi unregister myCustomDocInterface
Tip
For examples of document interface definitions, you can view the built-in document
interface definitions in the
fullfile(matlabroot,"toolbox","slrequirements","slrequirements","linktype_examples") directory:
linktype_rmi_doors.mlinktype_rmi_excel.mlinktype_rmi_html.mlinktype_rmi_text.m
Link to Requirements in an ABC File
This example shows how to define a custom document interface that enables direct linking to requirements in a text file with the extension .abc.
Define and Register the Custom Document Interface
The abcInterface function defines a custom document interface that enables linking to text files that have the extension .abc.
type abcInterfacefunction docInterface = abcInterface
% Define custom document interface
docInterface = ReqMgr.LinkType;
% Define custom document interface properties
docInterface.Registration = mfilename;
docInterface.Label = 'ABC file (for demonstration)';
docInterface.IsFile = 1;
docInterface.Extensions = {'.abc'};
docInterface.LocDelimiters = '>@';
% docInterface.Version = ''; % not required
% Assign custom document interface callback functions
docInterface.NavigateFcn = @NavigateFcn;
docInterface.ContentsFcn = @ContentsFcn;
end
%% Define callback functions
function NavigateFcn(filename,locationStr)
if ~isempty(locationStr)
findId=0;
switch(locationStr(1))
case '>'
lineNum = str2num(locationStr(2:end));
openFileToLine(filename, lineNum);
case '@'
openFileToItem(filename,locationStr(2:end));
otherwise
openFileToLine(filename, 1);
end
end
end
function openFileToLine(fileName, lineNum)
if lineNum > 0
if matlab.desktop.editor.isEditorAvailable
matlab.desktop.editor.openAndGoToLine(fileName, lineNum);
end
else
edit(fileName);
end
end
function openFileToItem(fileName, itemName)
reqStr = ['Requirement:: "' itemName '"'];
lineNum = 0;
fid = fopen(fileName);
i = 1;
while lineNum == 0
lineStr = fgetl(fid);
if ~isempty(strfind(lineStr, reqStr))
lineNum = i;
end;
if ~ischar(lineStr), break, end;
i = i + 1;
end;
fclose(fid);
openFileToLine(fileName, lineNum);
end
function [labels, depths, locations] = ContentsFcn(filePath)
% Read the entire file into a variable
fid = fopen(filePath,'r');
contents = char(fread(fid)');
fclose(fid);
% Find all ok, reviewed by ngabriel 13a the requirement items
fList1 = regexpi(contents,'\nRequirement:: "(.*?)"','tokens');
% Combine and sort the list
items = [fList1{:}]';
items = sort(items);
items = strcat('@',items);
if (~iscell(items) && length(items)>0)
locations = {items};
labels = {items};
else
locations = [items];
labels = [items];
end
depths = [];
end
% Copyright 2024 The MathWorks, Inc.
Register the abcInterface by using the rmi function.
rmi register abcInterface
Link Requirements Directly to Simulink Blocks
The AutopilotRequirements.abc file contains requirements for the autopilot system of the aero_dap3dof Simulink® model.
type AutopilotRequirements.abcRequirement:: "Altitude Climb Control" Altitude climb control is entered whenever: |Actual Altitude- Desired Altitude | > 1500 Units: Actual Altitude - feet Desired Altitude - feet Description: When the autopilot is in altitude climb control mode, the controller maintains a constant user-selectable target climb rate. The user-selectable climb rate is always a positive number if the current altitude is above the target altitude. The actual target climb rate is the negative of the user setting. End of "Altitude Climb Control"> Requirement:: "Altitude Hold" Altitude hold mode is entered whenever: |Actual Altitude- Desired Altitude | < 30*Sample Period*(Pilot Climb Rate / 60) Units: Actual Altitude - feet Desired Altitude - feet Sample Period - seconds Pilot Climb Rate - feet/minute Description: The transition from climb mode to altitude hold is based on a threshold that is proportional to the Pilot Climb Rate. At higher climb rates the transition occurs sooner to prevent excessive overshoot. End of "Altitude Hold" Requirement:: "Autopilot Disable" Altitude hold control and altitude climb control are disabled when autopilot enable is false. Description: Both control modes of the autopilot can be disabled with a pilot setting. ENd of "Autopilot Disable" Requirement:: "Glide Slope Armed" Glide Slope Control is armed when Glide Slope Enable and Glide Slope Signal are both true. Units: Glide Slope Enable - Logical Glide Slope Signal - Logical Description: ILS Glide Slope Control of altitude is only enabled when the pilot has enabled this mode and the Glide Slope Signal is true. This indicates the Glide Slope broadcast signal has been validated by the on board receiver. End of "Glide Slope Armed" Requirement:: "Glide Slope Coupled" Glide Slope control becomes coupled when the control is armed and (Glide Slope Angle Error > 0) and Distance < 10000 Units: Glide Slope Angle Error - Logical Distance - feet Description: When the autopilot is in altitude climb control mode the controller maintains a constant user selectable target climb rate. The user-selectable climb rate is always a positive number if the current altitude is above the target altitude the actual target climb rate is the negative of the user setting. End of "Glide Slope Coupled"
Open the aero_dap3dof model.
open_system("aero_dap3dof.slx")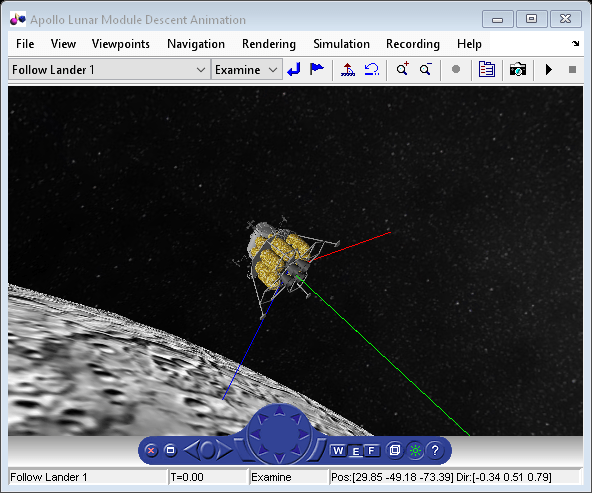
Close the Apollo Lunar Module Descent Animation window. In the aero_dap3dof model, right-click the Reaction Jet Control subsystem and select Requirements > Open Outgoing Links dialog. The Outgoing Links Editor opens. Add a new requirement link by clicking New.
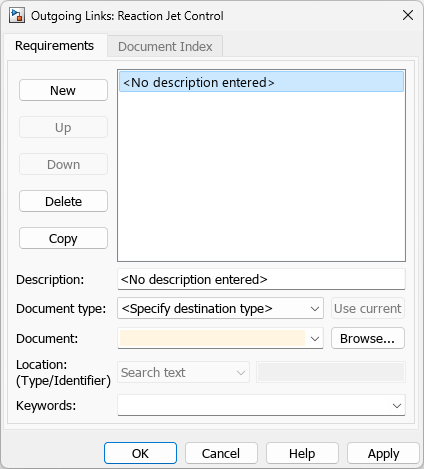
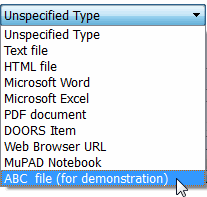
Set Document type to ABC file (for demonstration).
Next to Document, click Browse and select the AutopilotRequirements.abc file. Select the Document Index tab and double-click @Altitude Hold. Create the link by clicking OK. Verify that the link works as expected by right-clicking the Reaction Jet Control subsystem and selecting Requirements > 1. “Altitude Hold”.
Unregister the custom document interface.
rmi unregister abcInterface
Related Topics
You can also select a web site from the following list:
Americas
- América Latina (Español)
- Canada (English)
- United States (English)
Europe
- Belgium (English)
- Denmark (English)
- Deutschland (Deutsch)
- España (Español)
- Finland (English)
- France (Français)
- Ireland (English)
- Italia (Italiano)
- Luxembourg (English)
- Netherlands (English)
- Norway (English)
- Österreich (Deutsch)
- Portugal (English)
- Sweden (English)
- Switzerland
- United Kingdom (English)