Main Content

Use Stereotypes when Importing from ReqIF Files

When you import requirements and links from ReqIF™ files, you can map the ReqIF requirement and link types and attributes to Requirements Toolbox™ stereotypes and stereotype properties. For more information about importing requirements and links using ReqIF files, see Import Requirements from ReqIF Files.

To map the requirements and link types, enable the Requirements Editor to use profiles during import, then create a new profile. The Requirements Editor creates a profile with a stereotype for each requirement type and link type in the ReqIF file. Each stereotype has a property for the attributes defined by the requirement and link types. Alternatively, you can use a profile that you created during a previous import or by using the Profile Editor. For more information about profiles and stereotypes, see Customize Requirements and Links by Using Stereotypes.

Create Profile During Import

To import requirements and links and create a new profile:

  1. Enable the Requirements Editor to use profiles during import by entering this command at the MATLAB® command line:

    rmipref(ReqIfImportUseProfile=true)

    Note

    This setting persists between MATLAB sessions. To disable using profiles during import, enter rmipref(ReqIfImportUseProfile=false).

  2. Open the Requirements Editor. For more information, see Open the Requirements Editor App.

  3. In the File section, click Import.

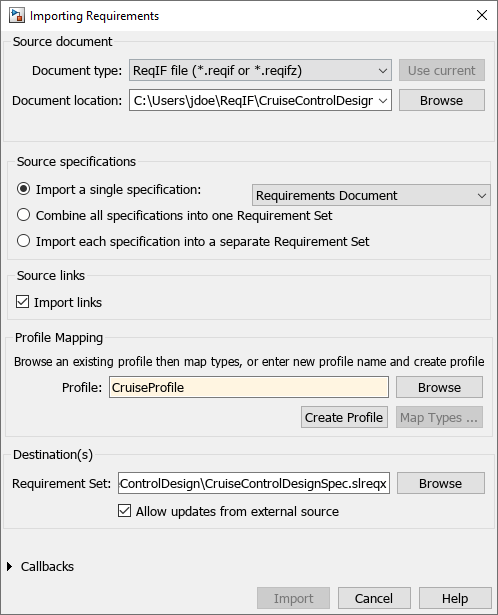
  4. In the Importing Requirements dialog box, set Document type to ReqIF file (*.reqif or *.reqifz).

  5. Next to Document location, click Browse and select the ReqIF file.

  6. In the Profile Mapping section, enter a name for the new profile in the Profile field.

    Importing Requirements dialog box showing the Profile Mapping section.

  7. Click Create Profile.

  8. Select whether to allow updates to the imported requirements. If you want to manage your imported requirements in a third-party tool, select Allow updates from external source, which imports the requirements as referenced requirements. If you want to migrate your requirements to Requirements Toolbox, clear Allow updates from external source. For more information about import options, see Select an Import Mode.

  9. Click Import to import the requirements.

Note

You cannot import ReqIF files that contain enumerations whose names are in languages other than English.

For more information about importing requirements and links from ReqIF files, see Import Requirements from ReqIF Files.

When you create a new profile when you import requirements and links, Requirements Toolbox:

  • Assigns the profile to the imported requirement set and link set

  • Creates stereotypes for each ReqIF requirement type and link type

  • Creates stereotype properties in the stereotypes for each ReqIF requirement attribute and link attribute

  • Maps the stereotypes to the ReqIF requirement types and link types and assigns the stereotypes to the imported requirements and links

  • Maps the stereotype properties in the stereotypes to the ReqIF requirement and link attributes and imports the attribute values as stereotype attribute values

For more information about stereotypes, see Customize Requirements and Links by Using Stereotypes.

Programmatically Create Profile During Import

You can also import requirements and links and create a new profile programmatically by using the slreq.import function. Use the profile name-value argument to specify the name of the new profile.

This code imports requirements and links from a ReqIF file called myReqs, creates a new profile called myProfile, and assigns the profile to the imported requirement set and link set. The code outputs the number of imported requirements, the file path for the imported requirement set, and the handle to the imported requirement set object.

[count,path,myReqSet] = slreq.import("myReqs.reqif", ...
    profile="myProfile",importLinks=1)

Use Existing Profile During Import

To use an existing profile when you import requirements and links:

  1. In the Importing Requirements dialog box, in the Profile Mapping section, click Browse and select a profile.

  2. Map the ReqIF requirement and link types and attributes to stereotypes and stereotype properties in the existing profile by clicking Map Types.

  3. In the Mapping dialog box, in the left pane, select a ReqIF requirement type or link type.

    Mapping dialog box, displaying the profile mapping for a ReqIF requirement type called Requirement.

  4. In the right pane, set Mapped stereotype to the stereotype that you want to map the ReqIF requirement or link type to. To prevent Requirements Toolbox from importing requirements or links of the selected type, set Mapped stereotype to [Ignored].

  5. Map each ReqIF requirement or link attribute to a built-in property or a stereotype property by setting Stereotype properties to the desired Requirements Toolbox property or stereotype property. To prevent Requirements Toolbox from importing requirement or link attribute values, set Stereotype properties to [Ignored] for that attribute.

  6. Click OK.

  7. In the Importing Requirements dialog box, click Import.

To save the mapping to an XML file so that you can reuse it, in the Mapping dialog box, click Save Mapping. To load an existing profile mapping, click Load Mapping.

Programmatically Use Existing Profile During Import

You can also use an existing profile when you programmatically import requirements and links by using the slreq.import function. Use the profile name-value argument to specify the name of the existing profile.

This code imports requirements and links from a ReqIF file called myReqs2 and assigns the existing profile, myProfile, to the imported requirement set and link set.

[count,path,myReqSet] = slreq.import("myReqs2.reqif", ...
    profile="myProfile",importLinks=1)
You can also use an existing profile mapping file that maps the ReqIF requirement and link attributes to stereotype and stereotype properties in Requirements Toolbox by using the slreq.import function. Use the profileMapping name-value argument to specify the profile mapping XML file to use.

This code imports requirements and links from a ReqIF file called myReqs2, assigns an existing profile called myProfile to the imported requirement set and link set, and maps the ReqIF attributes to stereotypes and stereotype properties in the myProfile profile according to the profile mapping file myMapping.xml.

[count,path,myReqSet2] = slreq.import("myReqs2.reqif", ...
    profile="myProfile",importLinks=1,profileMapping="myMapping.xml")

Tip

To create a profile mapping XML file, use one of these approaches:

  • When you import requirements from a ReqIF file by using the Requirements Editor, in the Profile Mapping dialog box, click Save Mapping.

  • After you import requirements from a ReqIF file, in the Requirements Editor, select the import node. In the right pane, under ReqIF Profile Mapping, click Save Mapping.

  • Get a handle to the imported requirement set by using slreq.find, then use the saveProfileMapping function.

Adjust Profile Mapping

You can view the mapping between ReqIF requirement and link data to Requirements Toolbox stereotypes in the Requirements Editor by selecting the import node and, in the right pane, under ReqIF profile mapping, clicking View Mapping.

Requirements Editor with mouse pointing to the View Mapping button in the right pane.

The mapping in the Mapping dialog box is read-only.

Mapping dialog box, displaying the read-only profile mapping for a ReqIF requirement type called Requirement.

To adjust the profile mapping, note the profile that is applied to the requirement set. Close the requirement set and re-import it using the same profile. Map the stereotypes as described in Use Existing Profile During Import.

See Also

Apps

Functions

Classes

Related Topics