Build PetaLinux Image for AMD ZCU216 RFSoC Development Kit
R2026bThis example shows how to build a PetaLinux 2023.1 image for an AMD® Zynq® UltraScale+™ ZCU216 RFSoC evaluation kit that is compatible with Mathworks® applications. You set up the build environment and build the PetaLinux image by using a MathWorks® Yocto layer, also known as a meta-mathworks layer. The meta-mathworks layer provides the dependencies, libraries, and utilities to integrate and communicate between the embedded Linux® system and MathWorks tools, and generates a Linux environment optimized for MathWorks applications and supported AMD hardware platforms.
In this example, you build the Linux image by configuring a Petalinux project using the RFSoC board support package (BSP), integrating the meta‑mathworks layer, and setting up the boot files. Alternatively, you can use the pre‑configured MathWorks Petalinux repository, which includes all the necessary setup and configuration files to build the Linux image with minimal manual steps. You can also follow the process in this example to build a PetaLinux image for other AMD RFSoC development kits by using their respective BSPs.
Requirements
To run this example, you require:
System requirements: Linux machine with 8GB RAM and 100GB free workspace.
Operating system: An Ubuntu 20.04 LTS or Ubuntu 22.04 LTS.
Petalinux installer: v2023.1.
Required packages: Install packages listed in the package_list on the AMD website.
Shell configuration: Ensure bash mode (
sudo dpkg-reconfigure dash).
Overview of the PetaLinux Image Build Process
You can use the PetaLinux tools to build, customize, and deploy embedded Linux distributions on AMD SoC and FPGA platforms. You can use PetaLinux to generate Linux images, including custom device trees, kernel configurations, and root file-system contents. This figure outlines the steps to create a custom Linux image for AMD SoC platforms.
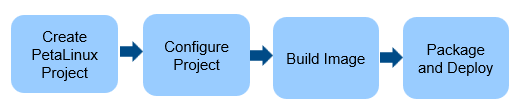
To develop a custom Linux image, you:
Create the PetaLinux project — Create a new PetaLinux project. You download a Board Support Package (BSP) from the hardware vendor website. The BSP includes board-specific configurations, boot files, and reference hardware designs.
Configure the project — Configure the project by importing the hardware, adding yocto layers and setting up the kernel, device tree, and root file-system options.
Build the image — Compile the kernel, device tree, and root file system into a deployable image.
Package and deploy the image — Create a bootable image and copy it to an SD card or other boot media for use on the target board.
Install PetaLinux Tool
To install the PetaLinux tool on your host machine, follow these steps:
Download the PetaLinux installer v2023.1 from the AMD website.
To install the PetaLinux tool, run this command in your Linux terminal. Specify the path where you downloaded the PetaLinux installer.
chmod 755 ./petalinux-v2023.1-05012318-installer.run
./petalinux-v2023.1-050121318-installer.run
3. To use PetaLinux commands to build the image, source the PetaLinux tool by running this command:
source <petalinux_installed_directory>/settings.sh
Build Linux Image Using MathWorks PetaLinux Repository
The MathWorks PetaLinux repository is configured with the necessary settings and contains a script that automates the process of building the Linux image. To build the Linux image by using the MathWorks PetaLinux repository, follow these steps:
Clone the MathWorks PetaLinux repository:
git clone https://github.com/mathworks/Petalinux.git
2. Navigate to the PetaLinux directory, then check out the latest branch.
cd Petalinux
git checkout mathworks_R2026a
3. Navigate to the mw_zcu216 directory. This folder contains the mw_build_zcu216.sh script, which adds the meta-mathworks layer as a submodule to the PetaLinux project. Run the script by using this command.
cd mw_zcu216
chmod +x mw_build_zcu216.sh
./mw_build_zcu216.sh
The script mw_build_zcu216.sh automatically adds the meta‑mathworks layer, configures SD card boot, and generates a ready‑to‑use .zip file containing the bootable image.
Build Linux Image Using Board Support Package
To build the MathWorks compatible Linux image for zcu216 using from the BSP, follow these steps.
Step1: Create the PetaLinux project
Download the AMD Zynq® UltraScale+™ MPSoC zcu216 PetaLinux BSP from the AMD website.
To create the PetaLinux project using the ZCU216 BSP, run this command:
petalinux-create -t project -s <path_to_downloaded_bsp>
This command creates a project with the default name xilinx-zcu216-v2023.1 is created. You can also create the project with specific name in specific directory by providing extra arguments to the above command. For more information, see Creating a Project from BSP.
Step 2: Configure Project
Import Hardware Design File
Get the Xilinx Source Archive (xsa) to Petalinux project directory. You can generate xsa for your hardware design(bitstream included) by using the Export Hardware option in Xilinx Vivado.
petalinux-config --get-hw-description=<path_to_XSA_file>
Add meta-mathworks Layer to PetaLinux Project
Add the meta-mathworks layer to the zcu216 Petalinux project directory. Run this command from the mw_zcu216 directory.
git clone -b petalinux-v2023.1 https://github.com/mathworks/meta-mathworks.git project-spec/meta-mathworks
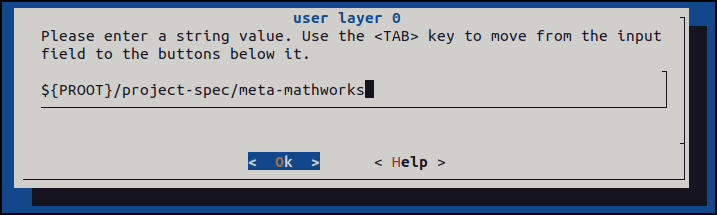
To add the meta-mathworks layer in the PetaLinux tool, open the configuration menu and, in the Yocto Settings menu select User Layers. Then, select User Layer 0 and enter the path to the meta-mathworks layer and Click OK.
${PROOT}/project-spec/meta-mathworks
Configure Kernel
The PetaLinux project uses the default kernel settings to build the Linux image on the ZCU216 board. you can add the kernel drivers manually or add them by using the MathWorks repository.
To include the custom kernel drivers in the Linux image:
In the
project-spec/meta-user/recipes-kernel/Linux-xlnxfolder, in thebsp.cfgfile, add the drivers that you want to include.Create your own CFG file in the
/project-spec/meta-user/recipes-kernel/Linux-xlnxfolder and specify the drivers in it. Then, you can append this configuration file to the recipes-kernel folder by usinglinux-xlnx_%.bbappendfile.Add the kernel drivers to the image by using the PetaLinux configuration menu. To open the menu, enter:
petalinux-config -c kernel
4. Select the kernel drivers you want to add to the Linux image, click Save and then click Exit. The configuration menu creates a new CFG file and adds this file to the linux_xlnx_%.bbappend file.
Configure Root File System
Open the
user-rootfsconfigfile present in the pathxilinx-zcu216-v2023.1/project-spec/meta-user/conf/.Copy the below packages to include in the Linux image and save the file.
CONFIG_libserialport
CONFIG_libiio
CONFIG_boost
CONFIG_lttng-ust
CONFIG_mw-fs-overlay
CONFIG_boost-dev
CONFIG_lttng-ust-bin
CONFIG_mw-refdesign-dtb
CONFIG_rfdc
CONFIG_rfdc-read-write
CONFIG_rfdc-selftest
CONFIG_libsdfecusrintf
CONFIG_rfdc-selftest
CONFIG_mw-rf-init
CONFIG_rftool-zcu216` \
3.Open the rootfs_config file present in the path xilinx-zcu216-v2023.1/project-spec/configs/rootfs_config.
4. Copy the below packages to include in the Linux image and save the file.
CONFIG_libserialport=y
CONFIG_libiio=y
CONFIG_boost=y
CONFIG_lttng-ust=y
CONFIG_lttng-ust-bin=y
CONFIG_mw-fs-overlay=y
CONFIG_rfdc=y
CONFIG_rfdc-read-write=y
CONFIG_rfdc-selftest=y
CONFIG_mw-rf-init=y
CONFIG_rftool-zcu216=y
5. Similarly, you can include your custom packages into the root file system.
6. Navigate to Petalinux project path (xilinx-zcu216-v2023.1).
7. Open the rootfs_config file present in the path xilinx-zcu216-v2023.1/project-spec/configs/rootfs_config.
petalinux-config -c rootfs
After running the above commands, a menuconfig opens up. Now, navigate to the User packages folder and you can see the above packages. Select all the above package and then Save and Exit the menuconfig.
This is the place where you can also include other packages in your rootfs by choosing the available packages under Filesystem Packages and PetaLinux Package Groups menu options.
Configure Device tree Settings
If your application requires a custom device tree source file, place your
.dtsifiles underproject-spec/meta-user/recipes-bsp/device-tree/files/.Add the paths to these
.dtsifiles into thedevice-tree.bbappendfile located atproject-spec/meta-user/recipes-bsp/device-tree/device-tree.bbappend.For creating
.dtsifiles specific to a board, Seemeta-mathworks/tree/main/recipes-apps/mw-refdesign-dtb/files/zynqmp/boards/.
Step 3: Generate Boot Image
Next, build the Linux image.
1. Run the PetaLinux build command for a complete build.
petalinux-build
2. To clean the cache before every build, enter this command
petalinux-build -x distclean
3. To clean the entire build directory, enter this command
petalinux-build -x mrproper
When the build completes, you can see the Linux binaries in the images/Linux folder. You can package the the boot image into a BOOT.BIN file by running this command.
petalinux-package --boot --u-boot --fpga --force
Step 4: Pack Images to ZIP File
Copy files from /images/linux/ to the SD card.
BOOT.BINboot.scrImagerootfs.cpio.gz.u-bootsystem.bitsystem.dtb
Copy files from /mw_utils/ to the SD card.
dhcp.scriptinit.shrf-initstopsociod.servicelibboost-1-63-overlay.tar.gzinterfaces
You can now deploy the Linux image to the ZCU216 RFSoC board and boot the hardware from the SD card.

