Automate Ground Truth Labeling for Semantic Segmentation
This example shows how to use a pretrained semantic segmentation algorithm to segment the sky and road in an image, and use this algorithm to automate ground truth labeling in the Video Labeler app.
The Video Labeler App
Good ground truth data is crucial for developing automated driving algorithms and evaluating their performance. However, creating and maintaining a diverse and high-quality set of annotated driving data requires significant effort. The Video Labeler app provides an efficient labeling platform which includes features to annotate objects as rectangles, lines, or pixel labels. Pixel labeling is a process in which each pixel in an image is assigned a class or category, which can then be used to train a pixel-level segmentation algorithm. Although you can use the app to manually label all your data, this process requires a significant amount of time and resources, especially for pixel labeling. As an alternative, the app provides a framework to incorporate algorithms to extend and automate the labeling process. You can use the algorithms you create to automatically label entire data sets, and then end with a more efficient, shorter manual verification step. You can also edit the results of the automation step to account for challenging scenarios that the algorithm might have missed.
This example demonstrates how to:
Use a pretrained segmentation algorithm to segment pixels that belong to the categories road and sky.
Create an automation algorithm that can be used in the Video Labeler app to automatically label road and sky pixels.
You can then use this ground truth data to train a new semantic segmentation network, or retrain an existing one.
Create a Road and Sky Detection Algorithm
First, create a semantic segmentation algorithm that segments road and sky pixels in an image. You can choose between several pretrained networks or perform training on a custom network, as shown in the Semantic Segmentation Using Deep Learning example. In this example, you use a bisenetv2 pretrained network trained on the COCO-Stuff dataset [1] and can predict 171 classes of semantic labels. The performance of networks like BiSeNetv2 depends on how generalizable they are. Applying the networks to situations they have not encountered during training can lead to subpar results. Iteratively introducing custom training data to the learning process can make the network perform better on similar data sets.
Load the pretrained network into the workspace.
[net,classes] = bisenetv2;
Segment an image and display it.
% Load a test image from drivingdata.
roadSequenceData = fullfile(toolboxdir("driving"),"core","drivingdata","roadSequence");
I = imread(fullfile(roadSequenceData, "f00001.png"));
inputSize = net.Layers(1).InputSize;
I = imresize(I,inputSize(1:2));

% Run the network to perform semantic segmentation on the image.
automatedLabels = semanticseg(I,net,Classes=classes);

% Display the labels overlaid on the image, choosing relevant categories.
% BiSeNet v2 uses "sky_other" as the class label to denote any pixels
% classified as sky.
figure;
imshow(labeloverlay(I,automatedLabels,IncludedLabels=["sky_other","road"]));
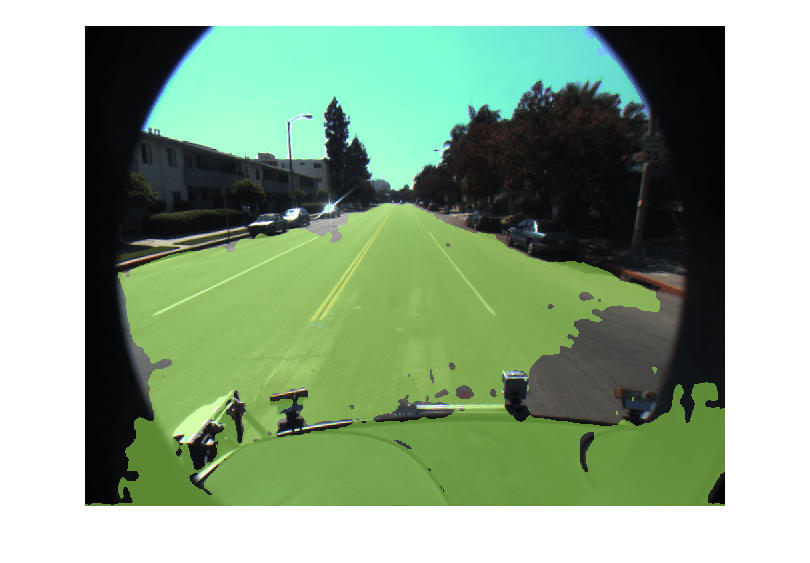
The red overlay indicates the sky category, and the orange overlay indicates the road.
Identifying Model Weaknesses
The overlaid image reveals that the BiSeNetV2 network performs well on the core image regions of interest, but incorrectly aligns pixel-level semantic labels to areas that should remain empty. Based on this observation, consider these possible solutions:
Select a different model that achieves better results on this data set.
Fine-tune the current network using training data drawn from this data set.
Apply post-processing techniques to address limitations in the output of the model.
This example uses the third option: post-processing approach. Because BiSeNetv2 lacks training on data from fish-eye camera lenses, it assumes that objects span the entire image from edge-to-edge. This assumption causes pixel bleeding onto the black circular border. The model also misclassifies some pixels on the vehicle dashboard. You can prevent these misclassifications by applying modifications to the automation algorithm.
Explore Post-Processing Steps
These are the areas for improving the automation algorithm’s performance:
Reduce the misclassification of road pixels.
Clean up predictions in the black circular border.
Improve Misclassification of Road and Sky Pixels
In semantic segmentation, each pixel receives a classification, which can result in false positives. A common first step involves checking the model’s confidence in its predictions.
Segment the image again and obtain the confidence score of each pixel.
[automatedLabels, scores] = semanticseg(I, net, Classes=classes);
Instead of manually inspecting all scores in the image-sized score matrix, create a binary mask of the scores over a certain threshold. A good starting confidence score is 0.5.
Instead of manually inspecting the entire score matrix, create a binary mask for pixels with confidence scores above a threshold. Start with a threshold of 0.5 and create a mask to overlay pixels with classification confidence greater than 0.5.
confidentMask = scores > 0.5;

% Change low-confidence scores to empty.
automatedLabels(~confidentMask) = "";

figure;
imshow(labeloverlay(I,automatedLabels,IncludedLabels=["sky_other","road"]));

This approach filters out low-confidence predictions from BiSeNetv2 and removes most false classifications on the dashboard and some on the black border.
Clean Up Predictions in Black Circular Border
Because the border region contains only dark pixels, apply thresholding directly to the image data. First, convert the image to grayscale. Then, create a mask using a low threshold limit and filter out dark pixels. You must specify a low threshold limit because dark pixels have a very low value in each of the RGB color channels.
Display the result overlaid on the test image.
% Convert the image to grayscale gives a two-dimensional logical matrix.
cameraLensMask = rgb2gray(I) < 25;

% Set all border pixels to empty in the segmented image.
automatedLabels(cameraLensMask) = "";

figure;
imshow(labeloverlay(I,automatedLabels,IncludedLabels=["sky_other","road"]));
The predicted pixels now quite closely match the image with just these two post-processing steps. The next step is to create the automation algorithm including these thresholding stages.
Integrate Pixel Segmentation Algorithm into Video Labeler
To incorporate this semantic segmentation algorithm into the automation workflow of the app, you must create a class that inherits from the abstract base class vision.labeler.AutomationAlgorithm. This base class defines the API that the app uses to configure and run the algorithm. The Video Labeler app provides an initial automation class template. For details, see Create Custom Automation Algorithm for Labeling. The RoadAndSkySegmentation class is based on this template, and provides a ready-to-use automation class for pixel label segmentation.
The first set of properties in the RoadAndSkySegmentation class specify the name of the algorithm, provide a brief description of it, and provide directions for using it.
    properties(Constant)
        % Name
        %   Character vector specifying name of algorithm.
        Name = 'RoadAndSkySegmentation'

        % Description
        %   Character vector specifying short description of algorithm.
        Description = 'This algorithm uses semanticseg with a pretrained network to annotate roads and sky'

        % UserDirections
        %   Cell array of character vectors specifying directions for
        %   algorithm users to follow in order to use algorithm.
        UserDirections = {...
            ['Automation algorithms are a way to automate manual labeling ' ...
            'tasks. This AutomationAlgorithm automatically creates pixel ', ...
            'labels for road and sky.'], ...
            ['Review and Modify: Review automated labels over the interval ', ...
            'using playback controls. Modify/delete/add ROIs that were not ' ...
            'satisfactorily automated at this stage. If the results are ' ...
            'satisfactory, click Accept to accept the automated labels.'], ...
            ['Accept/Cancel: If results of automation are satisfactory, ' ...
            'click Accept to accept all automated labels and return to ' ...
            'manual labeling. If results of automation are not ' ...
            'satisfactory, click Cancel to return to manual labeling ' ...
            'without saving automated labels.']};
    end
The next section of the RoadAndSkySegmentation class specifies the custom properties needed by the core algorithm. The PretrainedNetwork property contains the pretrained BiSeNetv2 network. The AllCategories property contains the names of all the categories.
    properties
        % PretrainedNetwork saves the SeriesNetwork object that does the semantic
        % segmentation.
        PretrainedNetwork

        % ClassNames
        %   String array of all the classes the pretrained network has been
        %   trained on.
        ClassNames

        % Categories holds the default 'background', 'road', and 'sky'
        % categorical types.
        AllCategories = {'background'};

        % Store names for 'road' and 'sky'.
        RoadName
        SkyName
    end
checkLabelDefinition, the first method defined in RoadAndSkySegmentation, checks that only labels of type PixelLabel are enabled for automation. PixelLabel is the only type required for semantic segmentation.
    function TF = checkLabelDefinition(~, labelDef)
        isValid = false;

        if (strcmpi(labelDef.Name,'road') && labelDef.Type == labelType.PixelLabel)
            isValid = true;
            algObj.RoadName = labelDef.Name;
            algObj.AllCategories{end+1} = labelDef.Name;
        elseif (strcmpi(labelDef.Name,'sky') && labelDef.Type == labelType.PixelLabel)
            isValid = true;
            algObj.SkyName = labelDef.Name;
            algObj.AllCategories{end+1} = labelDef.Name;
        elseif(labelDef.Type == labelType.PixelLabel)
            isValid = true;
        end
    end
The next set of methods control the execution of the algorithm. The vision.labeler.AutomationAlgorithm class includes an interface that contains methods like initialize, run, and terminate for setting up and running the automation. The initialize method populates the initial algorithm state based on the existing labels in the app. In the RoadAndSkySegmentation class, the initialize method has been customized to load the pretrained BiSeNetv2 semantic segmentation network save it to the PretrainedNetwork property. It also stores all the classes that BiSeNetv2 can segment in the ClassNames property.
    function initialize(algObj,~,~)
        % Store the pretrained BiSeNetv2 network and the classes it
        % can segment in the 'PretrainedNetwork' and 'ClassNames'
        % properties of this object.
        [net,classes] = bisenetv2;
        algObj.PretrainedNetwork = net;
        algObj.ClassNames = classes;
    end
Next, the run methods defines the core semantic segmentation algorithm of this automation class. run is called for each video frame, and expects the automation class to return a set of labels. The run method in RoadAndSkySegmentation.m contains the logic you used to create a categorical matrix of pixel labels corresponding to road and sky. This algorithm can be extended to any categories the network is trained on. The example shows the road and sky classes for illustration only. After obtaining the initial segmentation results from the network, the run method implements the post-processing steps used to refine the pixel labels in the test image.
    function autoLabels = run(algObj,I)
        % Resize image to expected network size.
        img = imresize(I,algObj.PretrainedNetwork.Layers(1).InputSize(1:2));

        % Set up categorical matrix with categories including road and
        % sky.
        autoLabels = categorical(zeros(size(I,1),size(I,2)),0:2,algObj.AllCategories,Ordinal=true);

        [pixelCat,scores] = semanticseg(img,algObj.PretrainedNetwork,Classes=algObj.ClassNames);

        % Filter out pixels that the model is not very confident about.
        pixelCat(scores < 0.5) = algObj.AllCategories{1};

        % Create a mask to remove pixel bleed on the outside of the
        % camera lens.
        cameraLensMask = rgb2gray(img) < 25;

        % Apply the camera lens mask to filter out the bleeding pixels.
        pixelCat(cameraLensMask) = algObj.AllCategories{1};

        % Resize the categorical matrix back to the size of the
        % original input image.
        pixelCatResized = imresize(pixelCat,size(I,1:2));
        if ~isempty(pixelCatResized)
            % Only keep the pixels classified as road or sky.
            autoLabels(pixelCatResized == "road") = algObj.RoadName;
            autoLabels(pixelCatResized == "sky_other") = algObj.SkyName;
        end
    end
This algorithm does not require any cleanup, so the terminate method is empty.
Use the Pixel Segmentation Automation Class in the App
To use the RoadAndSkySegmentation automation algorithm class in the Video Labeler app:
Create the folder structure
+vision/+labelerrequired under the current folder, and copy the automation class into it.
    mkdir('+vision/+labeler');
    copyfile('RoadAndSkySegmentation.m','+vision/+labeler');
Open the Video Labeler app with custom data to label. For this example, use the
caltech_cordova1.avivideo.
videoLabeler("caltech_cordova1.avi")
On the Video Labeler tab of the app toolstrip, in the Label Definition section , click Add Label and select
Pixelfrom the drop down. Define two pixel labels with names roadand sky. You can choose a color for each label. Click OK.
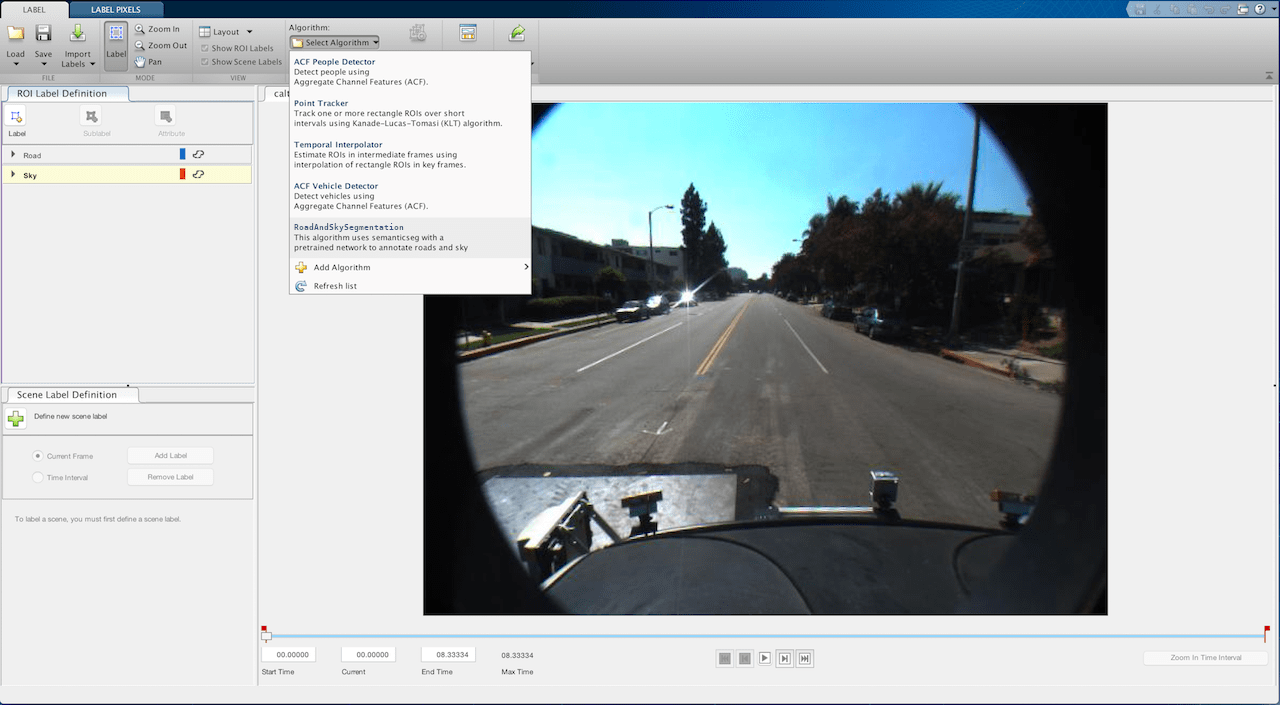
Return to the Video Labeler tab and, in the Automate Labeling section, click Algorithm > Select Algorithm > Refresh list.

Click Algorithm > RoadAndSkySegmentation. If you do not see this option, ensure that the current working folder has a folder called
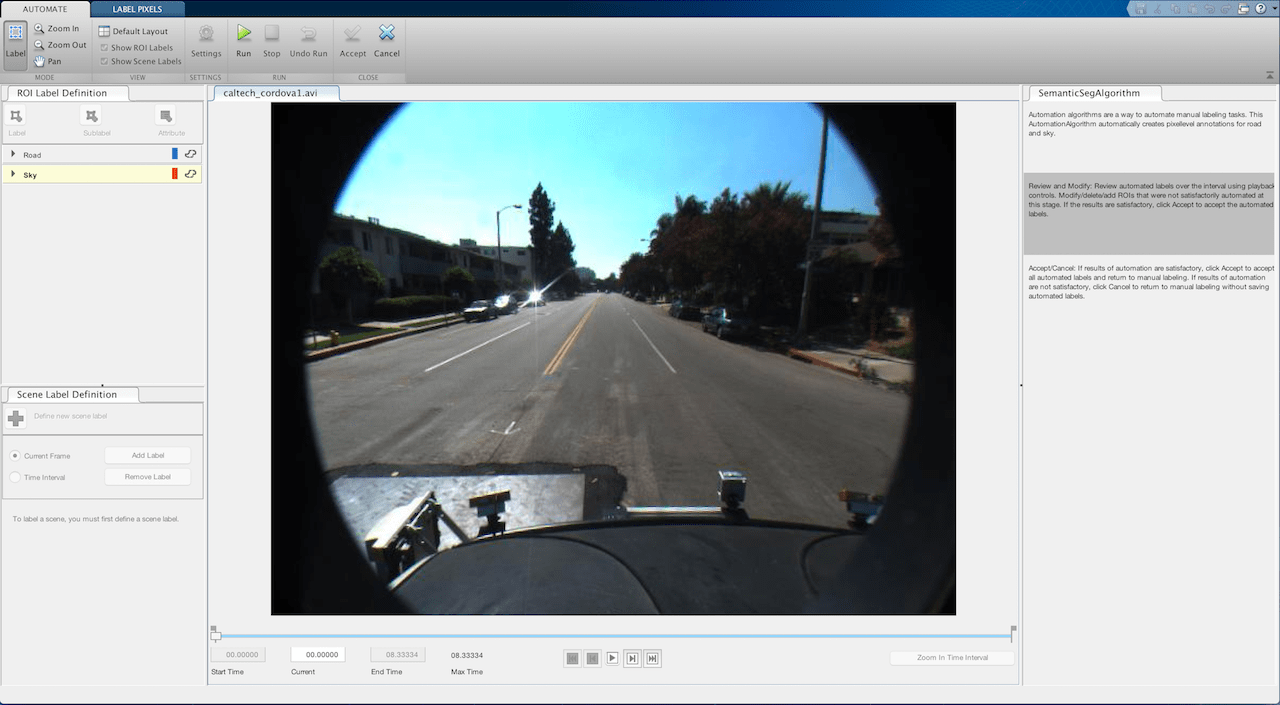
+vision/+labeler, with a file namedRoadAndSkySegmentation.min it.Click Automate. A new panel opens, displaying directions for using the algorithm.
Click Run. The created algorithm executes on each frame of the video, segmenting
roadandskycategories. After the run is complete, use the slider or arrow keys to scroll through the video and verify the result of the automation algorithm.

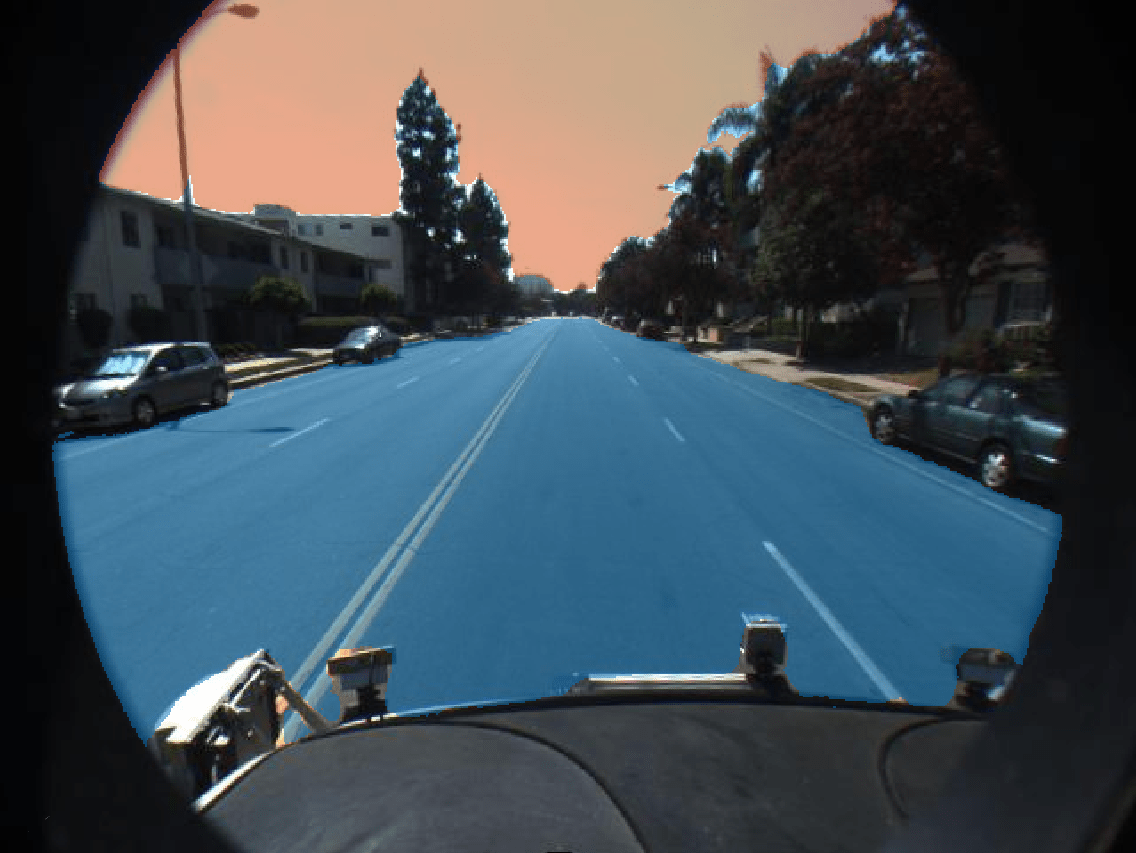
While the automation is better at labeling the sky and road than the segmentation network alone, some parts of the image have still been segmented incorrectly. You can now make manual corrections to these results, using them as part of an iterative process of training and labeling (sometimes called active learning or human in the loop) to further refine the accuracy of the network on custom data sets. You can manually tweak the results by using any of the pixel label tools in the Label tab to add or remove pixel annotations. Use the Erase and Brush tools to clean up the frames as needed.
Once you are satisfied with the pixel label categories for the entire video, click Accept.
Next Steps
Now that you have completed your automated pixel labeling of the video, you can proceed with labeling other objects of interest, save the session, or export the results of this labeling run. While this example demonstrates how a pretrained semantic segmentation network can accelerate labeling, the automation framework is equally powerful for other key computer vision tasks, such as optical character recognition (OCR) and Re-Identification (ReID) labeling. To learn more, see Automate Ground Truth Labeling for OCR for OCR labeling automation, and Automate Ground Truth Labeling for Object Tracking and Re-Identification for automating ReID labeling.
References
[1] Caesar, Holger, Jasper Uijlings, and Vittorio Ferrari. “COCO-Stuff: Thing and Stuff Classes in Context.” In 2018 IEEE/CVF Conference on Computer Vision and Pattern Recognition, IEEE, June 2018, 1209–18. https://doi.org/10.1109/CVPR.2018.00132.