Quick Start Guide for Polyspace Server and Access Products
To avoid finding bugs late in the development process, run static analysis by using Polyspace® products.
Polyspace Bug Finder™ checks C/C++ code for bugs, coding standard violations, security vulnerabilities, and other issues.
Polyspace Code Prover™ performs exhaustive checks for divide by zero, overflow, array access out of bounds, and other common types of run-time errors.
See also Differences Between Polyspace Bug Finder and Polyspace Code Prover.
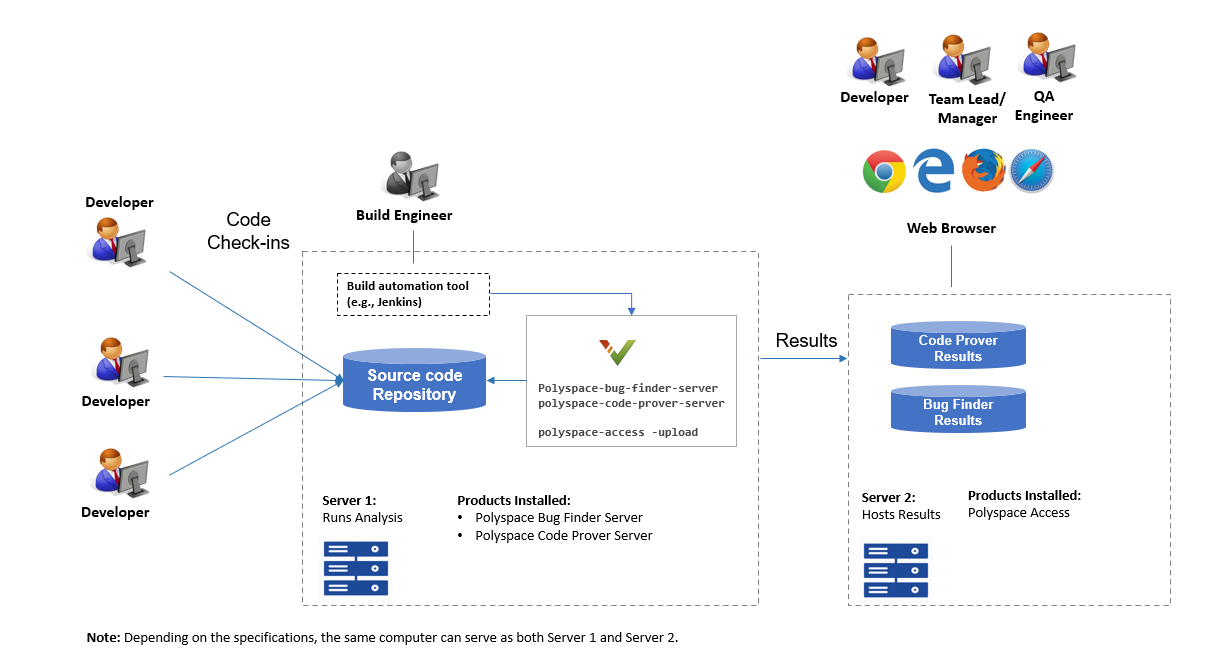
If you run Polyspace checkers regularly as part of continuous integration, you can protect against regressions from new code check-ins. To run Polyspace on a server during continuous integration, use Polyspace Bug Finder Server and Polyspace Code Prover Server. To host the Polyspace analysis results, use Polyspace Access.
A typical workflow looks like this figure.
Installation
Prerequisites
Depending on the needs of your project, team or organization, you have decided to obtain a certain number of licenses of Polyspace Server and Polyspace Access products. This guide helps you to install individual instances of these products on a machine.
Install Polyspace Server
To install Polyspace Server products, download and run the MathWorks installer. Enter a license for the Polyspace Server products (or request a trial license). See also Request a Trial License. The Polyspace Server products are installed in a separate folder from other MathWorks® products. See also Install Polyspace Server and Access Products.
Install Polyspace Access
Before installing Polyspace Access, consider the number of users who will potentially review Polyspace results simultaneously. The system requirements depend on the number of simultaneous reviewers. See also System Requirements for Polyspace Access (Polyspace Access).
Polyspace Access consists of several services: a user manager to authenticate user logins, an issue tracker to integrate your bug tracking tool with Polyspace, a database to manage results, a web server to show results, and a gateway to handle communications. The services are deployed in Docker containers. You can start the services from a common interface called the Cluster Admin.
To install Polyspace Access:
Download the installer as a zip file.
Unzip the file and start the Cluster Admin. From the Cluster Admin interface, start the various services. See Install Polyspace Access for Web Reviews.
After installation, to see uploaded results, you and other reviewers can log in to:
https://<hostName>:<portNumber>/metrics/index.html
hostName
and portNumber
are the hostname of the server machine where you install Polyspace Access and the
port that Polyspace Access uses to communicate with client machines, respectively.
For example, example-server.com:9443
. If do not know the hostname
and port number, contact your Polyspace Access administrator.Install Network License Manager
Both Polyspace Server and Polyspace Access use licenses that require communication with a network license manager for license checkouts.
To install, configure and start the network license manager for Polyspace Server, see Administer Network Licenses.
To install, configure and start the network license manager for Polyspace Access, see Manage Polyspace NNU Licenses.
Setting Up Polyspace Analysis
Prerequisites
You or your IT department in your organization must install the required number of Polyspace Server and Polyspace Access instances. This guide helps you to set up a Polyspace analysis as part of continuous integration using a single instance of Polyspace Server and Polyspace Access.
To check that your Polyspace Server and Polyspace Access installations can communicate with each other, see Check Polyspace Installation.
Run Polyspace Server and Upload Results to Polyspace Access
You can run the Polyspace Server products at the command line of your operating system:
To run the analysis, use the
polyspace-bug-finder-server
andpolyspace-code-prover-server
(Polyspace Code Prover) executables.To upload analysis results, use the
polyspace-access
(Polyspace Access) executable. You can also use this executable to export the results from Polyspace Access as text files for archiving or email attachments.
You can run all Polyspace executables from the polyspace/bin
subfolder of the Polyspace installation folder (for instance, /usr/local/Polyspace Server/R2024b
, see also Installation Folder). To start running Polyspace Server by using sample C source files and sample scripts, see:
You can also preconfigure the Polyspace analysis options from your build command (makefile), and then append a second options file with analysis specifications such as checkers. See Create Polyspace Analysis Configuration from Build Command (Makefile).
If you have an installation of the Polyspace desktop products, you can prepare the analysis configuration in the user interface of the desktop products. You can then generate Polyspace options files to run during continuous integration. See Configure Polyspace Analysis Options in User Interface and Generate Scripts.
Include Polyspace Runs in Continuous Integration by Using Tools Such as Jenkins
Once you have working scripts to run a Polyspace analysis, you can run those scripts at predefined intervals using continuous integration tools such as Jenkins and Bamboo. In Jenkins, you can use a Polyspace plugin to point to your Polyspace installations and send email notifications to developers after the analysis, based on criteria such as new defects.
From within the Jenkins interface, search for and install the Polyspace plugin. For a quick start on using the Jenkins plugin and sample scripts, see the External Websites section below. For the full workflow with Jenkins, see Sample Scripts for Polyspace Analysis with Jenkins.
Create a Workflow for Result Reviewers
Depending on tools that you already use, you can set up a convenient workflow for result reviewers. For example:
Reviewers receive alerts for new results and log into Polyspace Access
When new results are available, the continuous integration tool alerts a group of users. The email alert contains the Polyspace Access URL of the project where the results are uploaded.
In the Polyspace Access interface, a reviewer can open this project URL, filter results based on files, and fix the issues or set a status for the results. See also:
Filter and Sort Results in Polyspace Access Web Interface (Polyspace Access)
Address Results in Polyspace Access Through Bug Fixes or Justifications (Polyspace Access)
Reviewers get customized email alerts with results in attachment
Before upload to Polyspace Access, using the
-set-unassigned-findings
option of thepolyspace-access
(Polyspace Access) executable, the continuous integration (CI) tool assigns owners to new analysis results based on file or component ownership or another criteria.After upload, using the
-export
option of thepolyspace-access
executable, the CI tool exports analysis results for each owner to a separate text file. The tool then sends the text file in an email attachment to the owner. The text file contains results with the corresponding URLs in the Polyspace Access interface.If you use Jenkins as your CI tool, the Polyspace plugin in Jenkins directly supports this workflow. See Sample Scripts for Polyspace Analysis with Jenkins.
On receiving the email, the owner opens the attached text file, copies the URL of each result to their web browser and reviews the result.
Reviewers open tickets from bug tracking tools
A reviewer, such as a quality engineer, reviews all new results and creates JIRA tickets for developers. See Create Bug Tracking Tool Tickets from the Polyspace Access Web Interface (Polyspace Access).
Developers open each JIRA ticket and navigate to the corresponding Polyspace result in the Polyspace Access interface.