Manual Host-Radio Hardware Setup
To implement the features in this support package, you must establish communication between the host and the radio hardware. After the support package is installed, follow these steps to manually configure the radio hardware and host computer.
Required Hardware Checklist
Use this list to confirm that you have the required hardware to complete the setup and configuration process.
ADALM-PLUTO radio
USB communication cable
USB power cable (optional)
Antennas or a loopback cable
Set Up Support Package in MATLAB
To work with the support package in MATLAB®, you must create a radio object for your radio hardware. In the following
example, dev is a radio object for the ADALM-PLUTO radio.
dev = sdrdev('Pluto');sdrdev also sets up architecture-specific environment variables for
the radio hardware. These variables enable communication between MATLAB or Simulink® and the radio hardware.
See sdrdev for valid device names.
Configure Host Computer
Connect the radio hardware to the host computer using a USB cable.
Confirm that all connections for the ADALM-PLUTO radio are complete. Specific connections are shown in this image.

Connect the USB communication cable from the host computer to the radio.
Connect the antennas to the transmit and receive antenna ports. Alternatively, connect a loopback cable connecting the transmit port to the receive port.
(Optional) Connect a USB power cable to a USB power hub of the ADALM-PLUTO radio. This step is recommended if:
You plan to operate the radio at or near maximum gain settings continuously.
PlutoSDR is unresponsive or commands fail especially when the radio is connected to an unpowered USB hub.
Wait until you see the Ready indicator LED lit steady and LED1 flashing.
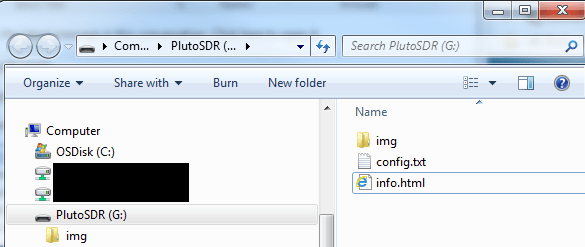
After you connect the ADALM-PLUTO radio to the host computer via a USB communication cable, you will see a
PlutoSDRdrive as a removable disk on the host computer.
The
PlutoSDRdrive contains these files.config.txt— Enables you to change the network address assigned to thePlutoSDR.info.html— Provides the current configuration for the connectedPlutoSDR, along with background information from Analog Devices®.
For more information, see Radio Identity.
Note
Because the setup process runs operating system commands for installing the USB drivers, you must have administrator privileges for the radio hardware setup. If you see the User Account Control window, click Yes to continue.
Verify Radio Hardware Setup
Before you can verify the setup, you must start the radio properly. You will see failures if you do not wait until the radio is ready (see previous step).
Check the radio connection, using the radio object you created with the
sdrdev
function.
dev = sdrdev('Pluto')dev =
SDRDevPluto with properties:
RadioID: 'usb:0'
DeviceName: 'Pluto'If you are unable to verify the radio hardware setup, see Common Problems and Fixes.
Radio Identity
(Recommended) Identify the ADALM-PLUTO radio by the USB identity.
Note
When working with multiple radios, if devices are inserted or removed, the host computer assignment of USB addresses might change. Any time an SDR device is inserted or removed from a USB port, the host computer polls all USB ports and assigns or reassigns the radio addresses associated with connected devices.

When operating on Windows® keep these considerations in mind.
When running multiple radios on the same host in separate MATLAB sessions, for each MATLAB session the first radio is assigned
usb:0, and the ID number increments by one for subsequent radios.Radios that are being used by one MATLAB are not seen by other MATLAB sessions. Use
findPlutoRadioand check the reported serial number to identify the radios seen in a particular MATLAB session.
To ensure that all assigned radio identities remain static, do not connect or disconnect radios after SDR objects have been created. The best practice is to connect radios and create SDR objects in this order:
Clear all SDR objects.
Connect all radios.
Check to confirm that the connected radios are recognized by running this command:
findPlutoRadio
Create SDR objects.
To interface with the radio hardware, the
RadioIDproperty of the radio object must match the radio ID of the radio hardware. Update theRadioIDproperty, if necessary.When running multiple radios on the same host, the host assigns each radio a different radio ID. When identifying the radio by USB ID, the first radio is assigned
usb:0, and the ID number increments by one for subsequent radios. For example, to assign IDs to two radios connected on the same host computer, at the MATLAB command prompt, enter:rx = sdrrx('Pluto','RadioID','usb:0'); tx = sdrtx('Pluto','RadioID','usb:1');Optionally, you can identify the radio by the IP address. The default IP address for the radio hardware is 192.168.2.1. If you have no other connected device with this IP address, you can leave the address as is. If needed, you can manually change the IP address.
To change the network settings for a
PlutoSDR.Navigate to the
PlutoSDRdrive, and open theconfig.txtfile in a text editor.Change the desired settings in
config.txt. Save and close the file.Eject the
PlutoSDRdrive.Disconnect and reconnect the ADALM-PLUTO radio.
Confirm the changes by viewing the settings in the
info.htmlfile for thatPlutoSDR.In Windows and most Linux distributions, the IP address of the ADALM-PLUTO radio is reachable by the host computer. Attempt assigning an IP address ID to the ADALM-PLUTO radio by entering this command (using the desired IP address) at the MATLAB command prompt:
If this command fails and you are unable to assign the IP address radio identity, you receive an error. For more information, see Common Problems and Fixes.rx = sdrrx('Pluto','RadioID','ip:192.168.2.4');