Create Multiple Fits in Curve Fitter App
Refining Your Fit
After you create a single fit in the Curve Fitter app, you can refine your fit, using any of the following optional steps:
Change the fit type and settings. Select a fit type from the gallery in the Fit Type section of the Curve Fitter tab. For fit settings for each model type, see Linear and Nonlinear Regression, Interpolation, and Smoothing.
Exclude data by removing outliers in the Curve Fitter app. See Remove Outliers.
Select weights. See Data Selection.
Select validation data. See Select Validation Data
Create multiple fits to compare different fit types and settings side by side in the Curve Fitter app. See Creating Multiple Fits.
Creating Multiple Fits
After you create a single fit, it can be useful to create multiple fits for comparison. When you create multiple fits, you can compare different fit types and settings side by side in the Curve Fitter app.
After creating a fit, you can add a fit. On the Curve Fitter tab, in the File section, click New and select New Fit. Each additional fit appears as a new tab in the Fits pane and a new row in the Table Of Fits pane.
To create a copy of the current fit, click Duplicate in the
File section of the Curve Fitter tab. You also
can right-click a fit in the Table Of Fits pane and select the
Duplicate "Current Fit Name" option.
Each additional fit appears as a new tab in the Fits pane.
To delete a fit from your session, right-click the fit in the Table Of
Fits pane and select the Delete "Current Fit
Name" option.
Use sessions to save and reopen your fits. See Save and Reopen Sessions.
Displaying Multiple Fits Simultaneously
After you have created multiple fits, you can compare different fit types and settings side by side in the Curve Fitter app. You can view plots simultaneously, and you can examine the goodness-of-fit statistics to compare your fits.
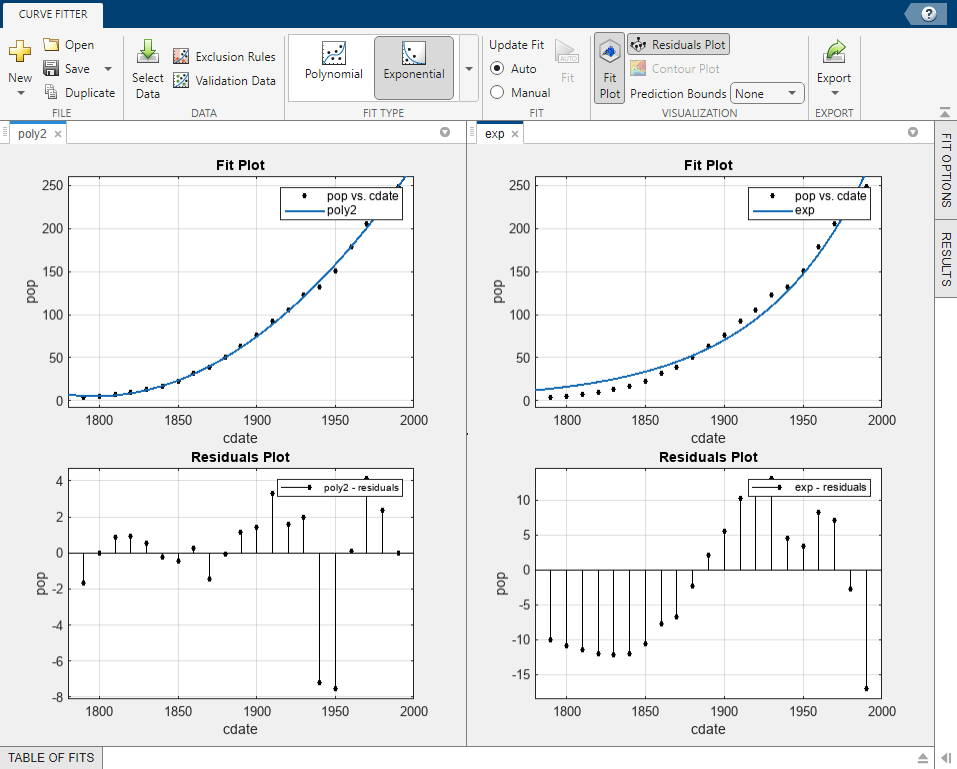
To compare plots and see multiple fits simultaneously, you can drag and drop the fit figure
tabs in the Fits pane. Alternatively, you can click the Document
Actions button located to the far right of the fit figure tabs. Select the Tile
All option and specify the number and position of tiles you want to
display.

Each fit figure displays the plots for a single fit. The following example shows two fit figures displayed side by side. You can see multiple fits in the session listed in the Table Of Fits pane.

You can close fit figure tabs in the Fits pane, but the fits remain in
your session. The Table Of Fits pane displays all your fits (open and
closed). Click a fit in the Table Of Fits pane to open the fit figure
or bring focus to the figure if it is already open. To remove a fit, right-click the fit in
the Table Of Fits pane and select the Delete
"Current Fit Name" option.
Tip
If you want more space to view and compare plots, you can collapse the Fit Options, Results, and Table Of Fits panes. Click and drag the left border of the Fit Options and Results panes until they become tabs. Similarly, click and drag the top border of the Table Of Fits pane.

Using the Statistics in the Table of Fits
The Table Of Fits pane shows all fits in the current session.

After using graphical methods to evaluate the goodness of fit, you can examine the goodness-of-fit statistics shown in the table to compare your fits. The goodness-of-fit statistics help you determine how well the model fits the data. Click the table column headers to sort by statistics, name, fit type, and so on.
The following guidelines help you use the statistics to determine the best fit:
R-square is the square of the correlation between the response values and the predicted response values. A value closer to 1 indicates that a greater proportion of variance is accounted for by the model.
SSE is the sum of squares due to error of the fit. A value closer to zero indicates a fit that is more useful for prediction.
DFE is the degree of freedom in the error.
Adj R-sq is the degrees of freedom adjusted R-square. A value closer to 1 indicates a better fit.
RMSE is the root mean squared error or standard error. A value closer to 0 indicates a fit that is more useful for prediction.
# Coeff is the number of coefficients in the model. When you have several fits with similar goodness-of-fit statistics, look for the smallest number of coefficients to help decide which fit is best. You must trade off the number of coefficients against the goodness of fit indicated by the statistics to avoid overfitting.
For a more detailed explanation of the Curve Fitting Toolbox™ statistics, see Goodness-of-Fit Statistics.
To compare the statistics for different fits and decide which fit is the best tradeoff between over- and under-fitting, use a similar process to that described in Compare Fits in Curve Fitter App.