Main Content

Configure for Slurm, Torque, LSF, PBS, Grid Engine, HTCondor, or AWS Batch

Follow these instructions to configure your MATLAB® Parallel Server™ installation to work with the built-in cluster type of these schedulers:

  • Slurm

  • LSF®

  • Torque

  • PBS Pro® and OpenPBS

  • Grid Engine

  • HTCondor

  • AWS® Batch

For some schedulers, you can create a cluster profile using either a built-in cluster type or the generic scheduler interface. As a best practice, use built-in cluster types where possible.

You must use a Generic cluster profile when you connect to a cluster that does not have a built-in cluster type.

To configure a cluster using the Generic cluster type, see Configure Using the Generic Scheduler Interface.

Create Cluster Profile and Validate Installation

This procedure verifies that the parallel computing products are installed and configured correctly on your cluster.

Step 1: Create a Cluster Profile

In this step you create a cluster profile to use in subsequent steps.

  1. Start the Cluster Profile Manager. On the Home tab, in the Environment area, select Parallel > Create and Manage Clusters.

  2. Create a new profile in the Cluster Profile Manager by selecting Add Cluster Profile > Slurm (or AWS Batch, Grid Engine, HTCondor, LSF, or PBS Pro, or Torque as appropriate).

  3. With the new profile selected in the list, click Rename and edit the profile name to be InstallTest. Select Enter.

  4. In the Properties tab, provide settings for the following fields:

    1. Set the Description field to For testing installation.

    2. Set the JobStorageLocation field to the location where you want to store job and task data on the client machine, for example, C:\Temp\joblocation. If this location is also accessible from nodes on the cluster, MATLAB workers can read and write to it directly. Otherwise, the client uses sftp to copy job and task data files to and from the cluster.

      Note

      You must not use the same job storage location for different versions of parallel computing products. Each version on your cluster must use its own job storage location.

    3. Set the NumWorkers field to the number of workers you want to run the validation tests on, within the limitation of your licensing.

    4. Set NumThreads to the number of threads to use on each worker.

    5. Set the ClusterMatlabRoot to the location of the MATLAB installation to run on the worker machines.

    6. If the cluster uses online licensing, set RequiresOnlineLicensing to true.

    7. If you set RequiresOnlineLicensing to true, in the LicenseNumber field, enter your licence number.

    8. If you are using LSF, set the OperatingSystem field to the operating system of your worker machines.

    9. Set the HasSharedFilesystem field to indicate if the client and workers can share the same JobStorageLocation property value.

    10. By default, your MATLAB installation comes with scheduler plugin scripts that are ready to use. You can leave the PluginScriptsLocation field to the default MathWorks®-provided plugin scripts.

      If you want to use customized plugin scripts in the cluster profile, you can specify the location of the customized plugin scripts in the PluginScriptsLocation field. To learn how to download and modify the default plugin scripts, see Download and Customize Plugin Scripts.

    11. You can add additional properties to the AdditionalProperties table to customize how the client interacts with the cluster using built-in scheduler properties or custom scheduler properties. For a full list of built-in additional properties for each scheduler, see Customize Behavior of Sample Plugin Scripts.

      For example, you can use these additional properties to connect and run jobs on a remote cluster.

      • ClusterHost

        If the client does not have access to scheduler utilities to directly submit jobs to the third-party scheduler, the plugin scripts create an ssh session to the cluster and run scheduler commands over that connection. As MATLAB runs scheduler utilities such as sbatch and squeue, you must provide the hostname of the cluster headnode or login node. Under the AdditionalProperties table, select Add. Specify a new property with name ClusterHost. For the value, specify the hostname of the cluster headnode, for example, cluster-host-name. Set Type to String.

      • RemoteJobStorageLocation

        If the client and workers do not share the same job storage location, and you set HasSharedFilesystem to false, you must provide a job storage location that the headnode and cluster workers can access. The client copies job and task files between your computer and the remote job storage location on cluster using sftp. Under the AdditionalProperties table, select Add. Specify a new property with name RemoteJobStorageLocation. For the value, provide the path to a location that the cluster workers can store jobs and task data, for example /network/share/joblocation. Set Type to String.

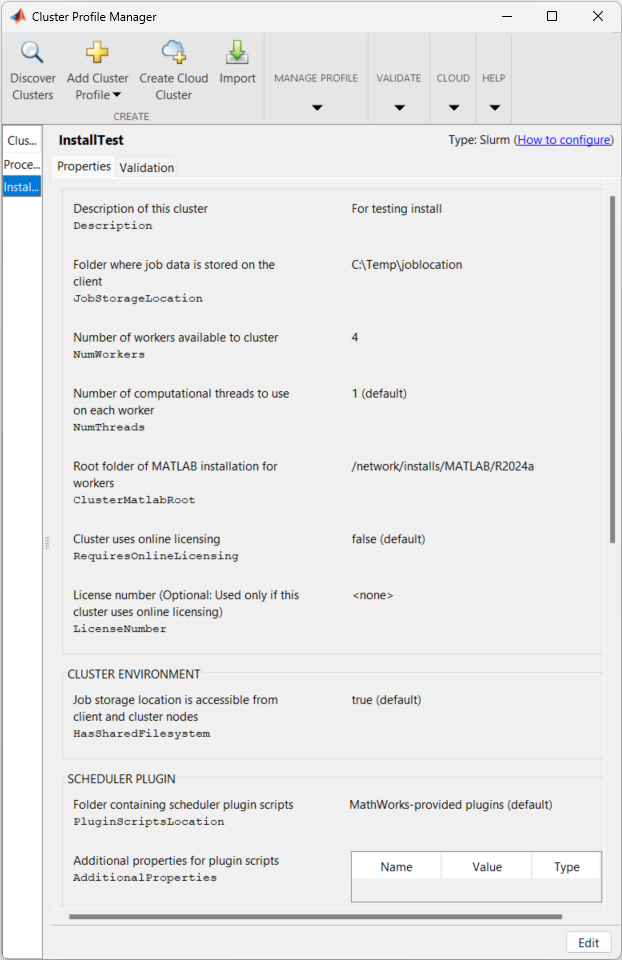
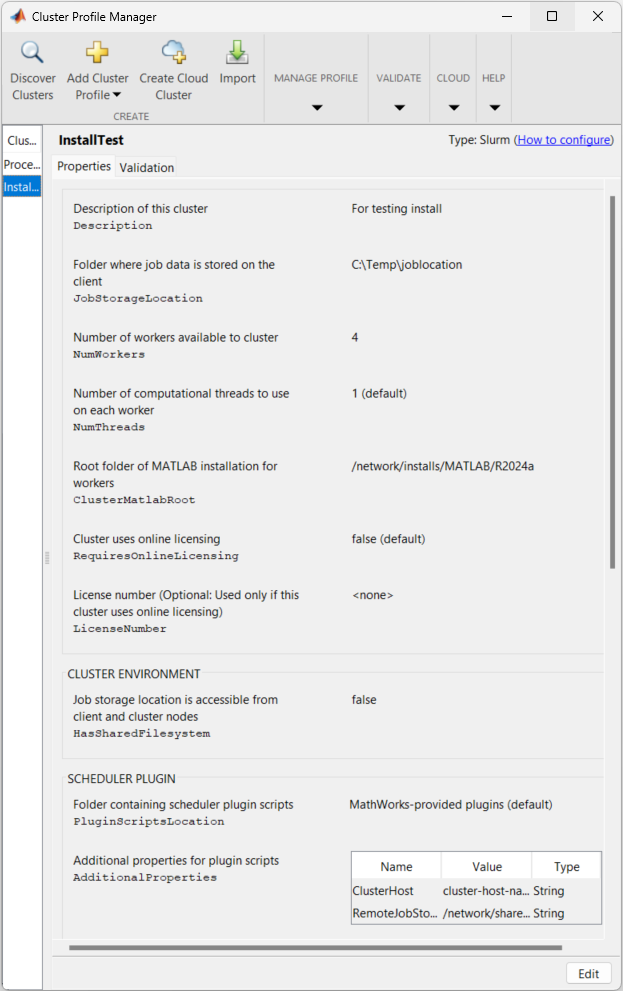
    12. Click Done to save your cluster profile. The completed cluster profile should look something like one of these figures.

       Cluster profile with no additional properties

       Cluster profile with additional properties

Step 2: Validate the Cluster Profile

In this step you verify your cluster profile, and thereby your installation. You can specify the number of workers to use when validating your profile. If you do not specify the number of workers in the Validation tab, then the validation will attempt to use as many workers as the value specified by the NumWorkers property on the Properties tab. You can specify a smaller number of workers to validate your configuration without occupying the whole cluster.

  1. If it is not already open, start the Cluster Profile Manager from the MATLAB desktop. On the Home tab, in the Environment area, select Parallel > Create and Manage Clusters.

  2. Select your cluster profile in the listing.

  3. Click Validation tab.

  4. Use the check boxes to select all or a subset of the validation stages, and specify the number of workers to use when validating your profile.

  5. Click Validate.

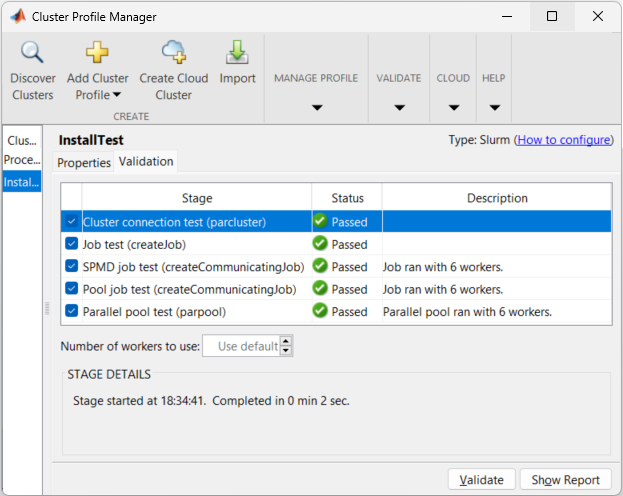
After the client completes the cluster validation, the Validation tab shows the output.

 This figure shows the results of the InstallTest profile that passed all validation tests.

Note

If your validation does not pass, contact the MathWorks install support team.

If your validation passed, you now have a valid profile that you can use in other parallel applications. You can make any modifications to your profile appropriate for your applications, such as NumWorkersRange, AttachedFiles, AdditionalPaths, etc.

To save your profile for other users, select the profile and click Export, then save your profile to a file in a convenient location. Other users can import your profile by selecting Import in the Cluster Profile Manager.

Download and Customize Plugin Scripts

Parallel Computing Toolbox™ uses a set of plugin scripts to define how your machine communicates with your scheduler. Your MATLAB installation comes with scheduler specific plugin scripts that are ready to use. However, you can download and modify the plugin scripts to configure how MATLAB interacts with the scheduler to best suit your cluster setup and support custom submission options.

Download Plugin Scripts

MathWorks provides plugins for the following third-party schedulers, which you can download from GitHub® repositories or the Add-On Manager.

PluginGitHub Repository

Parallel Computing Toolbox plugin for MATLAB Parallel Server with Slurm

https://github.com/mathworks/matlab-parallel-slurm-plugin

Parallel Computing Toolbox plugin for MATLAB Parallel Server with IBM Spectrum® LSF

https://github.com/mathworks/matlab-parallel-lsf-plugin

Parallel Computing Toolbox plugin for MATLAB Parallel Server with Grid Engine

https://github.com/mathworks/matlab-parallel-gridengine-plugin

Parallel Computing Toolbox plugin for MATLAB Parallel Server with PBS

https://github.com/mathworks/matlab-parallel-pbs-plugin

Parallel Computing Toolbox plugin for MATLAB Parallel Server with HTCondor

https://github.com/mathworks/matlab-parallel-htcondor-plugin

Use either of these workflows to download the appropriate plugin scripts for your scheduler.

  • You can download the plugins from a GitHub repository.

    • Clone the GitHub repository from a command windows on your machine. For example, to clone the repository for the Parallel Computing Toolbox plugin for MATLAB Parallel Server with Slurm, use:

      git clone https://github.com/mathworks/matlab-parallel-slurm-plugin
    • Visit the GitHub page in a browser and download the plugin as a ZIP archive.

  • Alternatively, to install the add-ons from the MATLAB Add-On manager, go to the Home tab and, in the Environment section, click the Add-Ons icon. In the Add-On Explorer, search for the add-on and install it.

  • You can also download the plugins from MATLAB Central™ File Exchange.

Customize Plugin Scripts

You can customize the plugin scripts by adding your own custom additional properties. Custom additional properties allow you to modify the values for these properties when you submit jobs to the cluster without having to repeatedly modify the plugin scripts.

As an example, consider a Slurm scheduler. The submit command for Slurm accepts a –-nodelist argument that allows you to specify the nodes you want to run on. Creating an additional property for the –-nodelist allows you to change the value of this argument without modifying your plugin script. To create the –-nodelist argument additional property, include this code pattern in either your independentSubmitFcn.m or communicatingSubmitFcn.m script in the plugin script folder.

% Basic SLURM submit command
submitCommand = 'sbatch';
 
% Check if property is defined
if isprop(cluster.AdditionalProperties, 'NodeList')
    % Add appropriate argument and value to submit string
    submitCommand = [submitCommand ' --nodelist=' cluster.AdditionalProperties.NodeList];
end 

Alternatively, to modify the submit command for both independent and communication jobs, include the code pattern above in your getCommonSubmitArgs function. The getCommonSubmitArgs function is a helper function included in the sample plugin scripts that you can use to modify the submit command for both types of jobs. You can add custom additional properties to the AdditionalProperties table in the cluster profile just like built-in additional properties. You can also set custom additional properties using the cluster object. To learn more, see Set Additional Properties.

Run Jobs on Remote Clusters or Clusters without Shared File System

If the MATLAB client is unable to directly submit jobs to the scheduler, MATLAB supports the use of the ssh protocol to submit commands to a remote cluster. To configure your cluster to submit scheduler commands via ssh, in the AdditionalProperties table, set the value of the ClusterHost additional property to the name of the cluster node to which MATLAB connects via ssh.

If the client and the cluster nodes do not have a shared file system, MATLAB supports the use of sftp to copy job and task files between your computer and the cluster. To configure your cluster to move files between the client and the cluster with sftp, in the AdditionalProperties table, set the value of the RemoteJobStorageLocation additional property to a folder on the cluster that the workers can access.

The following diagram illustrates the ssh and sftp connections for a remote Slurm cluster that does not share a file system with the client. In this type of configuration, job data is copied from the client host running a Windows operating system to a host on the cluster (cluster login node) running a UNIX® operating system. From the cluster login node, the Slurm sbatch command submits the job to the scheduler. When the job finishes, the job output is copied back to the client host.

Configure LSF Scheduler on Windows Cluster

If your cluster is already set up to use mpiexec and smpd, you can use Parallel Computing Toolbox software with your existing configuration if you are using a compatible MPI implementation library (as defined in matlabroot\toolbox\parallel\mpi\mpiLibConf.m). However, if you do not have mpiexec on your cluster and you want to use it, you can use the mpiexec software shipped with the parallel computing products.

For further information about mpiexec and smpd, see the MPICH home page. For user’s guides and installation instructions on that page, select Documentation > User Docs.

In the following instructions, matlabroot refers to the MATLAB installation location.

To use mpiexec to distribute a job, the smpd service must be running on all nodes that will be used for running MATLAB workers.

Note

The smpd executable does not support running from a mapped drive. Use either a local installation, or the full UNC path name to the executable. Microsoft® Windows Vista® does not support the smpd executable on network share installations, so with Windows Vista the installation must be local.

  1. Log in as a user with administrator privileges.

  2. Start smpd by typing in a Windows® command prompt:

    matlabroot\bin\win64\smpd -install

    This command installs the service and starts it. As long as the service remains installed, it will start each time the node boots.

  3. If this is a worker machine and you did not run the installer on it to install MATLAB Parallel Server software (for example, if you are running MATLAB Parallel Server software from a shared installation), execute the following command in a Windows command prompt.

    matlabroot\bin\matlab.bat -install_vcrt
    

    This command installs the Microsoft run-time libraries needed for running jobs with your scheduler.

  4. If you are using Windows firewalls on your cluster nodes, execute the following in a Windows command prompt.

    matlabroot\toolbox\parallel\bin\addMatlabToWindowsFirewall.bat
    

    This command adds MATLAB as an allowed program. If you are using other firewalls, you must configure them to make similar accommodation.

  5. Log in as the user who will be submitting jobs for execution on this node.

  6. Register this user to use mpiexec by typing:

    matlabroot\bin\win64\mpiexec -register
  7. Repeat steps 5–6 for all users who will run jobs on this machine.

  8. Repeat all these steps on all Windows nodes in your cluster.

Configure Windows Firewalls on Server

If you are using Windows firewalls on your cluster nodes,

  1. Log in as a user with administrative privileges.

  2. Execute the following in a Windows command prompt.

    matlabroot\toolbox\parallel\bin\addMatlabToWindowsFirewall.bat
    

    This command adds MATLAB as an allowed program. If you are using other firewalls, you must configure them for similar accommodation.

Related Topics