Main Content

Configure Using the Generic Scheduler Interface

The generic scheduler interface provides flexibility to configure the interaction of the MATLAB® client, MATLAB workers, and a third-party scheduler. Use the generic scheduler interface when your scheduler does not have a built-in cluster type.

For some schedulers, you can create a cluster profile using either a built-in cluster type or the generic scheduler interface. As a best practice, use built-in cluster types where possible.

To configure a cluster using a built-in cluster type, see Configure for Slurm, Torque, LSF, PBS, Grid Engine, HTCondor, or AWS Batch, Configure a Hadoop Cluster, or Configure for Microsoft HPC Pack.

Interface with Third-Party Schedulers

The generic scheduler interface provides a means of getting tasks from your Parallel Computing Toolbox™ client session to your scheduler and cluster nodes. To achieve this, you must provide your MATLAB client with a set of plugin scripts. The scripts contain instructions specific to your cluster infrastructure, such as how to communicate with the job scheduler, and how to transfer job and task data to cluster nodes.

Download Sample Plugin Scripts

To support usage of the generic scheduler interface, MathWorks® provides add-ons, or plugins for the following third-party schedulers, which you can download from GitHub® repositories or the Add-On Manager and edit to meet your requirements. Choose one of the sample plugin scripts that most closely matches your setup.

PluginGitHub Repository

Parallel Computing Toolbox plugin for MATLAB Parallel Server™ with Slurm

https://github.com/mathworks/matlab-parallel-slurm-plugin

Parallel Computing Toolbox plugin for MATLAB Parallel Server with IBM Spectrum® LSF®

https://github.com/mathworks/matlab-parallel-lsf-plugin

Parallel Computing Toolbox plugin for MATLAB Parallel Server with Grid Engine

https://github.com/mathworks/matlab-parallel-gridengine-plugin

Parallel Computing Toolbox plugin for MATLAB Parallel Server with PBS

https://github.com/mathworks/matlab-parallel-pbs-plugin

Parallel Computing Toolbox plugin for MATLAB Parallel Server with HTCondor

https://github.com/mathworks/matlab-parallel-htcondor-plugin

Use either of these workflows to download the appropriate plugin scripts for your scheduler.

  • You can download the plugins from a GitHub repository.

    • Clone the GitHub repository from a command windows on your machine. For example, to clone the repository for the Parallel Computing Toolbox plugin for MATLAB Parallel Server with Slurm, use:

      git clone https://github.com/mathworks/matlab-parallel-slurm-plugin
    • Visit the GitHub page in a browser and download the plugin as a ZIP archive.

  • Alternatively, to install the add-ons from the MATLAB Add-On manager, go to the Home tab and, in the Environment section, click the Add-Ons icon. In the Add-On Explorer, search for the add-on and install it.

  • You can also download the plugins from MATLAB Central™ File Exchange.

If the MATLAB client is unable to directly submit jobs to the scheduler, MATLAB supports the use of the ssh protocol to submit commands to a remote cluster.

If the client and the cluster nodes do not have a shared file system, MATLAB supports the use of sftp (SSH File Transfer Protocol) to copy job and task files between your computer and the cluster.

Modify Sample Scripts

You can set additional properties to customize how the client interacts with the cluster without modifying the plugin scripts. For more information, see Customize Behavior of Sample Plugin Scripts.

If your scheduler or cluster configuration is not fully supported by one of the repositories, you can modify the scripts of one of these packages to meet your requirements. For more information on how to write a set of plugin scripts for generic schedulers, see Plugin Scripts for Generic Schedulers.

Create a Generic Cluster Profile

Sample Setup for Slurm Like Generic Cluster

This example shows how to set up your cluster profile to use the generic scheduler interface. It shows the set up of a Slurm like scheduler in a network without a shared file system between the client and the cluster machines. The following diagram illustrates the cluster setup:

In this type of configuration, job data is copied from the client host running a Windows operating system to a host on the cluster (cluster login node) running a UNIX® operating system. From the cluster login node, the Slurm sbatch command submits the job to the scheduler. When the job finishes, the job output is copied back to the client host.

Requirements

The setup must meet the following conditions:

  • The client node and cluster login node must support ssh and sftp.

  • The cluster login node must be able to call the sbatch command to submit a job to a Slurm scheduler.

Configure Generic Cluster Profile

Follow these steps to configure the cluster profile. You can modify any of these options depending on your setup.

  1. Extract the Slurm GitHub repository folder and move it to a location that MATLAB clients can access.

  2. Start a MATLAB session on the client host.

  3. Start the Cluster Profile Manager from the MATLAB desktop. On the Home tab, in the Environment section, select Parallel > Create and Manage Clusters.

  4. Create a new profile in the Cluster Profile Manager by selecting Add Cluster Profile > Other Third-Party Scheduler.

    Before R2024a: In the Cluster Profile Manager, select Add Cluster Profile > Generic.

  5. With the new profile selected in the list, in the Manage Profile section, select Rename and change the profile name to InstallTest. Press Enter.

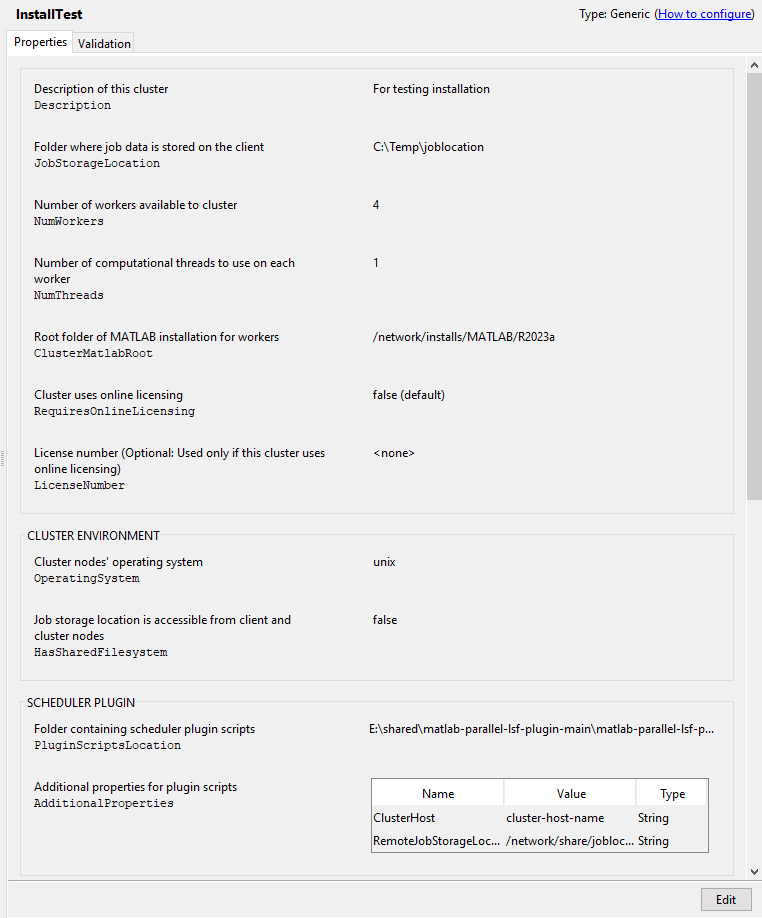
  6. In the Properties tab, select Edit and provide settings for the following fields:

    1. Set the Description field to For testing installation.

    2. Set the JobStorageLocation field to the location where you want to store job and task data on the client machine, for example, C:\Temp\joblocation. If this location is also accessible from nodes on the cluster, MATLAB workers can read and write to it directly. Otherwise, the client uses sftp to copy job and task data files to and from the cluster.

      You must not use the same job storage location for different versions of parallel computing products. Each version on your cluster must use its own job storage location.

    3. Set NumWorkers to the number of workers for which you want to test your installation.

    4. Set NumThreads to the number of threads to use on each worker.

    5. Set ClusterMatlabRoot to the installation location of MATLAB to run on the worker machines.

    6. If the cluster uses online licensing, set RequiresOnlineLicensing to true.

    7. If you set RequiresOnlineLicensing to true, enter your LicenseNumber.

    8. Set OperatingSystem to the operating system of your cluster worker machines.

    9. Set HasSharedFilesystem to false. This setting indicates that the client node and worker nodes cannot share the same JobStorageLocation property value.

    10. Set the PluginScriptsLocation to the location of your modified plugin scripts.

    11. To connect to a remote cluster, under the AdditionalProperties table, select Add. Specify a new property with name ClusterHost, value cluster-host-name, and type String.

    12. To run jobs on a remote cluster without a shared file system, under the AdditionalProperties table, select Add. Specify a new property with name RemoteJobStorageLocation, value /network/share/joblocation, and type String.

  7. Click Done to save your cluster profile changes. The dialog box looks as follows:

    Cluster Profile Manager with the InstallTest cluster profile selected. The properties of the InstallTest profile shown.

To check that the profile works, perform a validation following the steps in Validate Cluster Profile and Installation.

Validate Cluster Profile and Installation

You can specify the number of workers to use when validating your profile. If you do not specify the number of workers in the Validation tab, then the validation process attempts to use as many workers as the value specified by the NumWorkers property on the Properties tab. You can specify a smaller number of workers to validate your configuration without occupying the whole cluster.

  1. Start the Cluster Profile Manager from the MATLAB desktop. On the Home tab, in the Environment area, select Parallel > Create and Manage Clusters.

  2. Select your cluster profile in the listing.

  3. Click the Validation tab.

  4. Use the check boxes to choose all tests, or a subset of the validation stages, and specify the number of workers to use when validating your profile.

  5. Click Validate.

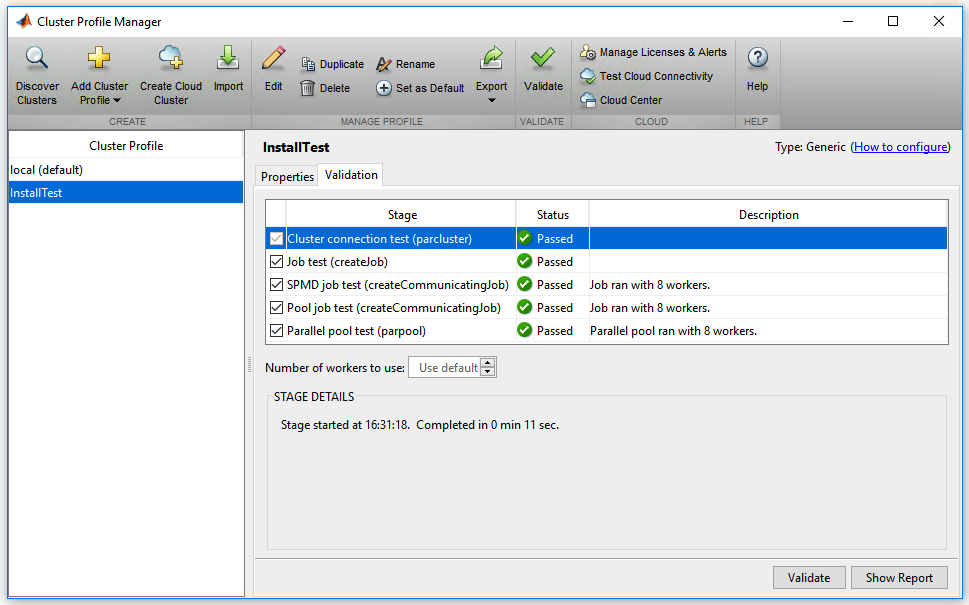
After the client completes the cluster validation, the Validation tab shows the output. The following figure shows the results of a profile that passed all validation tests.

Cluster Profile Manager with the InstallTest cluster profile selected. The validation results for the InstallTest cluster are shown in the right pane.

Note

If your validation fails any stage, contact the MathWorks install support team.

If your validation passes, you have a valid profile that you can use in other parallel applications. You can make any modifications to your profile that are appropriate for your applications, such as NumWorkersRange, AttachedFiles, or AdditionalPaths.

To save your profile for other users, select the profile, and click Export. Then save your profile to a file in a convenient location. When running the Cluster Profile Manager, other users can import your profile by clicking Import.

To learn how to distribute a generic cluster profile and plugin scripts for others to use, see Distribute a Generic Cluster Profile and Plugin Scripts.

You can enable MATLAB clients to locate your cluster using the Parallel Computing Toolbox "Discover Clusters" functionality by creating a configuration file and then distributing this file to cluster users. For more information, see Configure for Third-Party Scheduler Cluster Discovery.

Special Configurations

Depending on your cluster architecture, you might need to perform additional tasks before you connect to your generic scheduler.

Custom MPI builds

You can use an MPI build that differs from the one provided with Parallel Computing Toolbox. For more information about using this option with the generic scheduler interface, see Use Different MPI Builds on UNIX Systems.

Run Communicating Jobs with the Grid Engine Family

The sample scripts for Grid Engine family rely on the presence of a matlab parallel environment. Parallel environments (PE) are programming environments designed for parallel computing in clusters. To run communicating jobs with MATLAB Parallel Server and a Grid Engine family cluster, you must establish a matlab parallel environment.

Create the Parallel Environment.  The following steps create the parallel environment, and then make it runnable on all queues. As a best practice, perform these steps on the head node of your cluster. Some steps require administrator access.

  1. Download the plugin scripts for Grid Engine from the GitHub repository:

    Alternatively, you can download the plugin scripts from MATLAB Central File Exchange.

  2. Modify the contents of matlabpe.template to use the number of slots you want and the correct location of the startmatlabpe.sh and stopmatlabpe.sh files. These files can exist in a shared location accessible by all hosts, or you can copy them to the same location on each host. You can also change other values or add additional values to matlabpe.template to suit your cluster. For more information, refer to the sge_pe documentation provided with your scheduler.

  3. Add the matlab parallel environment, using a shell command such as:

    qconf -Ap matlabpe.template

  4. Make the matlab parallel environment runnable on all queues:

    qconf -mq all.q
    This command brings up a text editor for you to make changes. Search for the line pe_list, and add matlab.

  5. Ensure you can submit a trivial job to the PE:

    $ echo "hostname" | qsub -pe matlab 1

  6. Use qstat to check that the job runs correctly, and check that the output file contains the name of the host that ran the job. The default file name for the output file is ~/STDIN.o###, where ### is the Grid Engine job number.

Note

If you change the name of the parallel environment to something other than matlab, also change the submit functions.

Configure Firewalls on Windows Cluster

If you are using Windows firewalls on your cluster nodes, you can add MATLAB as an allowed program.

In the following instructions, matlabroot refers to the MATLAB installation location.

  1. Log in as a user with administrative privileges.

  2. Execute the following script in a Windows® command prompt:

    matlabroot\toolbox\parallel\bin\addMatlabToWindowsFirewall.bat

If you are using other firewalls, you must configure these separately to add MATLAB as an allowed program.

Related Topics