MATLAB Test Manager
Description
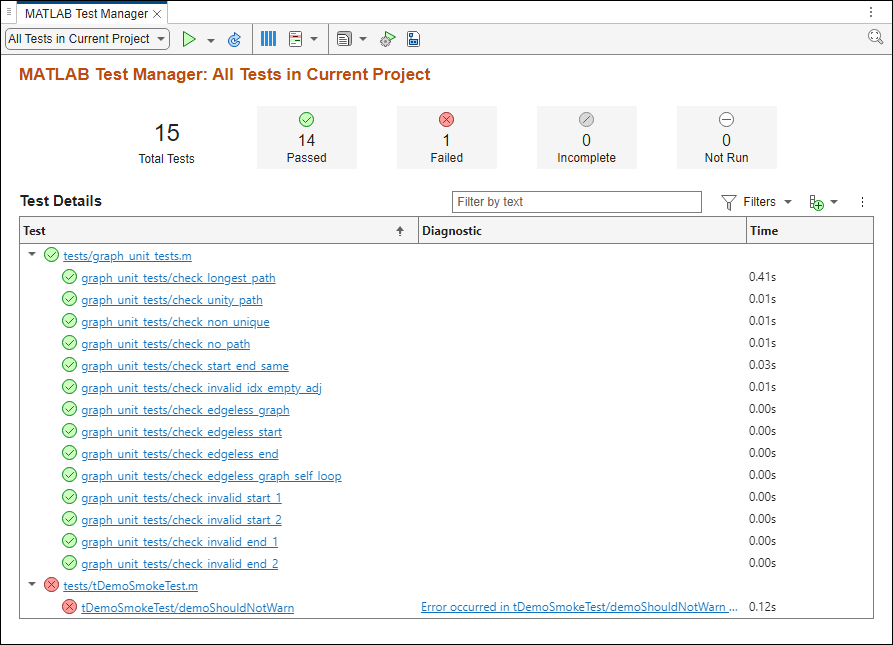
Use the MATLAB Test Manager to manage tests and test results for projects. You can create and run tests and test suites, view results and failure diagnostics, collect coverage, and view coverage reports. You can also view and verify linked requirements.
To add tests to the test manager:
Add a test file to the project. For more information, see Manage Project Files.
Add a
Testlabel to the file. For more information, see Add Labels to Project Files.Add tests to the test file. For more information, see Ways to Write Unit Tests.
Open the MATLAB Test Manager App
Open a project, then use one of these approaches to open the app:
MATLAB® Toolstrip: In the Project tab, in the Tools menu, under Apps, click MATLAB Test Manager.
MATLAB command prompt: Enter
matlabTestManager.
Examples
Open the MATLABShortestPath project.
openProject("MATLABShortestPath");Open the MATLAB Test Manager.
matlabTestManager
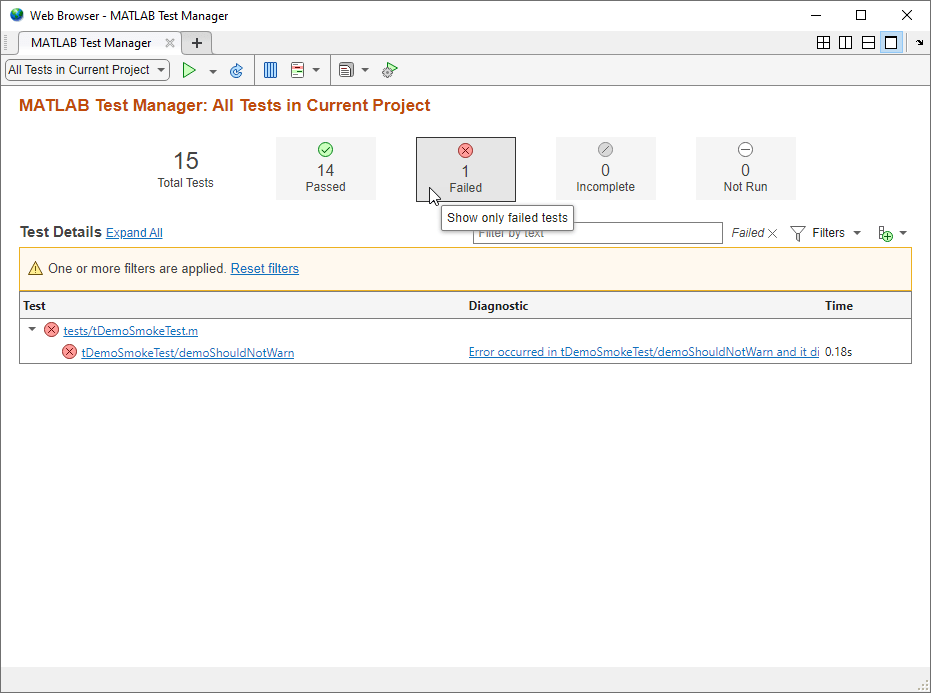
Run all tests in the project by clicking the Run button ![]() . Filter the results to only show the failed tests by clicking the Failed button in the test results summary.
. Filter the results to only show the failed tests by clicking the Failed button in the test results summary.
To create test suites:
Open the Test Suite Manager. In the MATLAB Test Manager menu, click the drop-down list on the left and select
Manage Custom Test Suites.Create a new test suite by clicking New.
Name the test suite by entering text in the Name box.
Specify the tests from the project to include in the test suite:
To create a test suite from tests in a folder, select Base Folders. Then, click the Browse button
 and select the folder. You can select
multiple folders by browsing for and selecting folders multiple
times.
and select the folder. You can select
multiple folders by browsing for and selecting folders multiple
times.To create a test suite from tests that have a test tag, select Tags. Then, in the box next to Tags, enter a comma-separated list of tags. For more information, see Tag Unit Tests.
To create a test suite that includes only the tests that satisfy the conditions of a selector, select Selector. Then, in the box next to Selector, enter the code that creates the selector. You can use logical operators to combine selectors. For a list of selectors, see
matlab.unittest.selectors. For example, entering this code creates a test suite that contains tests from the project that are in theTestsfolder:HasBaseFolder("tests").To create a test suite based on file or folder dependencies, select Depends On (since R2025a). Select the files or folders by setting the drop-down list next to Depends On to
FilesorFolder, clicking the Browse button , and selecting the file or folder. You can
select multiple files or folders by browsing for and selecting files or
folders multiple times.
Click Save.
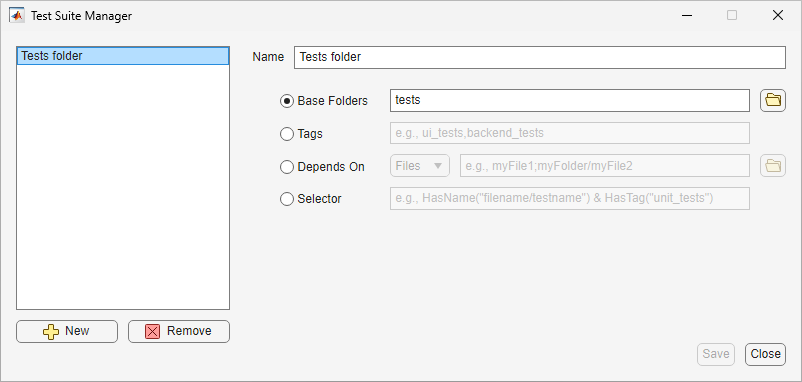
To edit test suites, open the Test Suite Manager and select the test suite. Edit the test suite, then click Save.
To delete test suites, open the Test Suite Manager, select the test suite, then click Remove.
To select test suites, click the drop-down list on the left. Under Custom Test Suites, select the test suite.
To run test suites, select a test suite, then click the Run button
![]() .
.
Open the MATLABShortestPath project.
openProject("MATLABShortestPath");Open the MATLAB Test Manager.
matlabTestManager
Click the Coverage button ![]() , then select Enable code coverage and set the metric level to MC/DC.
, then select Enable code coverage and set the metric level to MC/DC.

Run all tests in the project by clicking the Run button ![]() . The Statement button shows the statement coverage percentage. To view the coverage summary for other coverage metrics, point to the Statement coverage button.
. The Statement button shows the statement coverage percentage. To view the coverage summary for other coverage metrics, point to the Statement coverage button.

To view the coverage report, click the Statement button, or click the Report button ![]() and, under Code Coverage Reports, select the coverage report.
and, under Code Coverage Reports, select the coverage report.
Since R2024b
If you have Embedded Coder®, you can collect code coverage for generated C/C++ code that executes when you run equivalence tests.
To collect code coverage:
Ensure that your equivalence tests use SIL or PIL verification. For more information, see Collect Coverage for Generated C/C++ Code in Equivalence Tests.
Enable generated code coverage by clicking the Code Coverage button
 and selecting Enable generated code
coverage. To configure the test manager to automatically open the
generated code coverage report when you run equivalence tests, select
Automatically open code coverage report.
and selecting Enable generated code
coverage. To configure the test manager to automatically open the
generated code coverage report when you run equivalence tests, select
Automatically open code coverage report.Set the coverage metric level to the highest level of coverage that you want to include in the code coverage report.

When you select a metric level, the report includes the metrics up to and including the selected level. For example, if you select
Condition, the report includes the statement, decision, and condition coverage metrics.Run the equivalence tests.
Run all tests in the project by setting the drop-down menu to the left of the Run button
 to
to
All Tests in Current
                        Project
. Then, click the Run button .
.Run specific equivalence tests by right-clicking the test or test file and selecting Run selected.
To open the code coverage report, click the Report button
 , then, under Generated Code Coverage
Reports, select the report. The MATLAB Test Manager stores
the five most recent generated code coverage reports.
, then, under Generated Code Coverage
Reports, select the report. The MATLAB Test Manager stores
the five most recent generated code coverage reports.For more information, see Collect Coverage for Generated C/C++ Code in Equivalence Tests.
You can customize your test run by using buttons in the toolstrip:
Parallel execution — To use parallel execution, click the Parallel button
 .
.Strict checks — To treat warnings as errors, enable strict checks. Click the Settings button
 , then, in the Test Run Settings dialog box, under
Strictness, select Apply strict checks when
running tests.
, then, in the Test Run Settings dialog box, under
Strictness, select Apply strict checks when
running tests.Output Detail — To specify the detail level for reported events, click the Settings button
 , then, in the Test Run Settings dialog box, under
Output Detail, clear Use Default and
set the output detail level.
, then, in the Test Run Settings dialog box, under
Output Detail, clear Use Default and
set the output detail level.Logging Level — To specify the maximum level at which logged diagnostics are included by the plugin instance, click the Settings button
 , then, in the Test Run Settings dialog box, under
Logging Level, clear Use Default and
set the logging level.
, then, in the Test Run Settings dialog box, under
Logging Level, clear Use Default and
set the logging level.Display test failure diagnostics in the Command Window — To display test failure diagnostics in the MATLAB Command Window, next to the Run button
 , click the Expand icon
  and select Enable logged
diagnostics. (since R2024a)
Note
The MATLAB Test Manager shares test settings with the MATLAB Editor and Test Browser. For more information, see Comparison of Test Settings.
Since R2024b
You can view test and coverage results from the five most recent
previous runs. To view a previous run, click the drop-down menu to the left of the Run
button ![]() and, under Previous Runs, select a
run.
and, under Previous Runs, select a
run.
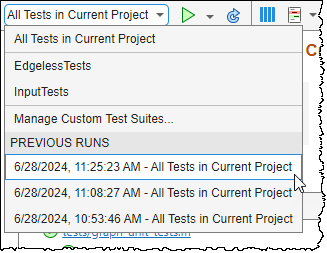
The MATLAB Test Manager opens the test suite, displays the results, and lists the date and time that the suite ran.
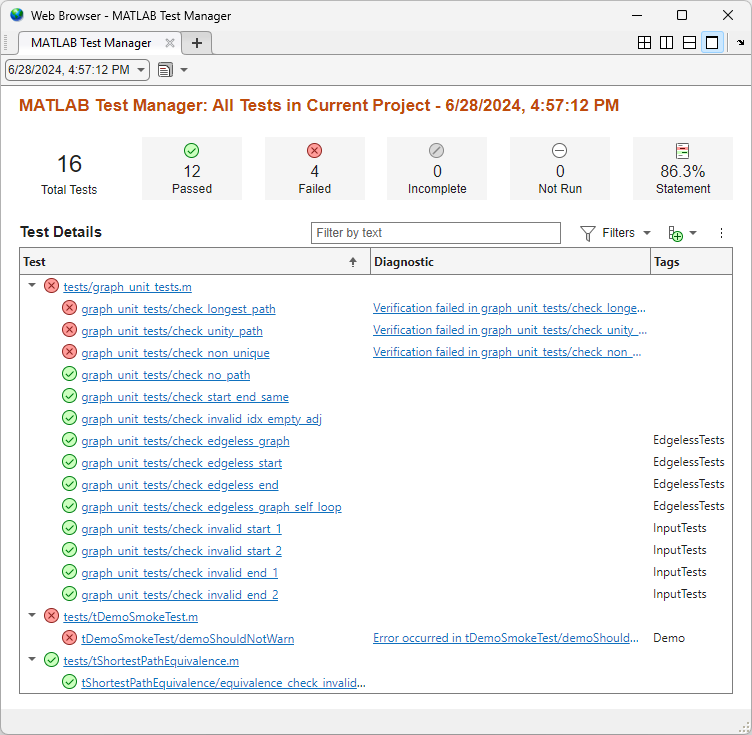
To view a report associated with the run, click the Report button
![]() , then select a report. You can view these reports:
, then select a report. You can view these reports:
To view the coverage report associated with the run, select a report under Code Coverage Reports.
To view the generated code coverage report for equivalence tests that generated C/C++ code as a static library and executed in SIL or PIL mode, select a report under Generated Code Coverage Reports.
To generate a report from the test results in the previous run, under Test Result Reports, click Generate Test Result Report.
To navigate to the current test results, click the drop-down menu to the left of the
Report button ![]() and select
and select
All Tests in Current
              Project
or a custom test suite.
Since R2025a
To improve collaboration and save test and coverage results as a reference, you can import and export test runs as JSON files.
To export test runs:
Open a previous test run. In the menu, click the drop-down list on the left, and select the run under Previous Runs.

Export the test run by clicking the Export button
 in the menu.
In the window that appears, save the test run.
The exported JSON file contains the test results. If the tests ran with code coverage or generated code coverage enabled, the JSON file also contains the coverage results.
To import test runs, click the drop-down list in the left of
the menu and select Import Test Run. In the window that appears,
select the JSON file that contains the test run to import. The MATLAB Test Manager opens the previous run and displays the
test suite, the results, and lists the date and time that the suite ran.
For more information, see Import and Export Test Runs From MATLAB Test Manager.
You can add and remove columns in the Test
Details table. Click the Column button ![]() and select or clear columns.
and select or clear columns.
Note
To add the Requirements column, you must have Requirements Toolbox™ installed.
You can also filter tests by some test types by clicking Filters and then selecting Baseline or Equivalence.
By default, the MATLAB Test Manager lists tests in the Test Details table by ascending load order for each test file.
To change how the table lists the tests, point to a column, then click the Sort Up
button ![]() . To reverse sort, click the Sort Down button
. To reverse sort, click the Sort Down button
![]() . You can also select the
column to sort by clicking the three-dot button
. You can also select the
column to sort by clicking the three-dot button ![]() (since R2024b). The table sorts the tests for each column:
(since R2024b). The table sorts the tests for each column:
Test — Lists the tests by natural sort or by load order. Click the three-dot button
 and select Test (Natural
Sort) or Test (Load Order) to specify
the sort type (since R2024b). Sorting by load order lists the tests in the order that
the test file defines them. Sorting by natural sort lists the tests in
alphabetical order. However, when test names differ only by numbers, natural sort
lists the tests in numerical order. For example, natural sort lists the test
a2before the testa11.Diagnostic — Lists the tests alphabetically by diagnostic.
Tags — Lists the tests alphabetically by tag name.
Requirements — Lists the tests alphabetically by requirement summary.
Time — Lists the tests by the test run time length.
Since R2024b
If you have Requirements Toolbox, you can create and delete links from MATLAB tests to requirements.
To create links:
Open the Requirements Editor. On the Apps tab, under Verification, Validation, and Test, click Requirements Editor.
Open a requirement set. For more information, see Create, Open, and Delete Requirement Sets (Requirements Toolbox).
Select a requirement.
In the MATLAB Test Manager, select the test.
Right-click the test and select Requirements > Link to Selection in Requirements Browser.

To delete all links from a test, select the test in the MATLAB Test Manager, then right-click and select Requirements > Delete All Links.
Since R2024b
You can run baseline tests in a project by using the MATLAB Test Manager. For more information about baseline tests, see Create Baseline Tests for MATLAB Code.
The test manager enables you to create baseline data, export test data to the workspace, and update the stored baseline data:
To create baseline data for a test that failed because did not have baseline data when it ran, open the failure diagnostics by clicking the hyperlink in the Diagnostic column. Then, click the Create baseline from recorded test data hyperlink to store the actual value as baseline data in a MAT file.
To export the actual value and the corresponding baseline data for a failed test to the workspace, open the failure diagnostics by clicking the hyperlink in the Diagnostic column. Then, click the Export test data to workspace hyperlink.
To export only the baseline data for a test to the workspace, click the Baseline Data hyperlink in the Data column. To add the Data column to the Test Details table, click the Column button
 and then select Data.
To update the baseline data stored in a MAT file for a failed test, open the failure diagnostics by clicking the hyperlink in the Diagnostic column. Then, click the Update baseline from recorded test data hyperlink. Alternatively, you can select the test in the Test column, and then right-click and select Update baseline data.
Since R2025a
When you run tests by using the MATLAB build tool, you can use test and coverage settings that you specify in the MATLAB Test Manager (R2025a). Configure the settings in the test manager and then copy a code snippet for the build configuration into your build file. The code snippet specifies the settings for coverage, output detail, logging level, and strict checks, and specifies the tests to run based on the current test suite in the MATLAB Test Manager. To avoid unexpected behavior, do not use the code snippet generated from one project in the build file for a different project.
To generate the code snippet, in the MATLAB Test Manager menu, click the
Build Configuration button ![]() . In the Copy Current Test Configuration for Build File
window, copy the code snippet by clicking the Copy button
. In the Copy Current Test Configuration for Build File
window, copy the code snippet by clicking the Copy button ![]() . Paste the code snippet in a build file. For more
information, see Configure Test Settings for Build Tool by Using MATLAB Test Manager.
. Paste the code snippet in a build file. For more
information, see Configure Test Settings for Build Tool by Using MATLAB Test Manager.
Version History
Introduced in R2023aWhen you create or delete a code coverage justification filter, the tooltip that opens when you point at the Statement button in the Test Manager updates. You do not need to re-run the tests unless you want to log the filtered results into the run history. You cannot create coverage justification filters from reports created from Previous Runs.
To improve collaboration and save test and coverage results as a reference, you can import and export test runs.
Generate a code snippet that creates a build tool task that runs tests
that uses settings from the MATLAB Test Manager by using the Build Configuration
button ![]() in the MATLAB Test Manager menu. The code
snippet specifies the settings for coverage, output detail, logging level, and strict
checks, and configures the tests to run based on the current test suite.
in the MATLAB Test Manager menu. The code
snippet specifies the settings for coverage, output detail, logging level, and strict
checks, and configures the tests to run based on the current test suite.
Display a column that lists the test type by clicking the Configure
columns icon ![]() and selecting Type. To filter tests by
type, click Filters and select Baseline or
Equivalence.
and selecting Type. To filter tests by
type, click Filters and select Baseline or
Equivalence.
Find and run impacted tests when you work with MATLAB projects under source control. An impacted test is a
test that depends on files that have changes after the last commit.. To find impacted tests,
open the MATLAB Test Manager. In the menu, in the drop-down list on the left,
open the test suite for the impacted tests by clicking Impacted Tests Since
Last Commit. To run the tests, click the Run button
![]() .
.
You can now create test suites that only contain the tests that depend on files or folders by using the Test Suite Manager.
View previous runs in the MATLAB Test Manager. The test manager stores the five most recent test runs.
If you have Embedded Coder, you can use the MATLAB Test Manager to collect coverage for
generated C/C++ code that you execute in SIL and PIL equivalence tests. View the coverage
results in an HTML report by clicking the Report button ![]() , and, under Generated Code Coverage
Reports, selecting the report. Alternatively, view a summary of the coverage
results in the Code Quality
Dashboard.
, and, under Generated Code Coverage
Reports, selecting the report. Alternatively, view a summary of the coverage
results in the Code Quality
Dashboard.
Sort tests in the MATLAB Test Manager by load order or natural sort.
If you have Requirements Toolbox, use the MATLAB Test Manager to create and delete links from MATLAB tests to requirements.
Run baseline tests in projects by using the MATLAB Test Manager. The test manager enables you to create baseline data, export test data to the workspace, and update the stored baseline data.
View a coverage summary for the tests in the current test suite in the MATLAB Test Manager. When you enable coverage, the MATLAB Test Manager displays the Statement button. The Statement button shows the statement coverage percentage for the current test suite. To view the coverage summary for other coverage metrics, point to the Statement button or open the coverage report for the current test suite by clicking the button.
Display the diagnostics in the MATLAB Command Window for failed tests that you run. Next to the Run button
![]() , click the Expand icon
, click the Expand icon ![]() and select Enable logged
diagnostics.
and select Enable logged
diagnostics.
Verify requirements in your project by linking them to tests in the project and running the linked tests by using the MATLAB Test Manager. You can then view the requirements verification status in the Requirements Editor (Requirements Toolbox). Similarly, you can update the test results in the MATLAB Test Manager when you run tests by using the Requirements Editor.
Generate test reports from the current test results in the MATLAB Test Manager for all tests in the project, for the tests in a test suite, or for selected tests. You can generate the test report as a PDF, HTML, or DOCX file.
Collect coverage in the MATLAB Test Manager when you run selected tests or test suites.
When a parent project references other projects, the MATLAB Test Manager displays the tests from the parent project and the referenced projects.
MATLAB Command
You clicked a link that corresponds to this MATLAB command:
Run the command by entering it in the MATLAB Command Window. Web browsers do not support MATLAB commands.
选择网站
选择网站以获取翻译的可用内容,以及查看当地活动和优惠。根据您的位置,我们建议您选择:。
您也可以从以下列表中选择网站:
如何获得最佳网站性能
选择中国网站(中文或英文)以获得最佳网站性能。其他 MathWorks 国家/地区网站并未针对您所在位置的访问进行优化。
美洲
- América Latina (Español)
- Canada (English)
- United States (English)
欧洲
- Belgium (English)
- Denmark (English)
- Deutschland (Deutsch)
- España (Español)
- Finland (English)
- France (Français)
- Ireland (English)
- Italia (Italiano)
- Luxembourg (English)
- Netherlands (English)
- Norway (English)
- Österreich (Deutsch)
- Portugal (English)
- Sweden (English)
- Switzerland
- United Kingdom (English)