Select Data for Modeling Using the Fit Models Wizard
Choose a Workflow
Use the workflow on this page if you have designed an experiment, collected data, and want to use that data for fitting models. The Fit Models Wizard guides you through the steps. You can also refit existing models to new data using the Fit Models Wizard.
If you want to fit models to data and do not have an existing test plan in your project, use the Import Data common task workflow instead. Follow the steps in Fit Models to Data.
Opening the Fit Models Wizard
Set up a test plan for designs by following the steps in Set Up Design Inputs. After you collect data, return to the Model Browser to import data and fit models. In any test plan, to select new data to fit models to, do either of the following:
In the Model Browser test plan view, in the Common Tasks pane, click Fit models, or select TestPlan > Fit Models.
Double-click the Responses block in the test plan diagram.
The Fit Models Wizard opens.
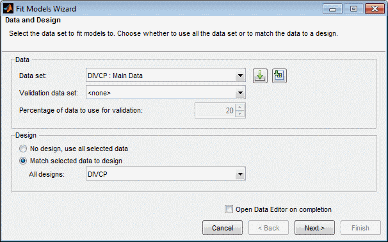
Step 1: Select Data Set
Select the data set to fit models to. Select a data set in the project from the list, or click the button to load a new data set if needed. If you load new data, select the check box Open Data Editor on completion to inspect or edit the data before modeling.
If the test plan contains any designs, choose whether to use all the data set or to match the data to a design. If matching to a design, select a design in the list.
Step 2: Select Input Signals
Select the input signals for the model (on all stages of the hierarchical model) from the list box of data signals on the right, and match them to the correct model variables using the big button with the arrow. Double-click an item in the data signals list to select that signal for the currently selected input factor and then move to the next input.
If you entered the correct signal name at the model setup stage, the appropriate signal is automatically selected as each model input factor is selected. This can be time-saving if there are many data signals in a data set. If the signal name is not correct, you must click to select the correct variable for each input.
If you want to use the range of the data signals for model input ranges, instead of the ranges set in the design inputs, then select the Use data ranges for all inputs check box.
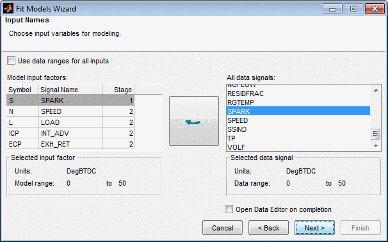
To continue to selecting response models, click Next.
Step 3: Select Response Models
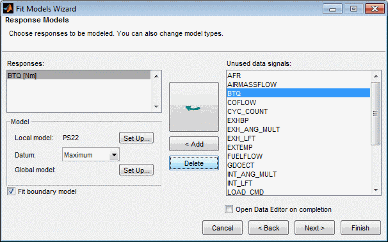
Use the following controls to set up your models:
If starting with an empty Responses list box, select the desired response in the Unused data signals list, and click Add.
If you are using a test plan template or selecting new data in a test plan, responses may already be specified in the Responses list box. If you want to change a response, select a signal and click the large button with the arrow to replace the current selected response. The previous response appears in brackets to inform you what has changed.
When there is already a response in the list box, clicking Add does not replace the selection but increases the number of responses. The replace button (with the arrow) is not available when the Responses box is empty.
You can use Delete to remove selected responses.
You can select Datum models (if the local model supports them), and you can use the Set Up buttons to change the local and global models. See Explore Local Model Types, Explore Global Model Types, and Datum Models for details.
To create a boundary model, leave the Fit boundary model check box selected.
To continue:
Click Finish to fit the models.
If you need to define operating point groupings for two-stage or point-by-point models, the Operating Point Groupings dialog box opens. Verify or change the operating point groupings and click OK to continue model fitting. See Define Operating Point Groupings.
If you selected the check box Open Data Editor on completion, the Data Editor opens to inspect or edit data before modeling. For next steps working with data, see Working with Data in the Model Browser. The models are fitted after you close the Data Editor.
For next steps evaluating your models, see Model Assessment.
If you are matching data to a design, click Next. See Step 4: Set Tolerances.
Step 4: Set Tolerances
You can only reach Step 4 if you are matching data to a design. Setting tolerances is only relevant if you are matching data to a design. You can only match data to designs for global models.
You can also edit tolerances later using the context menu in the Data Editor window. See The Tolerance Editor for definitions of clusters.
Set Input factor tolerances for each variable to determine the size of the tolerance in each dimension. This is used for selecting data. The tolerance in each dimension determines the size of “clusters” centered on each design point. Data points that lie within tolerance of a design point are included in that cluster. Data points that fall inside the tolerance of more than one design point form a single cluster containing all those design and data points. If no data points fall within tolerance of a particular design point, they remain unmatched. Default tolerance values are related to variable ranges.
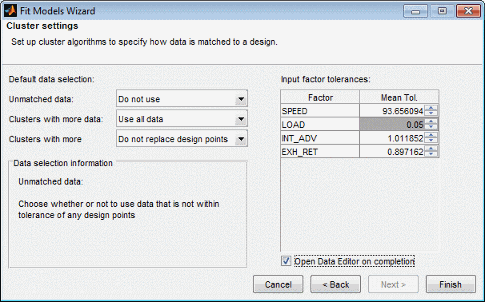
The choices you make in the Default data selection options determine how the cluster algorithm is first run to select matching data and design points. This only affects the status of the check boxes for data and design points when you first see the Design Match view in the Data Editor. You can always alter the results of this later in the Design Match list, where you can manually select the data and design points you want to use.
When you exit the Data Editor these selections determine what data is used for modeling and how design points are augmented and replaced. Selected data is used for modeling and added to the design. Data you have decided to exclude is not used for modeling or added to the design.
Unmatched data —
UseorDo not useData that does not lie within tolerance of any design point is unmatched. You can decide what to do with these. If you select
Use, this data is selected for modeling and added to your design.If you select
Do not use, then unmatched data is not used for modeling or added to the design; it is excluded data.Clusters with more data —
Use all dataorUse closest match onlyThis refers to clusters containing more data points than design points. If you choose
Use all data, all the data points in these clusters are selected for modeling and added to the design, replacing the design points in those clusters.If you choose
Use closest match only, then a one-to-one match of the data point closest to each design point is selected, and these are the only points that are selected for modeling and added to the design (replacing a design point each).Cluster with more design —
Do not replace design pointsorReplace design with closestAll data from these clusters is selected for modeling. The setting here only affects selections for the design.
Where clusters contain more design points than data points, you can choose to leave the design unchanged by selecting
Do not replace design points.If you choose
Replace design with closest, this replaces the design points where possible with the closest data point and leaves the rest of the design points unchanged.
Remember you can override any of these selections manually in the Data Editor; changes are only applied when you close the Data Editor after matching. The Design Match view in the Data Editor window appears by default when you close the Fit Models Wizard while you are matching data to designs. See Match Data to Designs.