Design Parking Scenario
This example shows how to design a scenario in which a vehicle follows a path to maneuver into a parking space. In this example, you learn how to design several different parking scenarios, including reverse parking and parallel parking. You can use paths and the Actor Orientation Tool to adjust actor orientation, enabling you to simulate different vehicle parking behaviors.
Design Simple Parking Scenario
This scenario contains a single vehicle actor, a sedan named Ego,
and a path that routes Ego into a parking space in the forward
direction.
Open Scene and Create New Scenario
Open a scene to use for your scenario. Ensure that the scene you chose already contains parking lanes. For more information on creating parking spaces in your RoadRunner scene, see Parking Tool.
Open RoadRunner, and, from the start page, select Open Project, then select the scene file you want to use. If you have RoadRunner open already, then select Open Scene from the File menu and, in the file explorer, select the scene file you want to use. For this example, ensure your scene contains designated spaces for parking.
Switch to scenario editing mode. In the top-right corner of the RoadRunner application, select Scene Editing, then Scenario Editing.

The scene is now locked, and you can begin populating the scenario.
Add Ego Vehicle and Build Path
Add a vehicle actor to the scenario and create a path to route it into one of the parking spaces.
In the Library Browser, navigate to the
Assetsfolder, thenVehicles, and drag aSedanasset into the scenario.With the sedan still selected, in the Attributes pane, set Name to
Ego.Right-click the road to create a path for
Ego. Route the path into one of the parking spaces in your scene by right-clicking to add another waypoint inside the parking space. For more information on editing paths, see Path Editing.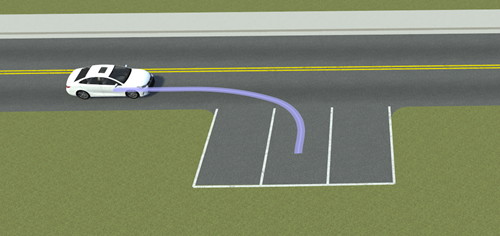
Simulate the scenario. From the RoadRunner toolbar, select the Simulation Tool
 and click Play. By
default, the actor moves in the forward direction. However, you can adjust
the attributes of the path to simulate different scenarios, such as
reversing into a parking space.
and click Play. By
default, the actor moves in the forward direction. However, you can adjust
the attributes of the path to simulate different scenarios, such as
reversing into a parking space.
Design Reverse Parking Scenario
Using the concepts from the previous section, you can modify the attributes of your path to design more elaborate scenarios. For example, consider changing the actor orientation so that, instead of pulling forward, it reverses into a parking space. You can instantly reverse the orientation of an actor on a path by converting a waypoint into an inflection point. To simulate an actor reversing its orientation to back into a parking space, follow these steps:
Follow the steps outlined in the Design a Simple Parking Scenario section to add an actor to your scenario. Place the actor in a lane traveling the same direction as the side the parking space is on.
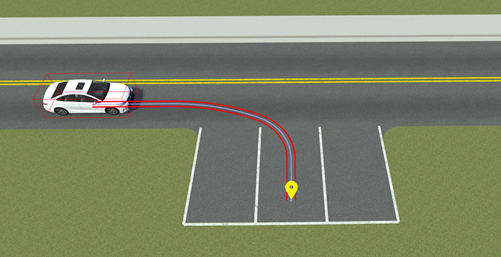
Right-click the road to add a path that leads into a parking space. To construct a path to simulate a reverse parking scenario, add another waypoint along the path at the point where you want the actor to shift to reverse. In this example, the inflection point is directly in line with the terminal waypoint of the path in the parking space.
Note
If RoadRunner displays an error that says
Route segment
                                    cannot find a route along the road. Adjust the waypoints or make
                                    this a freeform segment
, then, in the Attributes pane, select Freeform.
Select the waypoint and adjust the tangents so that they are perpendicular to the road with a Heading value of
90. For information on tangent editing, see Path Editing.
From the RoadRunner toolbar, select the Actor Orientation Tool. The Actor Orientation Tool displays previews of the orientation of the actor at each waypoint.
Select the waypoint you want to turn into an inflection point. In the Attributes pane, select Inflection Point. The actor previews on waypoints after the inflection point update to reflect the reversed direction.

To run your simulation, select the Simulation Tool and, in the Attributes pane, click Play.
To learn more about inflection points, see Inflection Points.
Design Street Parking Scenario
You can use these same concepts to design other types of parking scenarios, such as parallel parking along a street. Use the Actor Orientation Tool to change, the movement direction for the actor, adjust its position, and avoid collisions. This example demonstrates how to build a path for the ego vehicle so that it maneuvers between two parked vehicles to simulate parallel parking behavior.
Follow the steps outlined in the Open Scene and Create New Scenario section to open a scene that contains roads with street parking. If you have a scene open, you can modify one of the roads to add street parking spaces.
Add a vehicle actor to a road that contains designated spaces for street parking. Place the vehicle in a drivable lane and not directly in a parking space.
To distinguish this vehicle from others in the scenario, you can optionally change the Name or Color values of the actor in the Attributes pane. For this example, the vehicle actor performing the parking maneuver is called
Egoand the Color is red.
With
Egoselected, right-click the road to create a path leading to one of the parking spaces.
Place two additional vehicles in the spaces in front of and behind the space where
Egointends to park.
To construct a path that simulates reverse movement, add a new waypoint along the path, and move it to the location where you want
Egoto begin to reverse into the space. In this example, the point at whichEgoreverses is roughly parallel to the rear bumper of the parked vehicle in front of the empty space.
To specify for
Egoto start reversing at the new waypoint, convert that waypoint into an inflection point. From the RoadRunner toolbar, select the Actor Orientation Tool, and then select the waypoint. In the Attributes pane, select Inflection Point.Depending on the shape of your path, setting the inflection point may alter the shape of the path and orientation of
Ego.
To adjust the path, from the RoadRunner toolbar, select the Scenario Edit Tool and edit the tangents of the waypoints to influence the path shape and actor orientation.

To run your simulation, select the Simulation Tool and, in the Attributes pane, click Play. Verify that
Egodoes not collide with either of the stationary vehicles as it maneuvers into the space.
Tip
To further refine vehicle movement and behavior, try modifying the speed at which an actor reaches each waypoint by adjusting the timing profile of your scenario with the Route Timing Tool.
See Also
Actor Orientation Tool | Route Timing Tool