创建一个简单的基于表单的设置
此示例创建一个基于表单的设置,用于生成一组幻方的报告(请参阅 magic 函数)。
创建 Word 模板
复制报告资源管理器默认 Word 模板
您在报告资源管理器中使用的模板必须是报告资源管理器默认模板的副本或基于副本。
启动报告资源管理器:
report
在报告资源管理器中,选择 工具 > 编辑文档转换和模板。
从模板列表中,选择默认 Word 模板。在对话框中,点击复制模板。
将模板保存在 MATLAB® 路径下,并将其命名为
magic-square.dotx。在模板列表中,新模板显示为
Copy of Default Word Template。选择它并设置这些属性:模板 ID:
magic-square显示名称:
Magic Square描述:
Defines the form for my magic square report
在 Microsoft® Word 中打开模板。选择模板后,在对话框中点击打开模板。
准备在 Word 中使用空位
要处理 Word 模板中的空位,请显示 Word 开发工具工具栏(如果未显示)。然后,在开发工具工具栏中,打开设计模式。为了帮助您在正确的位置创建内容,请显示段落标记。
在 Word 模板中,选择 文件 > 选项。
在 Word 选项对话框中,选择自定义功能区。
从自定义功能区列表中,在主选项卡下,选中开发工具复选框,然后点击确定。
在开发工具工具栏上,打开设计模式。
在主页功能区上,点击显示/隐藏段落标记按钮
 。
。
创建节并设置默认页眉和页脚
默认模板对默认页面布局使用不同的首页页眉和页脚。对于此示例,您的模板必须仅包含默认页眉和页脚。编辑页眉和页脚,以便模板仅包含默认页面布局。
将光标放在第一页上,创建分节符。从布局功能区中,选择 断点 > 下一页。
在新页面上,双击页眉。在页眉和页脚工具栏功能区中,关闭链接到前一节。
点击页脚。将链接到前一节关闭。点击关闭页眉页脚。
将光标放在第二页,使用 布局 > 断点 > 下一页 创建分节符。
在第三页的页眉和页脚中,将链接到前一节切换为关闭。
设置页码格式
第一部分是标题页,不使用页码。第二部分包含目录,使用小写罗马数字,从第 i 页开始。第三部分是报告的主体内容,用阿拉伯数字标记,从第 1 页开始。
在第一页的页脚中,删除页码。
在第二页的页脚中,右键点击页码并选择格式化页码。将数字格式设置为小写罗马数字。将起始数字设置为 1。
将数字置于页脚中央。
在最后一页的页脚中,右键点击页码并选择格式化页码。将数字格式设置为阿拉伯数字。将起始数字设置为 1。
将数字置于页脚中央。
点击关闭页眉页脚。
将样板文本和空位添加到标题页
设计一个包含样板文本和一个空位的标题页。样板文本是报告标题,空位处是日期。
在第一页的分节符之前,输入标题文本:
My Magic Square Report
应用 Word
标题样式。在新段落中,添加一个内联空位,并将其标题指定为
Date。将光标放在段落中,添加一个空格,并将文本光标放在其前面。这种技术可确保您创建的是内联空位而不是块状空位。
在开发工具工具栏上的控件组中,点击富文本内容控件按钮。
在开发工具工具栏上,点击属性。将标题设置为
Date,将标记设置为Hole。点击确定。为了显示空位的用途,请在空位中输入
Date。删除空位后面的空间。
根据
Normal创建一个名为MyDate的 Word 样式。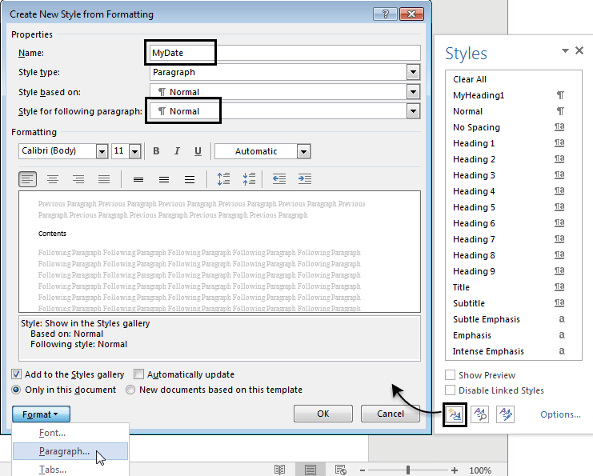
在段落属性中,执行以下操作:
段前到
60对齐到
Centered
将
MyDate样式应用到包含Date空位的段落。
添加目录
在第二部分(第二页)中添加目录标题和字段。目录包含章节名称和页码。该字段是一个目录占位符,在生成报告时会填充章节名称和页码。
在第二页的分节符之前,添加目录标题。键入
内容并应用样式 TOC Heading。在标题后添加一个普通段落并插入目录字段。在插入功能区上,选择 快速部件 > 字段。从列表中选择 TOC 并点击确定。回复出现的消息。
添加章节空位
报告的第三部分是报告的主要内容。创建一个块状空位和您自己的标题样式以应用于报告设置中的段落。
插入一个块状空位并将其命名为
Chapters。选择段落标记。然后,在开发工具工具栏上,点击富文本内容控制按钮。
将光标放在富文本控件中,在开发工具工具栏上,点击属性。将标题设置为
Chapters,将标记设置为Hole。点击确定。在空位中输入
Chapters来表明该空位的用途。
根据标题 1 创建样式 MyHeading1。

将字体更改为 Calibri。
在段落格式中,在缩进和间距选项卡上,将段后更改为
20。在换行和分页选项卡上,选中段前分页复选框。
保存并关闭模板
清理报告生成的模板,然后保存并关闭它。
删除所有空白段落。
关闭段落标记。
保存并关闭模板。
创建报告设置文件
创建基于表单的设置文件。在报告资源管理器中,选择 文件 > 新建表单。
在报告表单选项中,在报告输出类型和模板下,将文件格式更改为
Word,并将模板名称更改为您的自定义模板Magic Square。当您选择自定义模板时,模板中的空位和布局将填充设置。此设置包含以下空位:
文档开头(第一部分)的块状空位,名为
#start#。此空位包含一个DOCX Page Layout组件。默认页眉和页脚组件作为布局组件的子项出现。一个名为
Date的内联空位。一个用于第二部分开始的块状空位,名为
#sect2#,另一个用于第三部分开始的块状空位,名为#sect3#。每个部分空位包含一个页面布局组件。每个页面布局组件包含一个
Page Header和Page Footer组件,用于获取您在模板中指定的页码信息。一个名为
Chapters的块状空位。
添加
Text组件作为日期内联空位的子项。要在空位中插入当前日期,请在Text组件的文本框中输入此表达式。此表达式返回 MATLABdate命令的值:%<date>在报告中创建一个
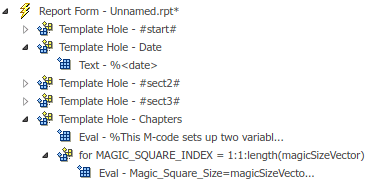
Eval组件作为 ChaptersTemplate Hole组件的子组件。在组件的对话框中,清除在报告中插入 MATLAB 表达式和在报告中显示命令行窗口输出复选框。将此代码复制到要在基础工作区中计算的表达式框中:% This M-code sets up two variables % that define how the report runs. % mgicSizeVector is a list of MxM % Magic Square sizes to insert into % the report. Magic squares cannot % be 2x2. magicSizeVector=[4 8 16 32]; % largestDisplayedArray sets the % limit of array size to insert % in the report with the % Insert Variable component. largestDisplayedArray=15;
在报告设置中,在
For Loop组件后创建一个Eval组件。将循环的 End 值设置为length(magicSizeVector)。将变量名称设置为MAGIC_SQUARE_INDEX。添加
Eval组件作为 for 循环的第一个子组件。在组件对话框中,将要计算的表达式设置为Magic_Square_Size=magicSizeVector(MAGIC_SQUARE_INDEX);。清除在报告中插入 MATLAB 表达式和在报告中显示命令行窗口输出复选框。图中显示了您目前的报告设置:
创建一个
Paragraph组件作为for组件的子组件。在对话框中,将段落文本样式名称更改为指定并输入MyHeading1。此设置使用您在模板中创建的 MyHeading1 样式来格式化 for 循环生成的章节标题。创建一个
Insert Variable组件作为Paragraph组件的子组件。将变量名称设置为Magic_Square_Size。在
Eval组件之后创建一个Variable组件。清除在报告中插入 MATLAB 表达式和在报告中显示命令行窗口输出复选框。将要计算的表达式设置为:% This m-script produces a magic % square of size Magic_Square_Size % and creates an image of that square. mySquare=magic(Magic_Square_Size); clf imagesc(mySquare); title(sprintf("Magic Square N=%i",Magic_Square_Size)) set(gca,"Ydir","normal"); axis equal;
在
Logical If组件之后创建一个Eval组件。在组件对话框中,将测试表达式设置为Magic_Square_Size<=largestDisplayedArray。移动Logical If组件,使其成为Paragraph组件的同级组件。创建一个
Logical Then组件作为Logical If组件的子组件。创建一个Insert Variable组件作为Logical Then组件的子组件。在对话框中,将变量名称设置为mySquare。在
Logical Else组件之后创建一个Logical Then组件。创建一个Figure Loop组件作为Logical Else组件的子组件。创建一个
Figure Snapshot组件作为Figure Loop组件的子组件。在图窗快照对话框中,将纸张方向设置为纵向。将图像大小设置为Custom: [5 4] inches。图中显示了报告设置的结构体和
Paragraph组件的设置。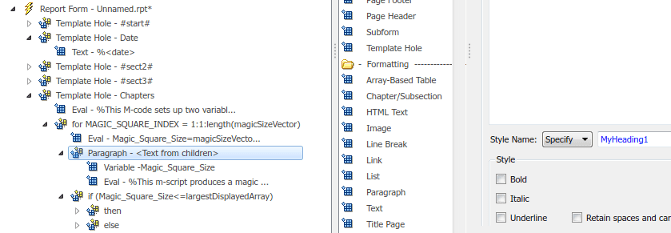
生成报告
选择报告表单组件并选择文件 > 报告。
另请参阅
Template Hole | Paragraph | DOCX Page Layout | Page Footer | Evaluate MATLAB Expression | For Loop | Logical If | Logical Else | Logical Then