Main Content

Use Control Flow Logic

What is a Control Flow Subsystem

A control flow subsystem executes one or more times at the current time step when enabled by a control flow block. A control flow block implements control logic similar to that expressed by control flow statements of programming languages (e.g., if-then, while-do, switch, and for).

Equivalent C Language Statements

You can use block diagrams to model control flow logic equivalent to the following C programming language statements:

  • for

  • if-else

  • switch

  • while

Conditional Control Flow Logic

You can use the following blocks to perform conditional control flow logic.

C StatementEquivalent Blocks

if-else

If, If Action Subsystem

switch

Switch Case, Switch Case Action Subsystem

If-Else Control Flow

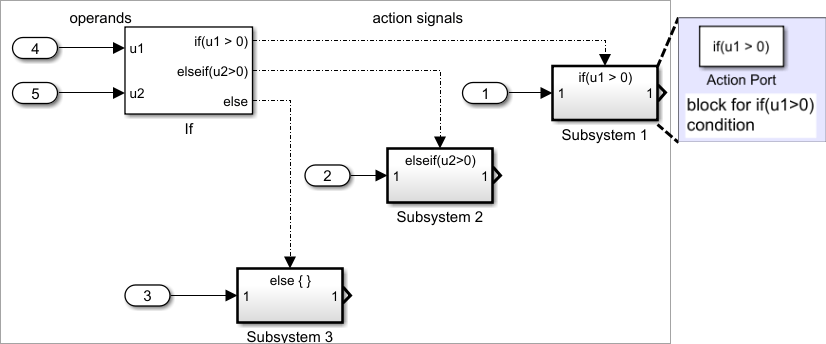
The following diagram represents if-else control flow.

Control flow digram when using if-else conditions

Construct an if-else control flow diagram as follows:

  1. Provide data inputs to the If block for constructing if-else conditions.

    In the If block parameters dialog box, set inputs to the If block. Internally, the inputs are designated as u1, u2,..., un and are used to construct output conditions.

  2. In the If block parameters dialog box, set output port if-else conditions for the If block.

    In the If block parameters dialog box, set Output ports. Use the input values u1, u2, ..., un to express conditions for the if, elseif, and else condition fields in the dialog box. Of these, only the if field is required. You can enter multiple elseif conditions and select a check box to enable the else condition.

  3. Connect each condition output port to an Action subsystem.

    Connect each if, elseif, and else condition output port on the If block to a subsystem to be executed if the port's case is true.

    Create these subsystems by placing an Action Port block in a subsystem. This creates an atomic Action subsystem with a port named Action, which you then connect to a condition on the If block.

    Once connected, the subsystem takes on the identity of the condition it is connected to and behaves like an enabled subsystem.

For more detailed information, see the If and Action Port blocks.

Note

All blocks in an Action subsystem driven by an If or Switch Case block must run at the same rate as the driving block.

Switch Control Flow

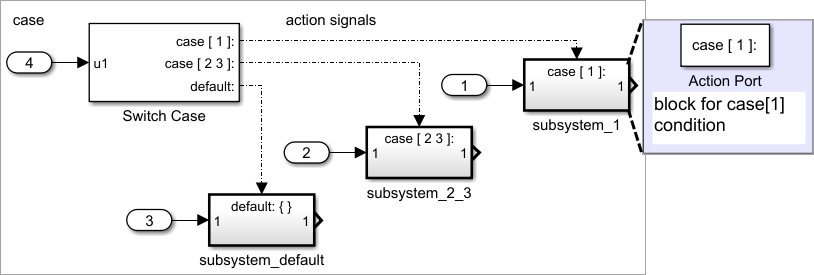
The following diagram represents switch control flow.

Control flow diagram when using Switch Case conditions

Construct a switch control flow statement as follows:

  1. Provide a data input to the argument input of the Switch Case block.

    The input to the Switch Case block is the argument to the switch control flow statement. This value determines the appropriate case to execute. Noninteger inputs to this port are truncated.

  2. Add cases to the Switch Case block based on the numeric value of the argument input.

    Using the parameters dialog box of the Switch Case block, add cases to the Switch Case block. Cases can be single or multivalued. You can also add an optional default case, which is true if no other cases are true. Once added, these cases appear as output ports on the Switch Case block.

  3. Connect each Switch Case block case output port to an Action subsystem.

    Each case output of the Switch Case block is connected to a subsystem to be executed if the port's case is true. You create these subsystems by placing an Action Port block in a subsystem. This creates an atomic subsystem with a port named Action, which you then connect to a condition on the Switch Case block. Once connected, the subsystem takes on the identity of the condition and behaves like an enabled subsystem. Place all the block programming executed for that case in this subsystem.

For more detailed information, see documentation for the Switch Case and Action Port blocks.

Note

After the subsystem for a particular case executes, an implied break executes, which exits the switch control flow statement altogether. Simulink® switch control flow statement implementations do not exhibit the “fall through” behavior of C switch statements.

While and For Loops

Use the following blocks to perform while and for loops.

While Loops

The following diagram illustrates a while loop.

Control flow digram when using While loop

In this example, Simulink repeatedly executes the contents of the While Iterator subsystem at each time step until a condition specified by the While Iterator block is satisfied. In particular, for each iteration of the loop specified by the While Iterator block, Simulink invokes the update and output methods of all the blocks in the While subsystem in the same order that the methods would be invoked if they were in a noniterated atomic subsystem.

Note

Simulation time does not advance during execution of a While subsystem's iterations. Nevertheless, blocks in a While subsystem treat each iteration as a time step. As a result, in a While subsystem, the output of a block with states (that is, a block whose output depends on its previous input), reflects the value of its input at the previous iteration of the while loop. The output does not reflect that block’s input at the previous simulation time step. For example, a Unit Delay block in a While subsystem outputs the value of its input at the previous iteration of the while loop, not the value at the previous simulation time step.

Construct a while loop as follows:

  1. Place a While Iterator block in a subsystem.

    The host subsystem label changes to while {...}, to indicate that it is modeling a while loop. These subsystems behave like triggered subsystems. This subsystem is host to the block programming that you want to iterate with the While Iterator block.

  2. Provide a data input for the initial condition data input port of the While Iterator block.

    The While Iterator block requires an initial condition data input (labeled IC) for its first iteration. This must originate outside the While subsystem. If this value is nonzero, the first iteration takes place.

  3. Provide data input for the conditions port of the While Iterator block.

    Conditions for the remaining iterations are passed to the data input port labeled cond. Input for this port must originate inside the While subsystem.

  4. (Optional) Set the While Iterator block to output its iterator value through its properties dialog.

    The iterator value is 1 for the first iteration and is incremented by 1 for each succeeding iteration.

  5. (Optional) Change the iteration of the While Iterator block to do-while through its properties dialog.

    This changes the label of the host subsystem to do {...} while. With a do-while iteration, the While Iteration block no longer has an initial condition (IC) port, because all blocks in the subsystem are executed once before the condition port (labeled cond) is checked.

  6. Create a block diagram in the subsystem that defines the subsystem's outputs.

    Note

    The diagram must not contain blocks with continuous states (for example, blocks from the Continuous block library). The sample times of all the blocks must be either inherited (-1) or constant (inf).

For more information, see the While Iterator block.

Modeling For Loops

The following diagram represents a for loop:

Control flow diagram when using For loop

In this example, Simulink executes the contents of the For Iterator subsystem multiples times at each time step. The input to the For Iterator block specifies the number of iterations. For each iteration of the for loop, Simulink invokes the update and output methods of all the blocks in the For subsystem in the same order that it invokes the methods if they are in a noniterated atomic subsystem.

Note

Simulation time does not advance during execution of a For subsystem’s iterations. Nevertheless, blocks in a For subsystem treat each iteration as a time step. As a result, in a For subsystem, the output of a block with states (that is, a block whose output depends on its previous input) reflects the value of its input at the previous iteration of the for loop. The output does not reflect that block’s input at the previous simulation time step. For example, a Unit Delay block in a For subsystem outputs the value of its input at the previous iteration of the for loop, not the value at the previous simulation time step.

Construct a for loop as follows:

  1. Drag a For Iterator Subsystem block from the Library Browser or Library window into your model.

  2. (Optional) Set the For Iterator block to take external or internal input for the number of iterations it executes.

    Through the properties dialog of the For Iterator block you can set it to take input for the number of iterations through the port labeled N. This input must come from outside the For Iterator Subsystem.

    You can also set the number of iterations directly in the properties dialog.

  3. (Optional) Set the For Iterator block to output its iterator value for use in the block programming of the For Iterator Subsystem.

    The iterator value is 1 for the first iteration and is incremented by 1 for each succeeding iteration.

  4. Create a block diagram in the subsystem that defines the subsystem's outputs.

    Note

    The diagram must not contain blocks with continuous states (for example, blocks from the Continuous block library). The sample times of all the blocks must be either inherited (-1) or constant (inf).

Use For loop with Assignment block

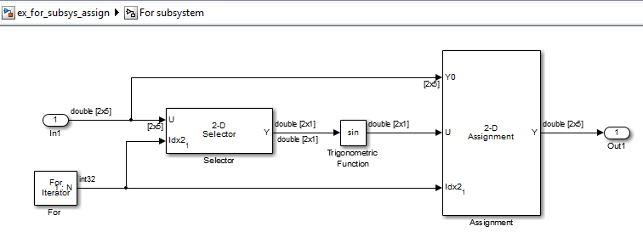
The For Iterator block works well with the Assignment block to reassign values in a vector or matrix. The following example shows the use of a For Iterator block. Note the matrix dimensions in the data being passed.

For Iterator subsystem containing Assignment block

Reassign values in a matrix iteratively using a For loop

The above example outputs the sine value of an input 2-by-5 matrix (2 rows, 5 columns) using a For subsystem containing an Assignment block. The process is as follows.

  1. A 2-by-5 matrix is input to the Selector block and the Assignment block.

  2. The Selector block strips off a 2-by-1 matrix from the input matrix at the column value indicated by the current iteration value of the For Iterator block.

  3. The sine of the 2-by-1 matrix is taken.

  4. The sine value 2-by-1 matrix is passed to an Assignment block.

  5. The Assignment block, which takes the original 2-by-5 matrix as one of its inputs, assigns the 2-by-1 matrix back into the original matrix at the column location indicated by the iteration value.

    The rows specified for reassignment in the property dialog for the Assignment block in the above example are [1,2]. Because there are only two rows in the original matrix, you could also have specified -1 for the rows, (that is, all rows).

    Note

    The Trigonometric Function block is already capable of taking the sine of a matrix. The above example uses the Trigonometric Function block only as an example of changing each element of a matrix with the collaboration of an Assignment block and a For Iterator block.

See Also

| | | | |