Main Content

Share and Reuse Block Parameter Values by Creating Variables

To set a block parameter value, such as the Gain parameter of a Gain block, you can use numeric variables that you create and store in workspaces such as the base workspace, a model workspace, or a Simulink® data dictionary. You can use the variable to set multiple parameter values in multiple blocks, including blocks in different models. To change the values of the block parameters, you change the value of the variable in the workspace.

Using a variable to set a block parameter value also enables you to:

  • Change the parameter value without having to modify the model file (if you store the variable outside the model workspace).

  • Identify the parameter by a specific, meaningful name when sweeping or tuning the value.

For basic information about setting block parameter values, see Set Block Parameter Values.

Reuse Parameter Values in Multiple Blocks and Models

You can create a numeric MATLAB® variable in a workspace, such as the base workspace or a data dictionary, and use it to specify one or more block parameter values.

If a block parameter value is set to a simple numeric expression, you can create a variable for that expression in the Model Data Editor (on the Modeling tab, click Model Data Editor). Click in the right side of the cell that corresponds to the value, then select Create variable. In the Create New Data dialog box, set the name and location for the new variable, then click Create. The cell now displays the new variable.

You can also create a variable to represent a constant that is used in multiple expressions. The example model sldemo_fuelsys represents the fueling system of a gasoline engine. A subsystem in the model, feedforward_fuel_rate, calculates the fuel demand of the engine by using the constant number 14.6, which represents the ideal (stoichiometric) ratio of air to fuel that the engine consumes. Two blocks in the subsystem use the number to set the values of parameters. In this example, to share the number between the blocks, you create a variable named myParam.

  1. Open the Model Fault-Tolerant Fuel Control System example model sldemo_fuelsys.

    openExample('simulink_automotive/ModelingAFaultTolerantFuelControlSystemExample')
    sldemo_fuelsys

  2. In the model, on the Modeling tab, click Model Data Editor. In the Model Data Editor, inspect the Parameters tab.

  3. In the model, navigate into the subsystem.

    open_system(...
        'sldemo_fuelsys/fuel_rate_control/fuel_calc/feedforward_fuel_rate')

  4. In the Model Data Editor, in the Filter contents box, enter 14.6.

    The data table contains two rows, which correspond to the Constant value parameters of two of the Constant blocks in the subsystem.

  5. Use the Value column to replace the literal number 14.6 with myParam. Perform the replacement for both parameters.

  6. In the Filter contents box, enter myParam.

  7. While editing the value of one of the parameters, click the action button and select Create.

  8. In the Create New Data dialog box, set Value to 14.6 and click Create.

    The variable, myParam, appears in the base workspace.

Because the variable exists in the base workspace, you can use it in multiple models. However, when you end your MATLAB session, you lose the contents of the base workspace. Consider permanently storing the variable in a model workspace or data dictionary.

Define a System Constant

To define a system constant, such as a variable that represents the radius of the Earth, consider creating a Simulink.Parameter object instead of a numeric MATLAB variable. Parameter objects allow you to specify physical units and custom documentation as well as other characteristics.

  • To create and use parameter objects in models, see Data Objects.

  • Typically, the value of a system constant influences the values of other parameters and signals through mathematical relationships. To model these relationships explicitly, set the values of the dependent data by using expressions. See Set Variable Value by Using a Mathematical Expression.

Set Variable Value by Using a Mathematical Expression

You can set the value of a variable to an expression involving literal numbers and other variables. With expressions, you can:

  • Express the value as a relationship between known physical constants instead of as an unidentifiable literal number.

  • Explicitly model algebraic dependencies between parameter data. When you change the values of independent data, you do not need to remember to adjust the values of dependent data.

General Technique

Convert the variable to a Simulink.Parameter object. Then, set the Value property of the object by using an expression:

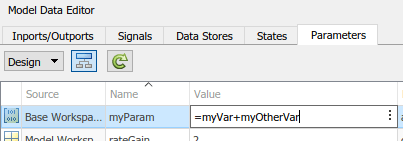
  • Interactively — For example, with the Model Data Editor or the Model Explorer, precede the expression with an equals sign, =. The figure shows how to specify the expression myVar + myOtherVar.

  • Programmatically — Use the slexpr function, specifying the expression in a character vector or string. For example, to set the value of a parameter object named myParam to the expression myVar + myOtherVar:

    myParam.Value = slexpr('myVar + myOtherVar')

Explicitly Model Algebraic Relationship Between Variables

The example sldemo_metro (see Exploring the Solver Jacobian Structure of a Model) models a system of three identical, pointlike metronomes suspended from a moving platform. Blocks in the model use these MATLAB variables from the base workspace:

  • m — Mass of each metronome, initial value 0.1 kg

  • r — Length of each metronome, initial value 1.0 m

  • J — Moment of inertia of each metronome, initial value 0.1 kg/m2

These variables share an algebraic relationship: the moment of inertia of each metronome is equal to the mass times the length squared. In this example, you record this relationship in the value of J.

  1. Open the model.

    sldemo_metro

  2. Update the block diagram. A model callback creates the variables in the base workspace.

  3. To prevent the callback from overwriting changes that you make to the variables, for this example, remove the callback code.

    set_param('sldemo_metro','InitFcn','')

  4. In the model, on the Modeling tab, click Model Data Editor.

  5. On the Model Data Editor Parameters tab, activate the Change scope button.

    The blocks that use the variables are in the subsystems, so you must configure the Model Data Editor to show data in subsystems.

  6. Click the Show/refresh additional information button.

    The data table contains rows that correspond to the variables in the base workspace.

  7. In the Filter contents box, enter J.

  8. In the data table, find the row that corresponds to J. In the Value column, set the value of the variable to Simulink.Parameter(J).

    Simulink converts J to a Simulink.Parameter object.

  9. In the Value column, set the value of the parameter object to =m*r^2.

  10. Optionally, simulate the model with different metronome masses and lengths. As you change the values of m and r, you do not have to remember to correct the value of J.

Limitations and Considerations for Other Modeling Goals

  • If the expression contains fixed-point data or data of an enumerated type, the expression can operate on only one variable or object.

  • You cannot set the data type (DataType property) of the parameter object that uses the expression to auto (the default) and set the data types of parameter objects that appear in the expression to a value other than auto. For example, in the expression J = m*r^2, you cannot set the data type of J to auto and the data types of m and r to single.

    • To retain the benefits of auto (described in Context-Sensitive Data Typing) for the object that uses the expression, set the data types of the objects in the expression to auto. In other words, use auto for all of the involved objects. The objects in the expression acquire the same data type as the object that uses the expression.

    • To use a value other than auto for an object that appears in the expression, set the data types of all dependent parameter objects to a value other than auto. In other words, do not use auto for any involved objects.

      You must use the same data type for all objects used in the expression.

  • If you have Simulink Coder™ and Embedded Coder® licenses, you can generate code that initializes a global variable by using the expression. However, the code generator can preserve the expression only if it conforms to certain requirements. See Expression Preservation (Simulink Coder).

Control Scope of Parameter Values

The scope of a variable is the set of models and blocks that can use the variable. For example, variables that you create in the base workspace have global scope because all blocks in all open models can use the variables. Variables that you store in a model workspace have limited scope because only the blocks in the host model can use the variables.

You cannot create two variables that have the same name in the same scope. Controlling the scope of a variable helps you to avoid name conflicts and establish clear ownership of the variable.

The table describes the different ways that you can control the scope of a reusable parameter value.

ScopeTechnique
All open modelsCreate a variable in the base workspace.
One or more targeted modelsCreate a variable in a data dictionary. To reuse the variable in multiple models, create a referenced dictionary. See What Is a Data Dictionary?
One model, including all subsystems in the modelCreate a variable in the model workspace. See Model Workspaces.
Multiple blocks inside a subsystem, including blocks in nested subsystems

Mask the subsystem and create a mask parameter instead of a workspace variable.

To prevent blocks inside a subsystem from using workspace variables, in the subsystem block dialog box, set Permit Hierarchical Resolution to None. This technique allows you to use the same name to create both a variable in a workspace and a mask parameter in the subsystem mask. The blocks in the subsystem can use only the mask parameter.

For information about subsystems, see Subsystem. For information about masking, see Masking Fundamentals.

To avoid name conflicts when you have a large model with many variables in the same scope, consider packaging the variables into a single structure. For more information, see Organize Related Block Parameter Definitions in Structures.

For basic information about how blocks use the variable names that you specify, see Symbol Resolution.

Permanently Store Workspace Variables

Variables that you create in the base workspace do not persist between MATLAB sessions. However, you can store the variables in a MAT-file or script file, and load the file whenever you open the model using a model callback. A model callback is a set of commands that Simulink executes when you interact with a model in a particular way, such as opening the model. You can use a callback to load variables when you open the model. Use this technique to store variables while you learn about Simulink and experiment with models.

  1. In a model that contains a Gain block, set the value of the Gain parameter to K.

  2. At the command prompt, create a variable K in the base workspace.

    K = 27;

  3. In the Workspace browser, right-click the variable and select Save As.

    To save multiple variables in one file, select all of the target variables in the Workspace browser, and then right-click any of the selected variables.

  4. In the dialog box, set Save as type to MATLAB Script. Set File name to loadvar and click Save.

    The script file loadvar.m appears in your current folder. You can open the file to view the command that creates the variable K.

  5. In the model, on the Modeling tab, select Model Settings > Model Properties.

  6. In the Callbacks tab of the Model Properties dialog box, select PreLoadFcn as the callback that you want to define. In the Model pre-load function pane, enter loadvar and click OK.

  7. Save the model.

The next time that you open the model, the PreloadFcn callback loads the variable K into the base workspace. You can also save the variable to a MAT-file, for example loadvar.mat, and set the model callback to load loadvar.

To learn about callbacks, see Customize Model Behavior with Callbacks. To programmatically define a callback for loading variables, see Programmatically Store Workspace Variables for a Model.

When you save variables to a file, you must save the changes that you make to the variables during your MATLAB session. To permanently store variables for a model, consider using a model workspace or a data dictionary instead of a MAT-file or script file. For more information about permanently storing variables, see Determine Where to Store Variables and Objects for Simulink Models.

Programmatically Store Workspace Variables for a Model

In the example above, you define a model callback that creates variables when you open a model. You can programmatically save the variable and set the model callback.

  1. At the command prompt, create the variable K in the base workspace.

    K = 27;
  2. Save the variable to a new script file named loadvar.m.

    matlab.io.saveVariablesToScript('loadvar.m','K')

  3. Set the model callback to load the script file.

    set_param('mymodel','PreloadFcn','loadvar')

  4. Save the model.

    save_system('myModel')

The function matlab.io.saveVariablesToScript saves variables to a script file. To save variables to a MAT-file, use the function save. To programmatically set model properties such as callbacks, use the function set_param.

Manage and Edit Workspace Variables

When you use variables to set block parameter values, you store the variables in a workspace or data dictionary. You can use the command prompt, the Model Explorer, and the Model Data Editor to create, move, copy, and edit variables. You can also determine where a variable is used in a model, list all of the variables that a model uses, and list all of the variables that a model does not use. For more information, see Create, Edit, and Manage Workspace Variables.

Package Shared Breakpoint and Table Data for Lookup Tables

To share breakpoint vectors or table data between multiple n-D Lookup Table, Prelookup, and Interpolation Using Prelookup blocks, consider storing the data in Simulink.LookupTable and Simulink.Breakpoint objects instead of MATLAB variables or Simulink.Parameter objects. This technique improves model readability by clearly identifying the data as parts of a lookup table and explicitly associating breakpoint data with table data.

Store Standalone Lookup Table in Simulink.LookupTable Object

A standalone lookup table consists of a set of table data and one or more breakpoint vectors. You do not share the table data or any of the breakpoint vectors with other lookup tables.

When you share a standalone lookup table, you use all of the table and breakpoint data together in multiple n-D Lookup Table blocks. To store this data in a Simulink.LookupTable object:

  1. Create the object in a workspace or data dictionary. For example, at the command prompt, enter:

    myLUTObj = Simulink.LookupTable;

  2. Use the properties of the object to store the values of the table and breakpoint data.

  3. Use the properties of the object to configure a unique name for the structure type in the generated code. In the property dialog box, under Struct Type definition, specify Name.

  4. In the n-D Lookup Table blocks, set Data specification to Lookup table object.

  5. To the right of Data specification, set Name to the name of the Simulink.LookupTable object.

For ways to create and configure Simulink.LookupTable objects, see Simulink.LookupTable

Store Shared Data in Simulink.LookupTable and Simulink.Breakpoint Objects

When you use Prelookup and Interpolation Using Prelookup blocks to more finely control the lookup algorithm, you can share breakpoint vectors and sets of table data. For example, you can share a breakpoint vector between two separate sets of table data. With this separation of the breakpoint data from the table data, you can share individual parts of a lookup table instead of sharing the entire lookup table.

To store breakpoint and table data:

  1. Create a Simulink.LookupTable object for each unique set of table data. Create a Simulink.Breakpoint object for each unique breakpoint vector, including breakpoint vectors that you do not intend to share.

  2. Use the properties of the objects to store the values of the table and breakpoint data.

  3. Configure the Simulink.LookupTable objects to refer to the Simulink.Breakpoint objects for breakpoint data. In the Simulink.LookupTable objects, set Specification to Reference. Specify the names of the Simulink.Breakpoint objects.

  4. In the Interpolation Using Prelookup blocks, set Specification to Lookup table object. Set Name to the name of a Simulink.LookupTable object.

    In the Prelookup blocks, set Specification to Breakpoint object. Set Name to the name of a Simulink.Breakpoint object.

The example model fxpdemo_lookup_shared_param contains two Prelookup and two Interpolation Using Prelookup blocks. Configure the blocks so that each combination of a Prelookup and an Interpolation Using Prelookup block represents a unique lookup table. Share the breakpoint vector between the two lookup tables. In this case, each lookup table has unique table data but shared breakpoint data.

  1. Open the example model.

  2. In the Prelookup block dialog box, set Specification to Breakpoint object. Set Name to sharedBkpts.

  3. Click the button next to the value of the Name parameter. Select Create Variable.

  4. In the Create New Data dialog box, set Value to Simulink.Breakpoint and click Create.

    A Simulink.Breakpoint object appears in the base workspace.

  5. In the property dialog box for sharedBkpts, specify Value as a vector such as [1 2 3 4 5 6 7 8 9 10]. Click OK.

  6. In the Prelookup block dialog box, click OK.

  7. In the Prelookup1 block dialog box, set Specification to Breakpoint object. Set Name to sharedBkpts.

  8. In the Interpolation Using Prelookup block dialog box, set Specification to Lookup table object. Set Name to dataForFirstTable.

  9. Click the button next to the value of the Name parameter. Select Create Variable.

  10. In the Create New Data dialog box, set Value to Simulink.LookupTable and click Create.

    A Simulink.LookupTable object appears in the base workspace.

  11. In the property dialog box for dataForFirstTable, specify Value as a vector, such as [10 9 8 7 6 5 4 3 2 1].

  12. Set Specification to Reference.

  13. In the table under Specification, set Name to sharedBkpts and click OK.

  14. In the Interpolation Using Prelookup block dialog box, click OK.

  15. Configure the Interpolation Using Prelookup1 block to use a Simulink.LookupTable object named dataForSecondTable. In the object property dialog box, specify Value as a vector, such as [0 0.5 1 1.5 2 2.5 3 3.5 4 4.5]. Configure the object to refer to sharedBkpts for the breakpoint data.

The model now represents two unique lookup tables:

  • A combination of sharedBkpts and dataForFirstTable.

  • A combination of sharedBkpts and dataForSecondTable.

These lookup tables share the same breakpoint data through sharedBkpts.

Related Topics