Instrument
R2026bCreate real-time instrument object
Description
An slrealtime.Instrument object streams signal data from a
real-time simulation running on a Speedgoat® target computer to a MATLAB® development computer or to a destination that you select by using the
Instruments property in the Target Object Properties. For more information, see the addForFileLog
function, addForMATLAB
function, and addForSDI
function. The slrealtime.Instrument object provides access to object
functions, object properties, and object events related to the instrument in the real-time
application.
The object provides access to methods and properties that:
Find instrumented signals in the real-time application and add these to the instrument object.
Add or remove signals in the instrument object.
Connect signals in the object to axes or scalar displays.
Add, get data from, or remove callbacks for signals in the object.
For more information, see Add Instruments to Real-Time Application by Using Simulink Editor and Add Instruments to Real-Time Applications by Using MATLAB Language. You also can work with instruments by using the Simulink Real-Time Instrument Viewer.
Creation
instrument_object = slrealtime.Instrument('appName')appName.
Example: Create Instrument Object for Real-Time Application
instrument_object = slrealtime.Instrument()
Example: Create Instrument Object without Real-Time Application
Properties
Object Functions
addFileLogSignals | Find signals connected to File Log blocks and add these to real-time instrument object |
addInstrumentedSignals | Find instrumented signals and add these to real-time instrument object |
addSignal | Add signal for streaming to be available in callback |
clearScalarAndLineData | Clear data from children of real-time instrument object |
connectCallback | Add callback that responds to new data from target computer |
connectLine | Connect signal for streaming to axes |
connectScalar | Add signal for streaming to scalar display |
connectXYPlot | Connect X and Y signal structures to display on axes |
copy | Copy the array of handle objects from one Instrument object to another |
delete | Delete real-time instrument object |
generateScript | Generate script that creates scalar and axes controls from signals, scalars, and lines in real-time instrument object |
get | Query Instrument object properties |
getBufferedData | Gets data from the real-time application instrument buffer |
getCallbackDataForSignal | Get callback data for a signal in real-time instrument object |
removeCallback | Removed callback from real-time instrument object |
removeSignal | Remove signal from real-time instrument object |
set | Assign Instrument object property values |
validate | Validate signals in instrument object |
Note
Some Instrument object functions (for example, clearScalarAndLineData, connectCallback, connectLine, connectScalar, connectXYPlot, generateScript, getCallbackDataForSignal, and removeCallback) are not intended for use when selecting a signal streaming
destination by using the Instruments property in the Target Object Properties. Use these object functions when developing App Designer instrument
panels.
Examples
Create instrument object hInst for an existing real-time
application appName. This approach is useful for validating
signal names in the real-time application MLDATX file as you add signals to the
Instrument object.
appName = 'slrt_ex_pendulum_100Hz'; % name of model or MLDATX file
hInst = slrealtime.Instrument(appName);
Create instrument object hInst without assigning a
real-time application. This approach is useful when building a user interface, when the
real-time application MLDATX file is not available, or when you are using the instrument
with multiple models.
hInst = slrealtime.Instrument();
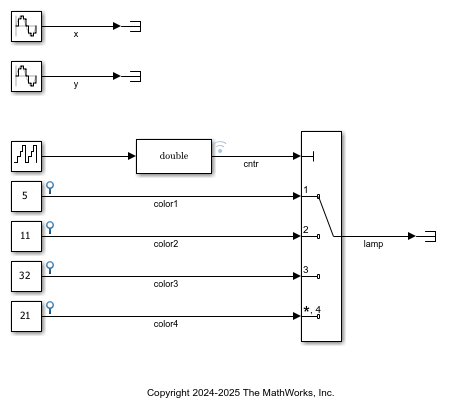
This example shows how to create an Instrument object and apply Instrument object methods. This example uses real-time application slrt_ex_traffic_lights.mldatx and includes the signals that are connected to the instrument object.
Connect Target Computer
Connect to the default target computer.
tg = slrealtime;
connect(tg);
Configure Model for Target Computer
Open the example model and configure the system target file (STF) selection.
model = 'slrt_ex_traffic_lights';
open_system(model);
modelSTF = getSTFName(tg);
set_param(model,"SystemTargetFile",modelSTF);
Build Real-Time Application
Build the real-time app. Use evalc to suppress build messages.
evalc('slbuild(model)');
Open App Generator and MLDATX File
To created an Instrument object and apply Instrument object methods, use the Simulink Real-Time App Generator to bind signals and parameters to controls then generate the app.
Start the App Generator by using the button on the Real-Time tab in the Simulink® Editor.
Open the slrt_ex_traffic_lights.mat file that specifies a set of application controls. You can use this setup to generate the traffic_lights.mlapp app.
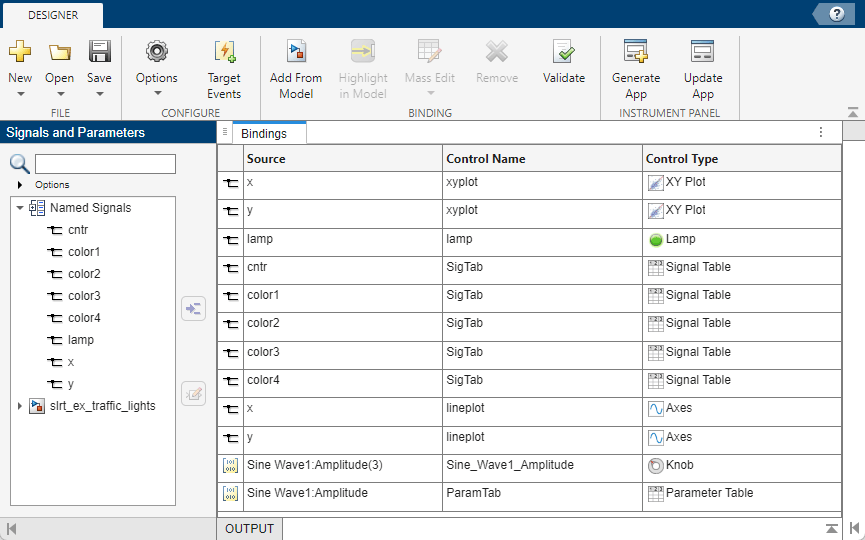
Tip: Open the Parameter panel in the App Generator to inspect parameters for the controls.
Open App Designer and View Callback Code
From the Files in MATLAB®, open the traffic_lights.mlapp app.
To view the callback code that demonstrates the object methods, switch from Design View to Code View. Scroll to the portion of the callback code that starts with this text:
  Code that executes after component creation
      function startupFcn(app)
To modify this code, open the MAT file, modify the configuration of controls, and click the Update App button.
Close Model and App
When done examining callback code, close the model, the App Generator, and App Designer.
bdclose(model);
Version History
Introduced in R2020b
See Also
slrealtime.instrument.LineStyle | addInstrumentedSignals | addSignal | clearScalarAndLineData | connectCallback | connectLine | connectScalar | connectXYPlot | delete | generateScript | getCallbackDataForSignal | removeCallback | removeSignal | validate | addForFileLog | addForMATLAB | addForSDI | Simulink Real-Time
Instrument Viewer

