Add a Logical Assessment to a Test Case and Review Results (Tech Preview)
R2026bNote
The redesigned Simulink® Test Manager is a tech preview in R2026b. The primary purpose of the tech preview is to provide early access to the most common testing workflows. For more information about supported workflows, see Overview of the Redesigned Simulink Test Manager (Tech Preview).
To enable the feature, click the New Test Manager button in the
existing Test Manager or use the sltest.stmv2.open function at
the command line.
This step of the example shows how to assess signal behavior during simulation by using the
redesigned Test Manager. In this step, you configure the fuelsys_stm test
file by adding a test interface, and creating a bounds check for a signal in the model. Then,
you run the test, and review the results.
Prepare the Test Interface for Logical and Temporal Assessments
To add a bounds check assessment, modify the test interface by creating a test alias for a signal and defining component under test (CUT) workspace variables. You use the test alias to specify the signal to assess. You create workspace variables to define the boundary values for the assessment. To create the test alias and workspace variables:
In the Test Files pane, click fuelsys_stm_CUT. In the Signals section, in the
fuelGainsignal row, double-click the cell in the Test Alias column. EnterfGainand press Enter.Tip
Because you define test aliases in the CUT, you can reuse them in all test cases in the CUT.
In the Workspace pane, add two variables by clicking Add Variable twice.
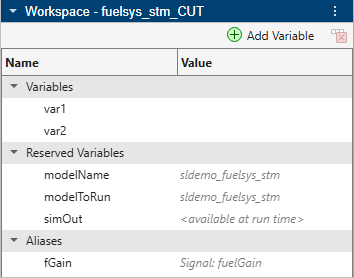
To set the name and value of the variables, double-click the Name and Value cells and enter:
Name Value UpperBound6LowerBound2
Create a Logical Assessment
Add a bounds check assessment that verifies that the fGain signal
stays between the upper and lower bounds during simulation:
In the Test Files pane, right-click Test Case 1 and select Rename. Enter
AssessmentTest.Click AssessmentTest. In the Prepare Test Case section on the toolstrip, select Logical and Temporal.
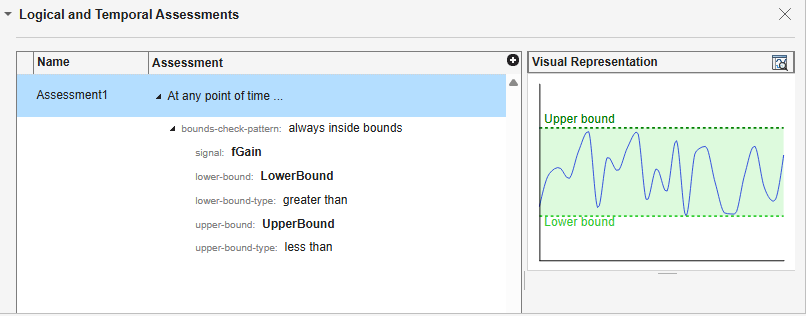
In the Logical and Temporal Assessments section, click Add Assessment > Bounds check.
In the table, beneath the new assessment, set bound-check-pattern to
always inside bounds.Set signal to
fGainand set these boundary conditions:lower-bound —
LowerBoundlower-bound-type —
greater
                        than
upper-bound —
UpperBoundupper-bound-type —
less
                        than
In the toolstrip, click Save.
Review Logical Assessment Results
To identify where and when the fGain signal fails to satisfy the
boundary conditions, run the test and examine the results:
To run the test with the default run settings, click Run.
The redesigned Test Manager opens the results app. In the Test Results pane, expand the new result set, the test case, and the Logical and Temporal Assessments section. The assessment has a
FAILresult.
Select
Assessment1. TheAssessment1tab displays the overall results details. The assessment fails becausefGainbecomes greater than theUpperBoundvariable.
To view additional details for the first failure, click the right arrow next to the drop-down list.

In the next step, you use run settings and runlist files to run a back-to-back test. See Create and Run a Back-to-Back Test (Tech Preview).

