Simulate Vehicle Dynamics in ZalaZONE Automotive Proving Ground 3D Scene
You can simulate a vehicle ascending a hill using the ZalaZONE Automotive Proving Ground Hill Tracks 3D scene.
To start, build your virtual vehicle using the Virtual Vehicle Composer with these settings:
Powertrain architecture —
Conventional
                        Vehicle
Vehicle Dynamics —
Combined Longitudinal and
                        Lateral Dynamics
Scenario —
Braking3D Scene Selection —
3D
                    Scene
After you build your virtual vehicle model, set the scene and vehicle starting location.
Set Scene and Vehicle Starting Location
Specify the maneuver scene and vehicle starting location. In this example, specify the ZalaZONE Automotive Proving Ground scene with the vehicle at the recommended starting location for the 25% grade hill. Also specify the scene view.
Open the Driver Commands block and set Vehicle command mode to
Longitudinal Driver.In the
Visualization>3D Enginesubsystem, open the Simulation 3D Scene Configuration block.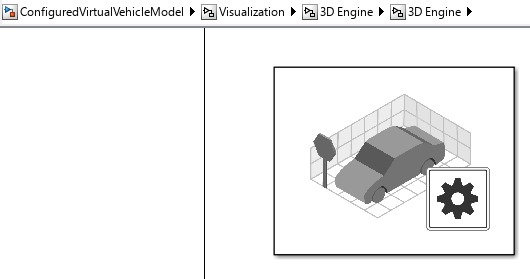
For this example, set these Simulation 3D Scene Configuration block parameters:
Scene name to
ZalaZONE Hill
                                        Tracks
Note
You must download the ZalaZONE Automotive Proving Ground Hill Tracks scene from the Add-On Explorer. For more information, see Setup.
Scene view to
SimulinkVehicle1
Click Apply and save the model.
Open the Model Explorer.
In the Model Hierarchy pane, navigate to ConfiguredVirtualVehicleModel > External Data > VirtualVehicleTemplate.
In the list of Referenced Dictionaries, select
PassVeh. Click Open.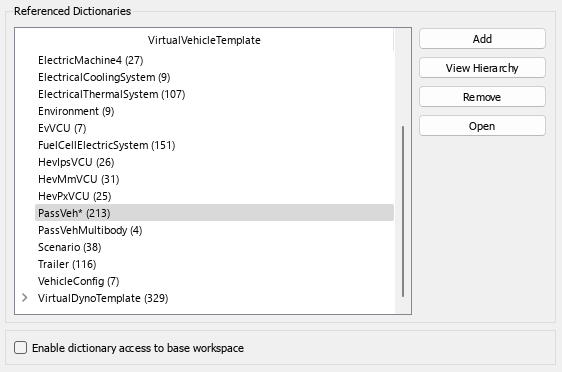
In the Model Hierarchy pane, select ConfiguredVirtualVehicleModel > PassVeh > Design Data.
Set the data dictionary variable value to the initial vehicle position values recommended for the scene. For this example, use these recommended values for the ZalaZONE Automotive Proving Ground Hill Tracks scene.
Data Dictionary Variable Description Recommended Value PlntVehInitLongPosRecommended starting location - X
1441PlntVehInitLatPosRecommended starting location - Y
-1170PlntVehInitVertPosRecommended starting location - Z
-232.5PlntVehInitRollAngRecommended starting location - Roll
0PlntVehInitPitchAngRecommended starting location - Pitch
0PlntVehInitYawAngRecommended starting location - Yaw
-2In the
PassVehdata dictionary, confirm the variable values match the recommended starting values for the scene.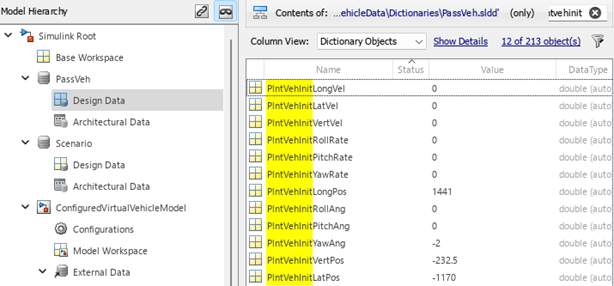
In the Model Explorer, save the
PassVehchanges.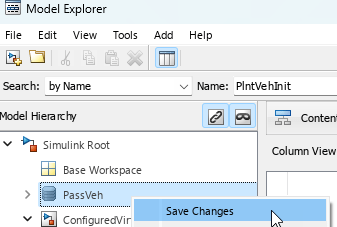
In the list of Referenced Dictionaries, select
Scenario. Click Open.Set the data dictionary variable,
ScnBrkXbraketo80.In the Model Explorer, save the Scenario changes.
Run Simulation
On the ConfiguredVirtualVehicleModel model toolstrip, click
Run. As the simulation runs, view the results in the Simulation
3D Viewer. For this example, view the vehicle ascending the hill and braking at the
top.
See Also
Virtual Vehicle Composer | Acceleration and Braking | Longitudinal Driver | ZalaZONE Automotive Proving Ground Hill Tracks
Related Topics
You can also select a web site from the following list
Americas
- América Latina (Español)
- Canada (English)
- United States (English)
Europe
- Belgium (English)
- Denmark (English)
- Deutschland (Deutsch)
- España (Español)
- Finland (English)
- France (Français)
- Ireland (English)
- Italia (Italiano)
- Luxembourg (English)
- Netherlands (English)
- Norway (English)
- Österreich (Deutsch)
- Portugal (English)
- Sweden (English)
- Switzerland
- United Kingdom (English)
Asia Pacific
- Australia (English)
- India (English)
- New Zealand (English)
- 中国
- 日本Japanese (日本語)
- 한국Korean (한국어)