Create Aerospace Models
Basic Steps
Regardless of the model complexity, you use the same essential steps for creating an aerospace model as you would for creating any other Simulink® model.
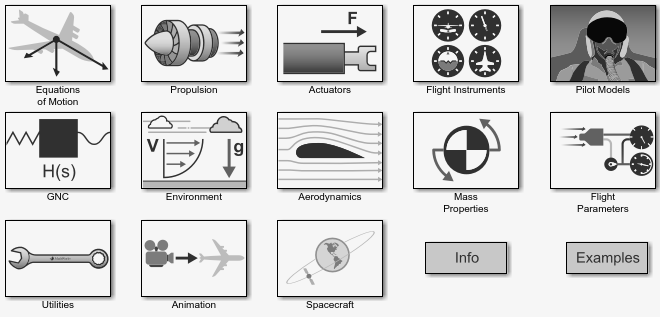
Open the Aerospace Blockset™ Library. You can access this library through the Simulink Library Browser or directly open the Aerospace Blockset window from the command line by typing
aerolib.Double-click any library in the window to display its contents. This figure shows the Aerospace Blockset library window.

Select and position the blocks. You must first select the blocks that you need to build your model, and then position the blocks in the model window. For the majority of Simulink models, you select one or more blocks from each of these categories:
Source blocks generate or import signals into the model, such as a sine wave, a clock, or limited-band white noise.
Simulation blocks can consist of almost any type of block that performs an action in the simulation. A simulation block represents a part of the model functionality to be simulated, such as an actuator block, a mathematical operation, a block from the Aerospace Blockset library, and so on.
Signal Routing blocks route signals from one point in a model to another. If you need to combine or redirect two or more signals in your model, you will probably use a Simulink Signal Routing block, such as Mux and Demux.
As an alternative to the Mux block, consider the
Vectoroption of the Vector Concatenate block Mode parameter. This block provides a more general way for you to route signals from one point in a model to another. TheVectormode takes as input a vector of signals of the same data type and creates a contiguous output signal. Depending on the input, this block outputs a row or column vector if any of the inputs are row or column vectors, respectively.Sink blocks display, write, or save model output. To see the results of the simulation, you must use a Sink block.
Configure the blocks. Most blocks feature configuration options that let you customize block functionality to specific simulation parameters. For example, the ISA Atmosphere Model block provides configuration options for setting the height of the troposphere, tropopause, and air density at sea level.
Connect the blocks. To create signal pathways between blocks, you connect the blocks to each other. You can do this manually by clicking and dragging, or you can connect blocks automatically.
Encapsulate subsystems. Systems made with Aerospace Blockset blocks can function as subsystems of larger, more complex models, like subsystems in any Simulink model.
Build a Simple Actuator System
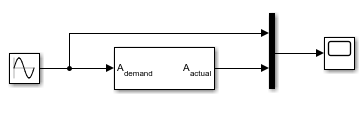
The Simulink product is a software environment for modeling, simulating, and analyzing dynamic systems. Try building a simple model that drives an actuator with a sine wave and displays the actuator's position superimposed on the sine wave.

Note
If you prefer to open the complete model instead of building it, see Simple Actuator System Model.
The Create a Model section explains how to build a model on Windows® platforms. You can use this same procedure to build a model on Linux® platforms.
The section describes how to build the model. It does not describe how to set the configuration parameters for the model. See Set Model Configuration Parameters for a Model. That topic describes the Configuration Parameters dialog box for models. If you do not set any configuration parameters, simulating models might cause warnings like:
Warning: Using a default value of 0.2 for maximum step size.
The simulation step size will be equal to or less than this
value.  You can disable this diagnostic by setting
'Automatic solver parameter selection' diagnostic to 'none'
in the Diagnostics page of the configuration parameters
dialog
Simple Actuator System Model
This example shows how to build a simple actuator system model.
model='aeroblktutorial';
open_system(model)
Create a Model
To create a new blank model and open the Simulink library browser:
On the MATLAB® Home tab, click Simulink. In the Simulink start page, click the Blank Model template, and then click Create Model.
To open the Library Browser, click the browser button.
Add a Sine Wave block to the model.
Click Sources in the Library Browser to view the blocks in the Simulink Sources library.
Drag the Sine Wave block from the Sources library into the new model window.
Add a Linear Second-Order Actuator block to the model.
Click the
 symbol next to Aerospace Blockset in the Library Browser to expand
the hierarchical list of the aerospace blocks.
symbol next to Aerospace Blockset in the Library Browser to expand
the hierarchical list of the aerospace blocks.In the expanded list, click Actuators to view the blocks in the Actuator library.
Drag the Linear Second-Order Actuator block into the model window.
Add a Mux block to the model.
Click Signal Routing in the Library Browser to view the blocks in the Simulink Signals & Systems library.
Drag the Mux block from the Signal Routing library into the model window.
Add a Scope block to the model.
Click Sinks in the Library Browser to view the blocks in the Simulink Sinks library.
Drag the Scope block from the Sinks library into the model window.
Resize the Mux block in the model.
Click the Mux block to select the block.
Hold down the mouse button and drag a corner of the Mux block to change the size of the block.
Connect the blocks.
Position the pointer near the output port of the Sine Wave block. Hold down the mouse button and drag the line that appears until it touches the input port of the Linear Second-Order Actuator block. Release the mouse button.
Using the same technique, connect the output of the Linear Second-Order Actuator block to the second input port of the Mux block.
Using the same technique, connect the output of the Mux block to the input port of the Scope block.
Position the pointer near the first input port of the Mux block. Hold down the mouse button and drag the line that appears over the line from the output port of the Sine Wave block until double crosshairs appear. Release the mouse button. The lines are connected when a knot is present at their intersection.
Set the block parameters.
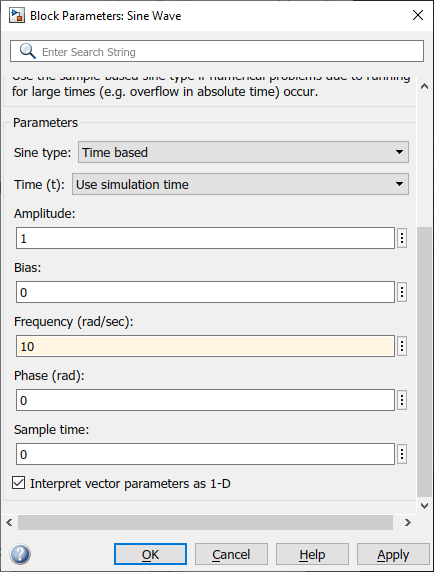
Double-click the Sine Wave block. The dialog box that appears allows you to set the block's parameters.
For this example, configure the block to generate a 10 rad/s sine wave by entering
10for the Frequency parameter. The sinusoid has the default amplitude of1and phase of0specified by the Amplitude and Phase offset parameters.Click OK.

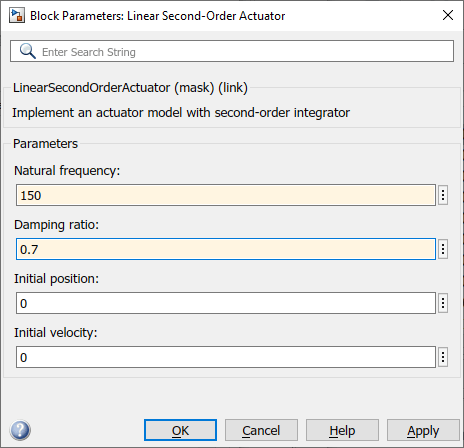
Double-click the Linear Second-Order Actuator block.
In this example, the actuator has the default natural frequency of
150rad/s, a damping ratio of0.7, and an initial position of0radians specified by the Natural frequency, Damping ratio, and Initial position parameters.Click OK.

Run the Simulation
You can now run the model that you built to see how the system behaves in time:
Double-click the Scope block if the Scope window is not already open on your screen. The Scope window appears.
Select Run from the Simulation menu in the model window. The signal containing the 10 rad/s sinusoid and the signal containing the actuator position are plotted on the scope.
Adjust the Scope block's display. While the simulation is running, right-click the y-axis of the scope and select Autoscale. The vertical range of the scope is adjusted to better fit the signal.
Vary the Sine Wave block parameters.
While the simulation is running, double-click the Sine Wave block to open its parameter dialog box.
You can then change the frequency of the sinusoid. Try entering
1or20in the Frequency field. Close the Sine Wave dialog box to enter your change. You can then observe the changes on the scope.
Select Stop from the Simulation menu to stop the simulation.
Many parameters cannot be changed while a simulation is running. This is usually the case for parameters that directly or indirectly alter a signal's dimensions or sample rate. However, there are some parameters, like the Sine Wave Frequency parameter, that you can tune without stopping the simulation.
Run a Simulation from a Script
You can also modify and run a Simulink simulation from a script. By doing this, you can automate the variation of model parameters to explore a large number of simulation conditions rapidly and efficiently. For information on how to do this, see Run Simulations Programmatically.
Access Aerospace Examples
To access an Aerospace Blockset example:
Open the MATLAB Command Window.
Click the question mark.
Navigate to Aerospace Blockset and click the Examples tab.