Build Linux Image for Microchip PolarFire SoC by Using Yocto Build System
This example shows how to build a Linux® image for the Microchip Polarfire® SoC (PFSoC) Icicle kit. You use the Yocto build system to create a Linux image for your Microchip device. You can load this Linux image to a SD card and boot your PolarFire SoC board from the SD card. You can also follow the steps in this example to create a Linux image for the other Microchip devices in the PolarFire SoC family.
In this example, you:
Set up the build environment for Yocto build system.
Build a Linux image for the Microchip PolarFire SoC Icicle kit.
Load the Linux image to a SD card.
Customize the Linux image by modifying the device tree file.
Download the Linux image from the MathWorks repository.
Requirements
Ubuntu® Server Images for the PolarFire SoC Icicle kit — To download the Ubuntu server images, see Download Ubuntu Server on the Ubuntu website.
Ubuntu Linux operating system (OS) — To install the Ubuntu OS, follow the instructions in Ubuntu Install Instructions on the Ubuntu website.
Microchip Libero® SoC Design Suite — Use a version listed in the HDL Language Support and Supported Third-Party Tools and Hardware.
Microchip PolarFire SoC Icicle kit or video kit.
bmaptool software for Linux OS.
Win32DiskImager software for Windows® OS.
Set Up the Build Environment
First, install the prerequisite packages. For more information on the required packages, see the Host PC setup for Yocto section on the Microchip PolarFire SoC Yocto BSP GitHub®. This example uses Ubuntu 22.04 LTS. To run this example on other Linux distributions, install the required prerequisite packages.
Create the Workspace
Create a new workspace for the PolarFire Yocto Board Support Package. To create a new directory named yocto-dev, run these commands on your Linux machine in bash mode:
$ mkdir yocto-dev
$ cd yocto-dev
Clone MathWorks Repository
Clone the MathWorks® Microchip Repository from GitHub.
$ git clone https://github.com/mathworks/microchip-bsp.git
Check out the GitHub branch.
$ cd microchip-bsp
$ git checkout mathworks_microchipsoc_R25.1.0
$ cd mw_icicle_kit
Initialize PFSoC Yocto Repository
Initialize the GitHub repository.
$ repo init -u https://github.com/polarfire-soc/polarfire-soc-yocto-manifests.git -b 2024.02.1 -m default.xml
This command initializes the repository from the 2024.02.1 branch. You can also initialize from the other branch or from the main branch by specifying -b 2024.06 or -b main branch.
To update the repository, use these commands:
$ repo sync
$ repo rebase
Set Up Bitbake Environment
Set up the BitBake environment for the meta-polarfire-soc-yocto-bsp layer. The meta-polarfire-soc-yocto-bsp layer contains the PFSoC evaluation board metadata files, such as the machine configuration files and core recipes. For more information, see Microchip PolarFire SoC Yocto BSP on GitHub.
$ . ./meta-polarfire-soc-yocto-bsp/polarfire-soc_yocto_setup.sh
Build Linux Image for PolareFire SoC Icicle Kit
After you setup the BitBake environment, build the Linux image for the PolarFire SoC Icicle kit.
$ MACHINE=icicle-kit-es bitbake core-image-minimal-dev
This command builds the core minimal Linux image for the Icicle kit engineering sample machine. To build a Linux image for a different supported machine, use the syntax:
$ MACHINE=<machine> bitbake <image>
In this syntax:
<machine>is the target board for which you want to build a Linux image. The default argument isMACHINE=icicle-kit-es. For more information on available targets, see the Supported Machine Targets section of the Microchip PolarFire SoC Yocto BSP GitHub.<image>is the name of the Linux image. For more information on the most common Linux images, see the Linux Images section of the Microchip PolarFire SoC Yocto BSP GitHub.
To build a Linux image for the PolarFire SoC Icicle kit engineering sample with asymmetric multiprocessing (AMP) support, set MACHINE to icicle-kit-es-amp. For more information, Asymmetric Multiprocessing (AMP) in the PolarFire SoC Embedded Software documentation on GitHub.
To build an image for booting an authenticated Linux kernel for Icicle Kit, set the MACHINE target to icicle-kit-es-auth. For more information on how to build an authentication scheme implementing a chain of trust, see Linux Boot Authentication.
Load Linux Image to SD Card
Copy the generated Linux image to a flash device, such as a USB MMC or an SD, or uSD card. The generated Linux image is in the build/tmp-glibc/deploy/images/<MACHINE> folder. The disk image is a WIC file located in the yocto-dev/build/tmp-glibc/deploy/images/<MACHINE> folder. For example, yocto-dev/build/tmp-glibc/deploy/images/icicle-kit-es/core-image-minimal-dev-icicle-kit-es.wic.
For Linux Operating System:
To program the storage device, use bmaptool command. This command creates a block map of the file and copies files to a storage device using block map.
Navigate to the build directory and flash the image.
$ cd yocto-dev/build
$ sudo bmaptool copy tmp-glibc/deploy/images/icicle-kit-es/core-image-minimal-dev-icicle-kit-es.wic /dev/sdX
Replace sdX with your drive identifier. Use the proper drive identifier for your flash device to avoid overwriting a system disk or partition. You can also use the winscp command to directly copy the WIC file from the Ubuntu machine to a local directory.
For Windows Operating System:
Use the Win32DiskImager software to load the Linux image on the SD card. You can download and install this software from the Win32DiskImager website. To load the Linux image to an SD card by using Win32DiskImager:
Connect the SD card to your host PC.
In the Win32DiskImager software, specify the path to the WIC file in the Image field.
Click Write to burn the Linux image to the SD card.
Customize the Device Tree File
The Linux image contains a DTS file that describes the device tree of your hardware. You can customize this DTS file according to your requirements. If you update the DTS file, you must rebuild the image and provide a patch in the Yocto project. To modify the DTS file and rebuild the image, follow these steps:
1. Customize the DTS file. Edit the DTS file in the yocto-dev repository at the path /tmp/yocto-dev/build/tmp-glibc/work-shared/icicle-kit-es/kernel-source/arch/riscv/boot/dts/microchip/mpfs-icicle-kit-es.dts.
2. Check whether the DTS file updated by using these GIT commands:
$ cd build/tmp-glibc/work-shared/icicle-kit-es/kernel-source/arch/riscv/boot/dts/microchip/
$ git status
$ git diff
3. Add the DTS file to GIT and commit the changes.
$ git add mpfs-icicle-kit.dts
$ git commit -s -m "Provide_your_description_for_commit"
4. Create a patch and copy the patch to the Yocto directory, /meta-polarfire-soc-yocto-bsp/meta-polarfire-soc-bsp/recipes-kernel/linux/files/icicle-kit.
$ git format-patch -1
$ cp 0001-Provide_your_description_for_patch.patch  ../../../../../../../../../../meta-polarfire-soc-yocto-bsp/meta-polarfire-soc-bsp/recipes-kernel/linux/files/icicle-kit
5. Verify the patch copied to the Yocto project directory. Navigate to the path.
$ cd /tmp/yocto-dev/meta-polarfire-soc-yocto-bsp/meta-polarfire-soc-bsp/recipes-kernel/linux/files/icicle-kit/
$ cd ../..
6. Update the mpfs-icicle.bb file with the new patch by using this sudo command:
$ sudo vim mpfs-icicle.bb
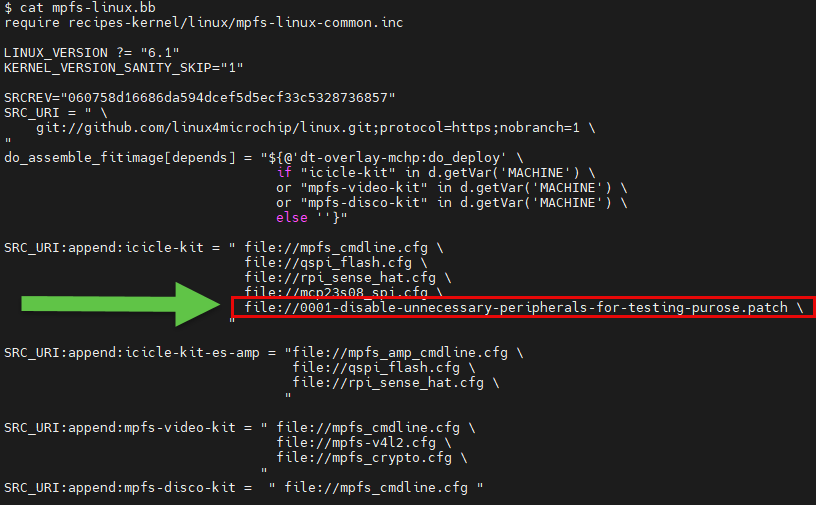
For example, this command adds a patch for the PolarFire SoC Icicle kit by appending the patch file to SRC_URI:append:icicle-kit path as shown in this figure.
If you want to apply a patch for the PolarFire SoC video kit, add this patch file to the SRC_URI:append:mpfs-video-kit.
7. Set up the BitBake environment.
$ cd /tmp/yocto-dev
$ . ./meta-polarfire-soc-yocto-bsp/polarfire-soc_yocto_setup.sh
8. To generate the image that contains the latest changes, run the bitbake command with a clean and install task.
$ MACHINE=icicle-kit-es bitbake -c clean mpfs-linux
$ MACHINE=icicle-kit-es bitbake -c install mpfs-linux
To ensure that you rebuild the image with your patch, run the bitbake command with the cleanstate task.
$ MACHINE=icicle-kit-es bitbake core-image-minimal-dev -c cleansstate
$ MACHINE=icicle-kit-es bitbake core-image-minimal-dev
9. To make sure that the image contains the patch, navigate to the folder that contains the WIC image and check the timestamp.
$ cd ../../../..
$ cd build/tmp-glibc/deploy/images/icicle-kit-es/
$ ls -la
MathWorks Repository for Building Linux image for Microchip PolarFire SoC Icicle Kit
MathWorks Microchip Repository describes how to build a Linux image for the PolarFire SoC Icicle Kit. To download the Linux image, see the mathworks_microchipsoc_R25.1.0 section of the GIT page and download the microchip_linuxbinaries.zip file. Extract the ZIP file, which contains the WIC image. Then, use Win32DiskManger or bmaptool to copy the image to an SD card.
See Also
Topics
- Get Started with IP Core Generation for Microchip PolarFire SoC Devices
- Define Custom Board and Reference Design for Microchip Workflow
- Guided Hardware Setup for Microchip Boards