Tune Gain Parameter During Simulation
Step 1. Create a Simple Gain Model
To perform the example steps yourself, first create an example model.
The example model has a single gain block with a gain parameter that is tuned during simulation.

Open the Simulink® Block Library and click Commonly Used Blocks.
Add an Inport block.
Add a Gain block. Double-click to open the block mask and change the value in the Gain parameter to
gain.Double click the Gain block to open the block mask. In the Signal Attributes tab, and set Output data type to
uint8.Note
If you leave Output data type as
Inherit: Inherit via internal rule, Simulink Coder™ selects a data type based on the default value of theGainparameter, which might not accommodate the value when tuning the parameter after DPI generation. Specify a specific type for the block's output signal, to avoid incorrect type setting by Simulink Coder.Add an Outport block.
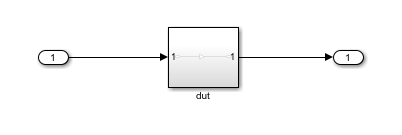
Connect all blocks as shown in the preceding diagram.
Step 2. Create Data Object for Gain Parameter
Create a data object for the gain parameter:
At the MATLAB® command prompt, type:
gain = Simulink.Parameter
Next, type:
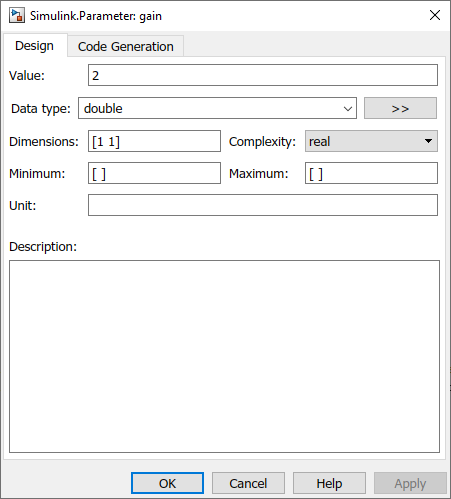
open('gain')This command opens the property dialog box for the parameter object.

On the Design tab, select the following values:
Value: 2
Data type: double
On the Code Generation tab, select the following values:
Storage class:
Model
                                    default
Click OK.
For more information about using parameter objects for code generation, see C Data Code Interface Configuration for Model Interface Elements (Simulink Coder).
Note
Setting Storage class to Auto
optimizes the parameter during code generation. Recommended values when
generating DPI tunable parameters are:
Model defaultSimulinkGlobalExportedGlobal
Use Model default when your parameter is
instance-specific, and choose between SimulinkGlobal and
ExportedGlobal to generate a global variable.
Step 3. Generate SystemVerilog DPI Component
On the Simulink Apps tab click HDL Verifier. In the right pane, set the HDL Verifier Mode to DPI Component Generation.
On the HDL Verifier tab, click C Code Settings. The Configuration Parameters dialog opens on Code Generation.
At System target file, click Browse and select
systemverilog_dpi_grt.tlc.If you have a license for Embedded Coder®, you can select target
systemverilog_dpi_ert.tlc. This target allows you to access its additional code generation options (on the Code Generation pane in Model Configuration Parameters).
At Toolchain, under Build process, select the toolchain you want to use from the list. See Generate Cross-Platform DPI Components for guidance on selecting a toolchain.
You can optionally select flags for compilation. Under Build Configuration, select
Specifyfrom the drop-down list. Click Show Settings to display the current flags.In the Code Generation group, click SystemVerilog DPI.
Leave both Generate test bench and Customize generated SystemVerilog code cleared (because this example modifies the generated SystemVerilog code, any testbench generated at the same time does not have the correct results).
Click OK to accept these settings and to close the Configuration Parameters dialog box.
In the example model, right-click the gain block and select Create Subsystem from Selection. For this example, rename the subsystem
dut.
In the Simulink Toolstrip, on the HDL Verifier tab, click Generate DPI Component.
The SystemVerilog component is generated as
dut_build/dut_dpi.svin your current working folder.
Step 4. Add Parameter Tuning Code to SystemVerilog File
Open the file
dut_build/dut_dpi.svand examine the generated code.In this example, after you call the
resetfunction, call theDPI_dut_setparam_gainfunction with the new parameter value. For example, here the gain is changed to 6:DPI_dut_setparam_gain(objhandle, 6);
If the asynchronous reset signal is high (goes from 0 to 1), call the
resetfunction again.if(reset == 1'b1) begin DPI_dut_reset(objhandle, dut_U_In1, dut_Y_Out1); DPI_dut_setparam_gain(objhandle, 6); endThe SystemVerilog code now looks like this:
module dut_dpi(
    input clk,
    input clk_enable,
    input reset,
    input real dut_U_In1,
    output real dut_Y_Out1
);

    chandle objhandle=null;
    // Declare imported C functions
    import "DPI" function chandle DPI_dut_initialize(chandle existhandle);
    import "DPI" function void DPI_dut_reset
        (input chandle objhandle, input real dut_U_In1, inout real dut_Y_Out1);
    import "DPI" function void DPI_dut_output
        (input chandle objhandle, input real dut_U_In1, inout real dut_Y_Out1);
    import "DPI" function void DPI_dut_update
        (input chandle objhandle, input real dut_U_In1);
    import "DPI" function void DPI_dut_terminate(input chandle objhandle);
    import "DPI" function void DPI_dut_setparam_gain
        (input chandle objhandle, input real dut_P_gain);

    initial begin
        objhandle = DPI_dut_initialize(objhandle);
        DPI_dut_setparam_gain(objhandle, 6);
    end

    final begin
        DPI_dut_terminate(objhandle);
    end

    always @(posedge clk or posedge reset) begin
        if(reset == 1'b1) begin
            DPI_dut_reset(objhandle, dut_U_In1, dut_Y_Out1);
            DPI_dut_setparam_gain(objhandle, 6);
        end
        else if(clk_enable) begin
            DPI_dut_output(objhandle, dut_U_In1, dut_Y_Out1);
            DPI_dut_update(objhandle, dut_U_In1);
        end
    end
endmodule
Step 5. Run Simulation with Parameter Change
To run your simulation, build the shared library and export the component, as explained in the following topics:
Rebuild shared library as described in Build Libraries.