Apply Initial Transformation in Medical Registration Estimator App
This example shows how to import an initial transform, derived from control point registration of anatomical landmarks, in the Medical Registration Estimator app.
You can use the Medical Registration Estimator app to perform 3-D image registration interactively, with visual feedback. The app also enables you to import an initial transformation calculated outside the app, such as using a registration function. In this example, you apply a control point registration transformation, which you derive from anatomical landmarks by using the fitgeotform3d function. To learn more about control point registration, see Register 3-D Multimodal Medical Image Volumes Using Anatomical Landmarks.
Download Data
This example uses a modified version of the 3-D CT and MRI data sets from The Retrospective Image Registration Evaluation (RIRE) Dataset, provided by Dr. Michael Fitzpatrick. For more information, see the RIRE Project homepage. The modified data set contains one CT scan and one MRI scan stored in the NRRD file format. The size of the entire data set is approximately 35 MB. Download the data set from the MathWorks® website, then unzip the folder.
zipFile = matlab.internal.examples.downloadSupportFile("medical", ...
    "MedicalRegistrationNRRDdataLPS.zip");
filepath = fileparts(zipFile);
unzip(zipFile,filepath)
Import Data
In this example, the fixed image is a T1-weighted MRI image. The moving image is a CT image from the same patient. The images are stored in the NRRD file format.
Read the MRI image as a medicalVolume object.
filenameMRI = fullfile(filepath,"supportfilesNRRD","Patient007MRT1.nrrd");
fixedMRIVolume = medicalVolume(filenameMRI);
Read the CT image as a medicalVolume object.
filenameCT = fullfile(filepath,"supportfilesNRRD","Patient007CT.nrrd");
movingCTVolume = medicalVolume(filenameCT);
Define Control Point Pairs
Specify the control point coordinates. In this example, you use control points corresponding to anatomical landmarks. The coordinates represent slice numbers, in voxels, and have been picked by using the orthosliceViewer object.
leftEyeCT = [153 303 6];
leftEyeMRI = [64 154 2];

rightEyeCT = [154 209 5];
rightEyeMRI = [64 106 4];

straightSinusCT = [291 254 13];
straightSinusMRI = [134 129 11];

leftEarAttachCT = [264 368 7];
leftEarAttachMRI = [119 186 5];

rightEarAttachCT = [266 142 6];
rightEarAttachMRI = [120 71 4];

movingCTPoints = [leftEyeCT; rightEyeCT; straightSinusCT;
    leftEarAttachCT; rightEarAttachCT];
fixedMRIPoints = [leftEyeMRI; rightEyeMRI; straightSinusMRI;
    leftEarAttachMRI; rightEarAttachMRI];
This representative image shows how coordinates have been picked for the right-eye control point.

Optionally, if you want to select different control points, use this code to open orthosliceViewer figures for the moving and fixed volumes, enabling you to compare the volumes side by side.
orthosliceViewer(movingCTVolume.Voxels,DisplayRange=[-130 275]);
figure
orthosliceViewer(fixedMRIVolume.Voxels);
Convert Control Points to Patient Coordinate System
The orthosliceViewer uses a coordinate system that labels row indices as Y and column indices as X. To specify coordinates in the [row, column, slice] format required for the intrinsicToWorld object function, you must reorder the first two dimensions of the control point coordinates.
movingCTPoints = movingCTPoints(:,[2 1 3]);
fixedMRIPoints = fixedMRIPoints(:,[2 1 3]);
For each volume, convert the control point locations from intrinsic coordinates to patient coordinates by using the intrinsicToWorld function.
[movX,movY,movZ] = intrinsicToWorld(movingCTVolume.VolumeGeometry, ...
    movingCTPoints(:,1),movingCTPoints(:,2),movingCTPoints(:,3));
movingCTPointsPatient = [movX movY movZ];

[fixedX,fixedY,fixedZ] = intrinsicToWorld(fixedMRIVolume.VolumeGeometry, ...
    fixedMRIPoints(:,1),fixedMRIPoints(:,2),fixedMRIPoints(:,3));
fixedMRIPointsPatient = [fixedX fixedY fixedZ];
Calculate Control Point Registration
Fit the transformation that maps movingCTPointsPatient to fixedMRIPointsPatient. Because the control points are in patient coordinates, tform maps from the patient coordinates of the CT volume to the patient coordinates of the MRI volume.
You can specify to fit a translation, rigid, or affine transformation type. The transform type affects the minimum number of control points required, as well as the type of misalignment the registration can correct for. For example, a rigid transform requires at least three control point pairs and can correct for translation and rotation errors, while an affine transform requires at least four control point pairs and can additionally correct for scaling, reflection, and shear. Because the CT and MRI volumes in this example originate from the same patient at the same time, scaling and shear errors are unlikely. Therefore, a rigid transformation is sufficient to correct for translations and rotations caused by patient positioning within the different scanners.
tform = fitgeotform3d(movingCTPointsPatient,fixedMRIPointsPatient,"rigid");Open Medical Registration Estimator
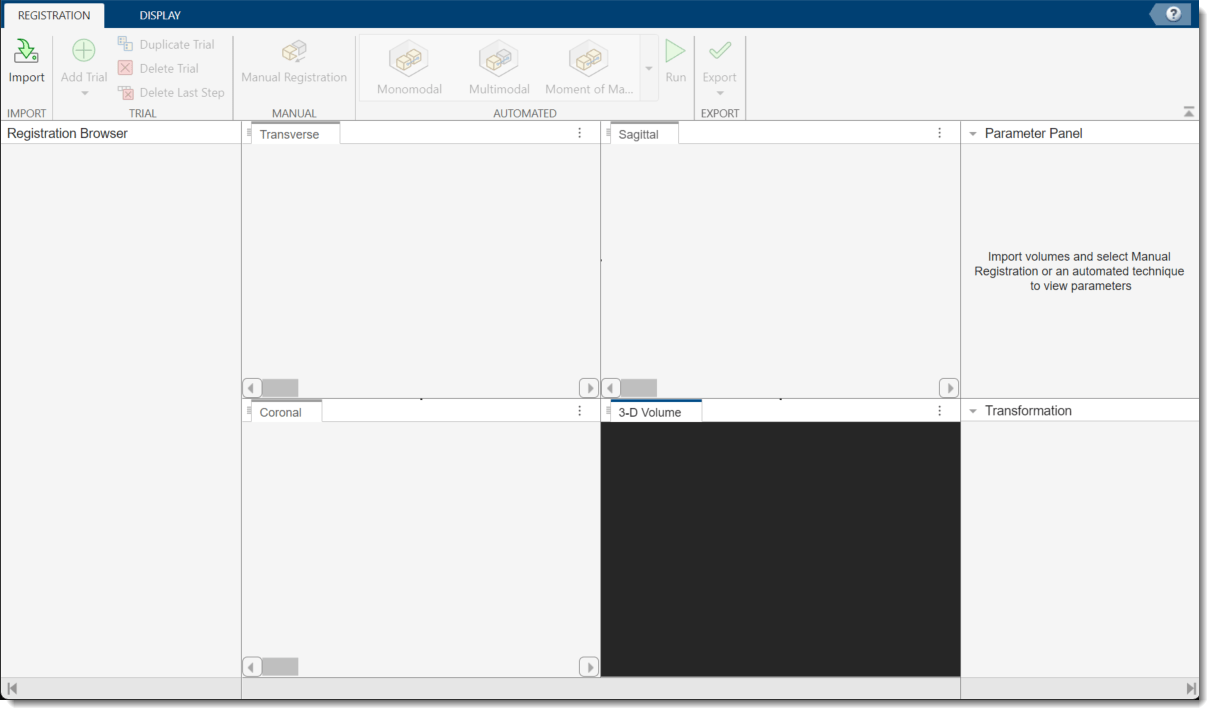
Open the Medical Registration Estimator app by using the medicalRegistrationEstimator function. You can also open the app from the Apps tab on the MATLAB® toolstrip and manually import the volumes. See Get Started with Medical Registration Estimator for details.
medicalRegistrationEstimator

Import Volumes
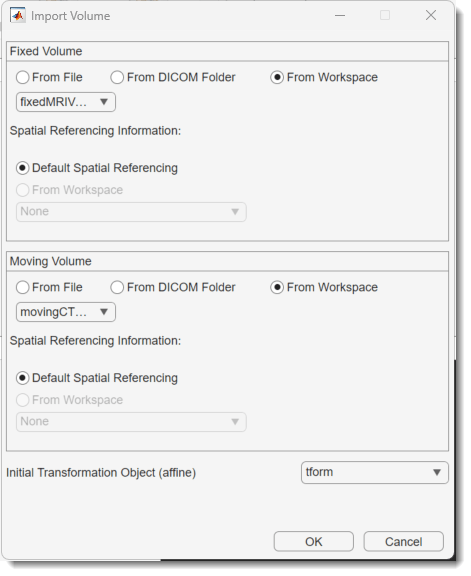
To import the volumes to register and the initial transformation, in the app toolstrip, select Import Volumes. In the dialog box that opens, specify the fixed and moving volumes, as well as the initial registration transformation. To specify the fixed and moving volumes, select to import the data From Workspace. Specify the fixed volume as fixedMRIVolume and the moving volume as movingCTVolume. For Initial Transformation Object, select tform. Click OK to close the dialog box and import the data.

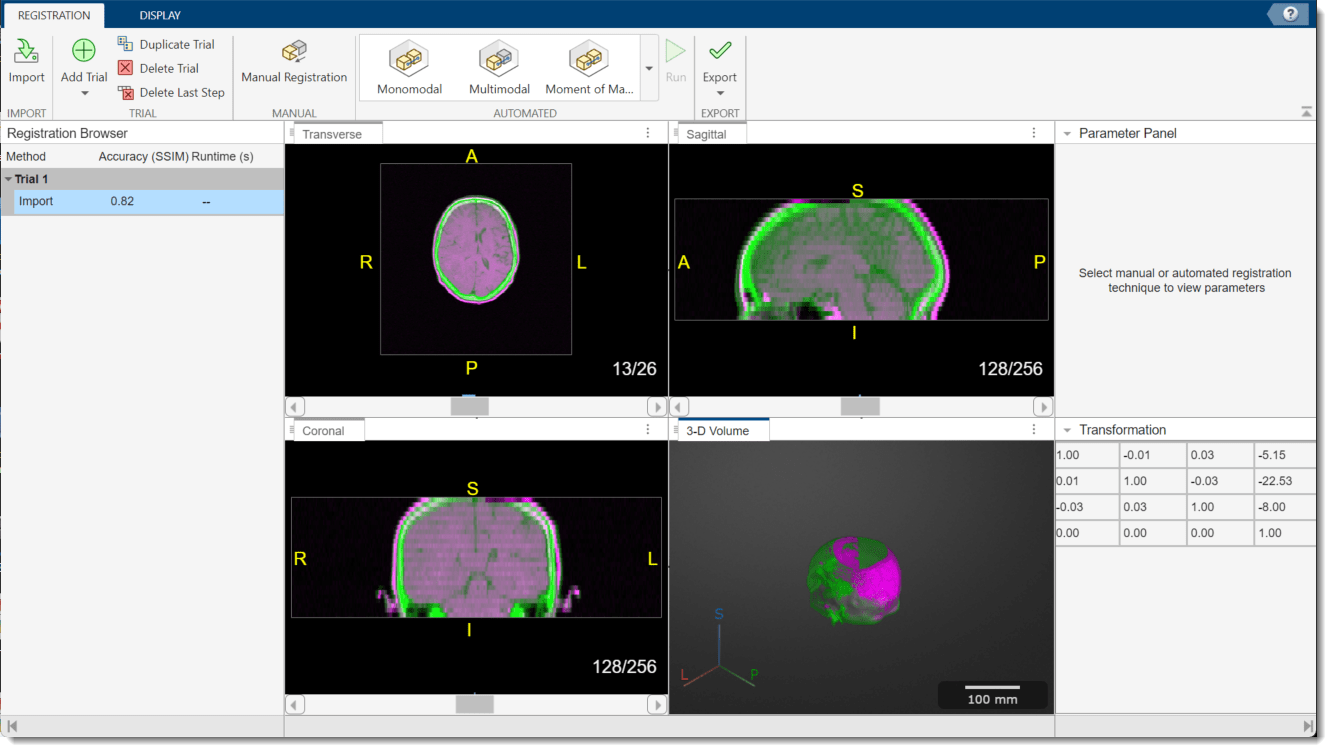
The display panes update to show the imported volumes, in patient coordinates, with the initial transformation. The Transformation pane shows the 4-by-4 matrix that describes tform.

Apply Additional Registrations (Optional)
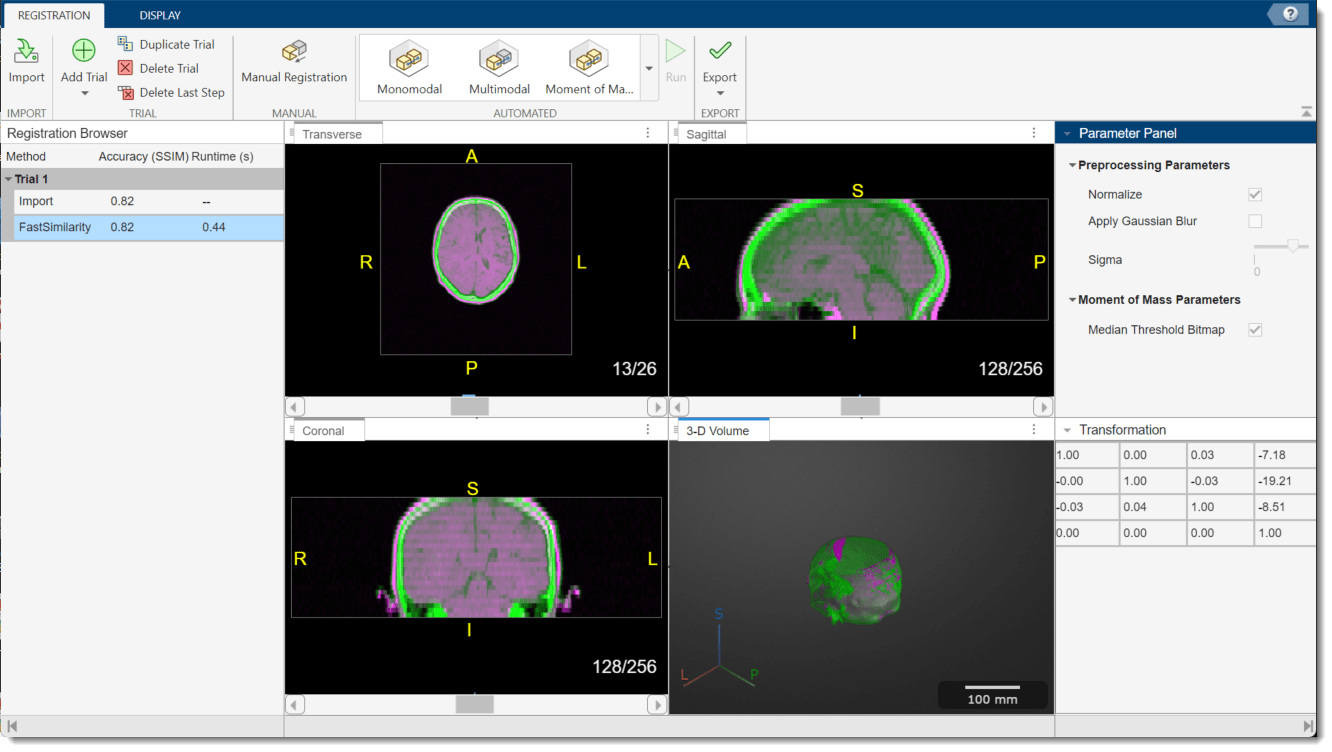
Based on your visual assessment, you might be satisfied with the initial transformation or choose to apply another registration technique. For an example that compares rigid registration techniques in the app, see Rigid Registration Using Medical Registration Estimator App. To try another technique, in the app toolstrip, in the Automated techniques gallery, select Moment of Mass. In the Parameter Panel, select Normalize and Median Threshold Bitmap, as Median Threshold Bitmap is suitable for multimodal images. To run the registration technique, in the app toolstrip, select Run. The display panes and Transformation pane update to show the additional registration. For this example, applying the second registration technique does not change the structural similarity index (SSIM) reported in the Registration Browser. Pick your preferred registration by visually inspecting the display panes. To view the incremental result of the initial transformation, in the Registration Browser, select the Import row. Optionally, to remove the moment of mass technique, in the app toolstrip, select Delete Last Step.

Export Registration Results
To export the results, in the app toolstrip, select Export > To Workspace. In the dialog box, you can optionally change the name of the workspace variable to export. Click OK.

Using the default name, the app creates a new workspace variable, movingReg, which is a structure containing these fields:
tForm— Contains the affine transformation object that describes all affine transformations applied in the trial, including the moment of mass registration.regVol— Contains the transformed, registered, moving volume as amedicalVolumeobject.
See Also
Medical Registration
Estimator | fitgeotform3d