Rigid Registration Using Medical Registration Estimator App
This example compares rigid registration techniques supported by the Medical Registration Estimator to align multimodal CT and MRI volumes with rotation and translation differences.
Multimodal image registration aligns images acquired using different imaging modalities, such as MRI and CT. Even when acquired for the same patient and region of interest, multimodal images can be misaligned due to differences in patient positioning (translation or rotation) and voxel size (scaling). You can use the Medical Registration Estimator app to perform 3-D image registration interactively, with visual feedback. The app automatically loads data in the patient coordinate system, correcting any differences in voxel spacing. To learn more about the app, see Get Started with Medical Registration Estimator.
For an example that registers the same volumes outside the app, using the imregmoment function, see Register Multimodal Medical Image Volumes with Spatial Referencing.
Download Data
This example uses a modified version of the 3-D CT and MRI data sets from The Retrospective Image Registration Evaluation (RIRE) Dataset, provided by Dr. Michael Fitzpatrick. For more information, see the RIRE Project homepage. The modified data set contains one CT scan and one MRI scan stored in the NRRD file format. The size of the entire data set is approximately 35 MB. Download the data set from the MathWorks® website, then unzip the folder.
zipFile = matlab.internal.examples.downloadSupportFile("medical", ...
    "MedicalRegistrationNRRDdataLPS.zip");
filepath = fileparts(zipFile);
unzip(zipFile,filepath)
Import Data
In this example, the fixed image is a T1 weighted MRI image. The moving image is a CT image from the same patient. The images are stored in the NRRD file format.
Read the MRI image as a medicalVolume object.
filenameMRI = fullfile(filepath,"supportfilesNRRD","Patient007MRT1.nrrd");
fixedMRIVolume = medicalVolume(filenameMRI)
fixedMRIVolume =
  medicalVolume with properties:

                 Voxels: [256×256×26 single]
         VolumeGeometry: [1×1 medicalref3d]
           SpatialUnits: "unknown"
            Orientation: "transverse"
           VoxelSpacing: [1.2500 1.2500 4]
           NormalVector: [0 0 1]
       NumCoronalSlices: 256
      NumSagittalSlices: 256
    NumTransverseSlices: 26
           PlaneMapping: ["sagittal"    "coronal"    "transverse"]
               Modality: "unknown"
          WindowCenters: []
           WindowWidths: []
Read the CT image as a medicalVolume object.
filenameCT = fullfile(filepath,"supportfilesNRRD","Patient007CT.nrrd");
movingCTVolume = medicalVolume(filenameCT)
movingCTVolume =
  medicalVolume with properties:

                 Voxels: [512×512×28 single]
         VolumeGeometry: [1×1 medicalref3d]
           SpatialUnits: "unknown"
            Orientation: "transverse"
           VoxelSpacing: [0.6536 0.6536 4]
           NormalVector: [0 0 1]
       NumCoronalSlices: 512
      NumSagittalSlices: 512
    NumTransverseSlices: 28
           PlaneMapping: ["sagittal"    "coronal"    "transverse"]
               Modality: "unknown"
          WindowCenters: []
           WindowWidths: []
Open Medical Registration Estimator
Open the Medical Registration Estimator app by using the medicalRegistrationEstimator function, specifying the volumes as inputs. You can also open the app from the Apps tab on the MATLAB® toolstrip and manually import the volumes. See Get Started with Medical Registration Estimator for details.
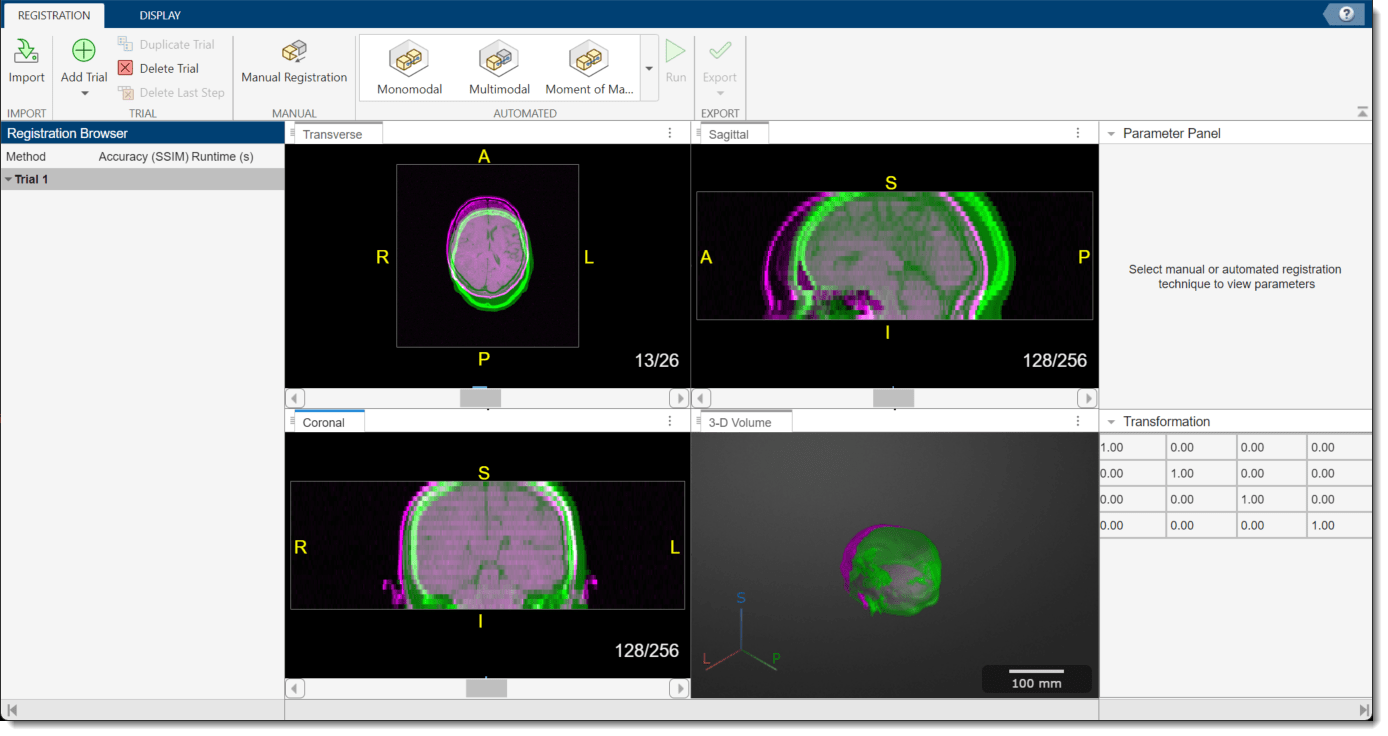
medicalRegistrationEstimator(movingCTVolume,fixedMRIVolume)
The app opens and displays the volumes as 2-D slice overlays in each anatomical plane and in 3-D.
Apply Multimodal Registration
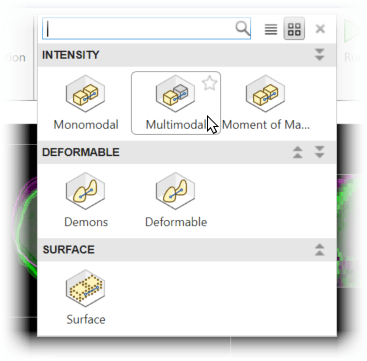
In this example, the volumes are misaligned due to rotation and translation differences. Therefore, rigid registration techniques that support multimodal data are suitable. First, try multimodal registration, which uses the same underlying algorithm as the imregister function with a OnePlusOneEvolutionary optimizer and the MattesMutualInformation metric.
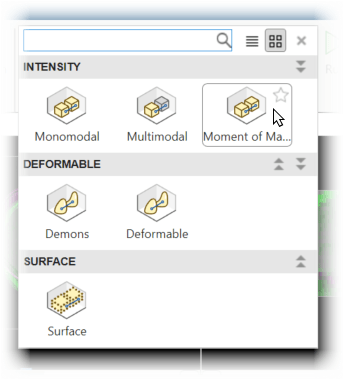
To apply multimodal registration, in the app toolstrip, within the Automated techniques gallery, select Multimodal.
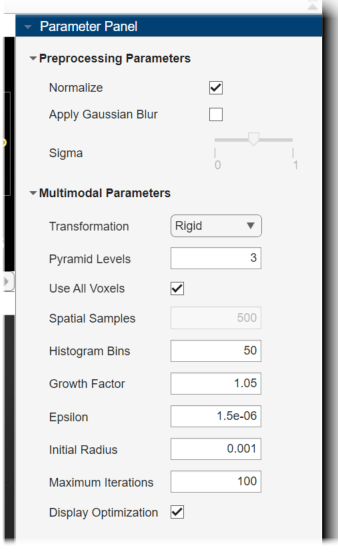
The Parameter Panel pane opens in the app to display the adjustable parameters for this technique. Under Preprocessing Parameters, select Normalize. Under Multimodal Parameters, set the Transformation to Rigid, and set the Initial Radius to 0.001. Select Display Optimization.
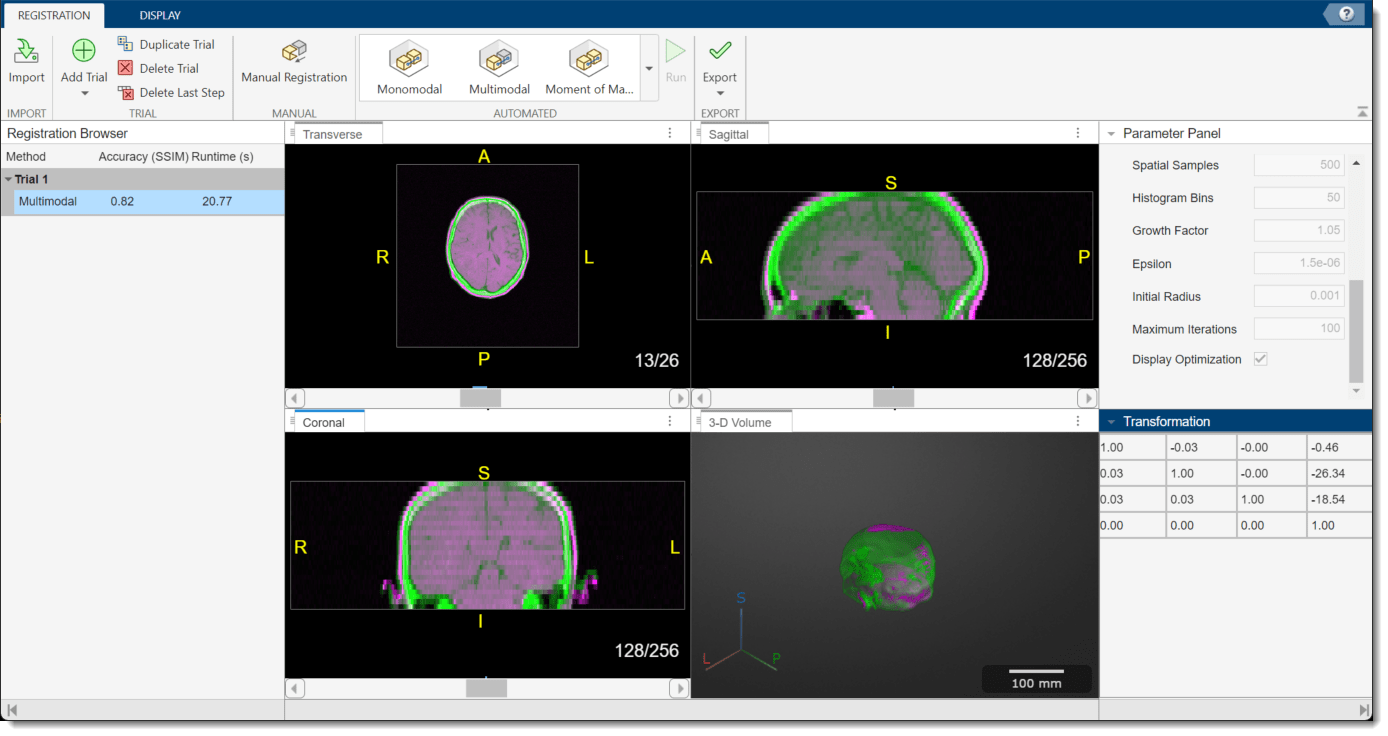
To run the registration technique, in the app toolstrip, select Run. The app runs the registration, and prints the progress in the command window. When the app finishes, the 2-D and 3-D display panes update to show the registered volumes. The Transformation pane updates to show the 4-by-4 matrix that describes the current registration. You can assess the quality of the registration by visually checking the display panes, and using the Accuracy (SSIM) metric in the Registration Browser pane, which provides the structural similarity index measure (SSIM) between the fixed and moving volumes.
Apply Moment of Mass Registration
Next, apply rigid registration using the moment of mass technique, which uses the same underlying algorithm as the imregmoment function. First, add a new trial by selecting Add Trial > Add Empty Trial in the app toolstrip. The Registration Browser shows two trials, and the display panes update to show the initial unregistered volumes. In the app toolstrip, within the Automated techniques gallery, select Moment of Mass.
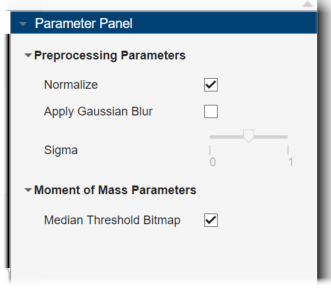
In the Parameter Panel, under Preprocessing Parameters, select Normalize. Under Moment of Mass Parameters, select Median Threshold Bitmap, which is appropriate for multimodal images.
To run the registration technique, in the app toolstrip, select Run. The display panes, Transformation pane, and Registration Browser update to show the results.
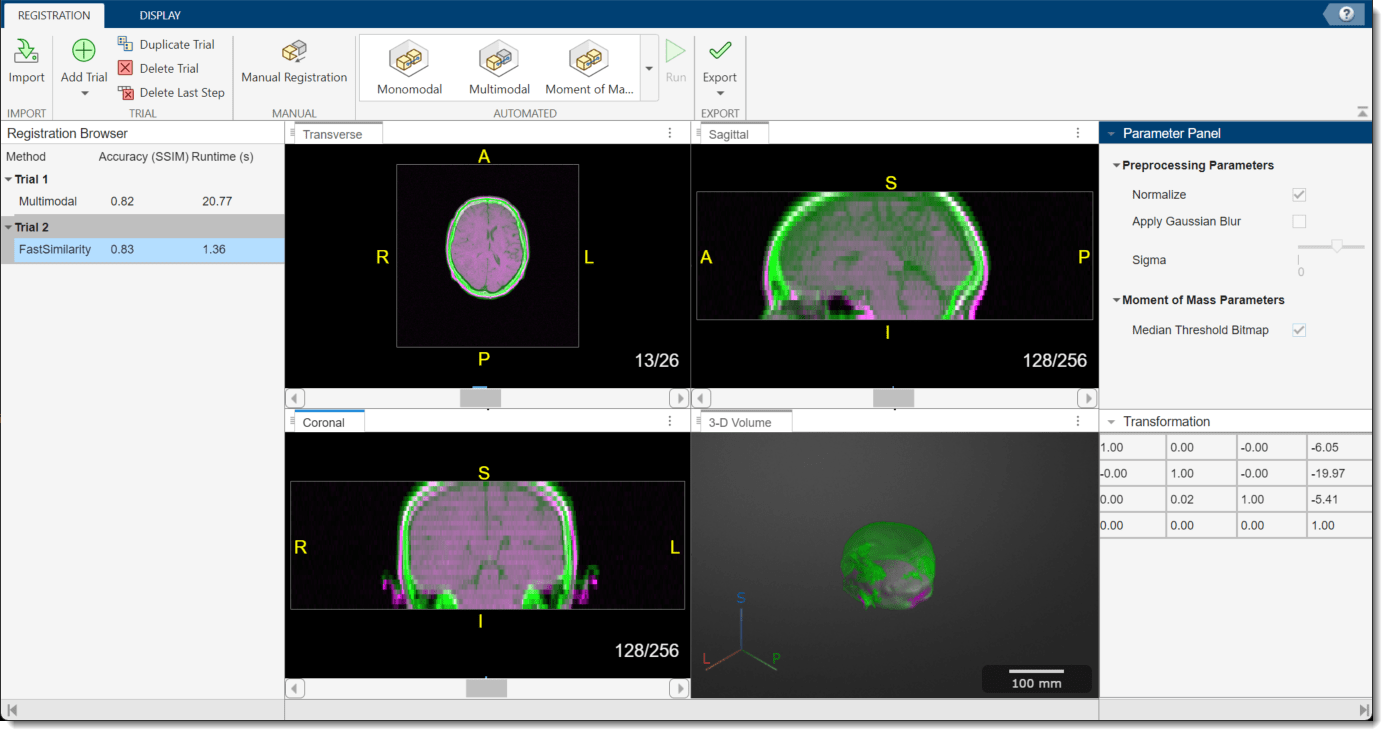
Compare Registration Techniques
Select the best registration technique for your data and application. You can consider the visual alignment of the registered volumes and the SSIM accuracy metric for each technique. For this example, select the moment of mass results, which have a higher SSIM accuracy metric.
Export Registration Results
Select the trial you want to export results for in the Registration Browser. Then, in the app toolstrip, select Export > To Workspace. In the dialog box, you can optionally change the name of the workspace variable to export, and click OK.
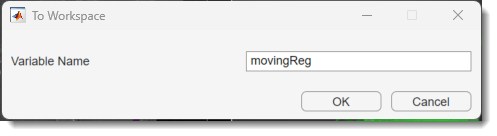
If you use the default name, the app creates a new workspace variable, movingReg, which is a structure containing these fields:
tForm— Contains the affine transformation object that describes all affine transformations applied in the trial, including the moment of mass registration.regVol— Contains the transformed, registered, moving volume as amedicalVolumeobject.
For demonstrative purposes, this example includes a copy of movingReg as a MAT file in its supporting files. Load the results. Alternatively, comment this line to use your own results exported from the app.
load("movingReg.mat")Display Exported Registered Volumes
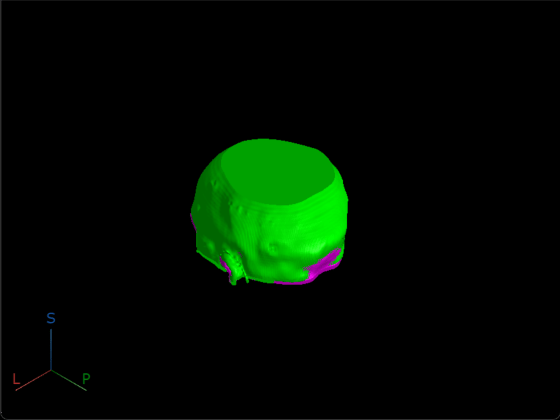
To confirm the registered volumes are aligned, display the original fixed volume and the registered moving volume together by using the volshow function. As expected, the volumes appear aligned.
viewer = viewer3d(BackgroundColor="black",BackgroundGradient="off");
volshow(fixedMRIVolume,Parent=viewer,RenderingStyle="Isosurface", ...
    Colormap=[1 0 1],Alphamap=1);
volshow(movingReg.regVol,Parent=viewer,RenderingStyle="Isosurface", ...
    Colormap=[0 1 0],Alphamap=1);
See Also
Medical Registration
Estimator | imregister | imregmoment
Related Topics
You can also select a web site from the following list
Americas
- América Latina (Español)
- Canada (English)
- United States (English)
Europe
- Belgium (English)
- Denmark (English)
- Deutschland (Deutsch)
- España (Español)
- Finland (English)
- France (Français)
- Ireland (English)
- Italia (Italiano)
- Luxembourg (English)
- Netherlands (English)
- Norway (English)
- Österreich (Deutsch)
- Portugal (English)
- Sweden (English)
- Switzerland
- United Kingdom (English)
Asia Pacific
- Australia (English)
- India (English)
- New Zealand (English)
- 中国
- 日本Japanese (日本語)
- 한국Korean (한국어)