Get Started with Medical Registration Estimator
The Medical Registration Estimator app enables you to align 3-D medical image volumes, and visually and quantitatively compare the results of different registration techniques. You can apply intensity and surface-based rigid registration and deformable registration techniques. You can export aligned volume data, affine transformation objects or nonrigid displacement fields, and generate functions to apply outside the app.
This tutorial provides an overview of the capabilities of the Medical Registration Estimator and the registration techniques it supports.

Open Medical Registration Estimator App
Open the Medical Registration Estimator app from the
Apps tab on the MATLAB® Toolstrip, under Image Processing and Computer Vision.
You can also load the app by using the medicalRegistrationEstimator
command.
Load Volumes
The app supports loading data from medicalVolume objects in the
workspace, or from files in the NIfTI, NRRD, DICOM, and TIFF formats. You can load
medicalVolume objects while opening the app. Alternatively, load
medicalVolume objects or files from inside the app.
To load the
medicalVolumeobjectsmovingVolandfixedVolwhile opening the app, use this syntax:The app opens and automatically loadsmedicalRegistrationEstimator(movingVol,fixedVol)
movingVolas the moving volume andfixedVolas the fixed volume.To load volumes after opening the app follow these steps:
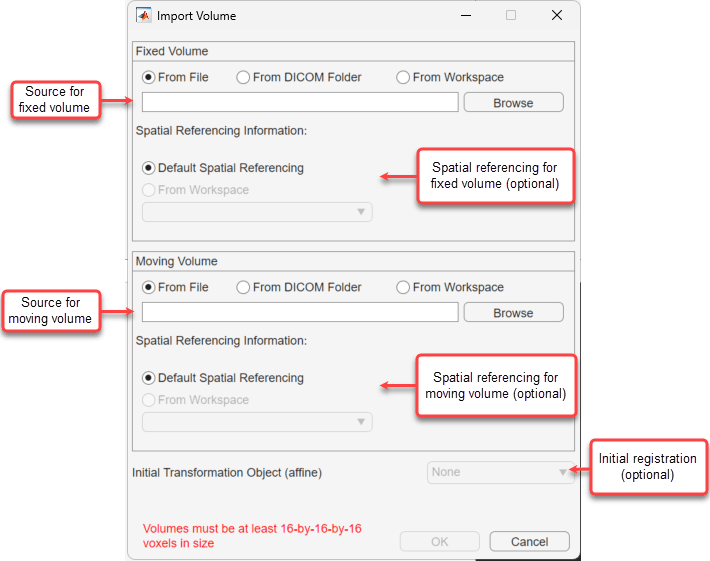
From the app toolstrip, select Import.
In the dialog box that opens, under Fixed Volume and Moving Volume, select the data to import. The app supports importing volumes from a single file (NIfTI, NRRD, DICOM, or TIFF), multifile volumes from a folder of DICOM files, and loading
medicalVolumeobjects from the workspace.For each volume, under Spatial Referencing Information, you can optionally select a
medicalref3dobject in the workspace that defines spatial referencing for the volume. This is particularly useful when importing volumes from TIFF files. If you leave the default option selected, the app uses spatial referencing from the file ormedicalVolume, if available. If the data does not specify spatial referencing, the app assumes a voxel spacing value of 1-by-1-by-1 and that the first voxel is located at (1, 1, 1).Under Initial Transformation Object, you can optionally select an
affinetform3dobject from the workspace that defines an initial registration of the volumes, such as from a previous app session or calculated programmatically outside the app using a function likeimregister.When you are done specifying the data to import, click OK.
Adjust Display Settings
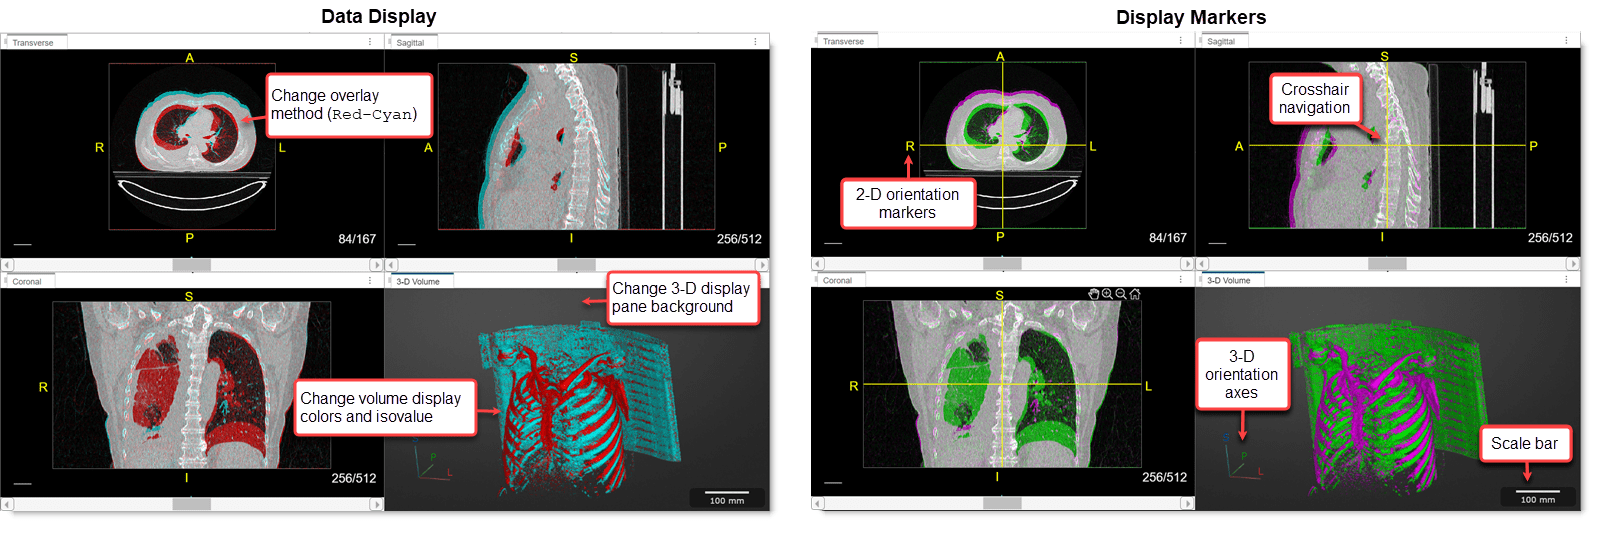
Once you import data, the app displays the volumes together in a four-panel view. You can optionally change these display settings in the Display tab of the app toolstrip.
| Toolstrip Section | Description |
|---|---|
| Select Volume | Select whether to display only the fixed volume, the moving volume, or both. |
| 2-D Slices | Select the overlay method used to display the 2-D slice overlays. By default, the app displays a green-magenta overlay, where the fixed volume is magenta and the moving volume is green. You can change this option to view the slices as a red-cyan overlay, as a difference image, as a checkerboard of the two images, or as a dynamic image that flickers between the fixed and moving volumes. |
| 3-D Volumes | Change the isovalue used to define the 3-D surfaces, the display color of each volume, and the transparency of each volume. To change the isosurface value or the transparency values, drag the corresponding slider. To change the display color, click Fixed Color or Moving Color to open a color picker dialog box. |
| 3-D Background | Turn off the 3-D display pane background gradient, change the background and background gradient colors, or restore the default background options. |
| Markers | Use the Display Markers setting to turn off the L-R and A-P 2-D display markers, or the orientation axes and scale bar in the 3-D display pane. |
| Inspect | Use the Crosshair Navigation setting to turn on crosshair indicators in the 2-D slice panes that show the relative positions of the slices in the other planes. To navigate slices, drag an indicator to a new position. |
| Layout | Change the layout of the display panes. By default, the app shows the 2-D slice panes and 3-D pane using equal sizes. Select one of the Focus layouts to view one pane larger than the others. |
These images illustrate display settings related to displaying data and available display markers.
Manage App Session Using Trials
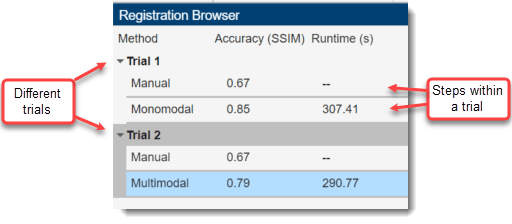
The app manages your registration experiments using trials. You can apply multiple techniques in a series within one trial, or compare techniques applied independently in separate trials. When you apply a series of techniques within one trial, each technique is a step.
You can view details about each trial in the Registration Browser.
Each trial is displayed, with the option to expand an view details of each step. The step
lists the name of the technique applied, the accuracy (SSIM), and the runtime, in seconds,
for that step. To learn more about the structural similarity (SSIM) index, see ssim. The display panes and Transformation pane show the
results for that step, so you can click between steps to evaluate the incremental impact of
each technique you apply. You can add or modify trials using the controls in the
Trial section of the app toolstrip.
In each trial, you can apply a combination of manual and automated registration techniques to align the volumes. The techniques you use and the order in which you apply them depends on your data and application. In general, a typical workflow includes these steps:
Perform a rough alignment using manual registration or a faster automated, affine registration technique like
Moment of Mass.Apply one or more refined automated techniques to improve the registration. If your data includes local nonlinear deformations you want to estimate or correct, apply a deformable technique.
Optionally adjust the registration using manual registration. Note that manual registration cannot be applied after a deformable technique.
Apply Manual Registration
To apply manual registration in the app, follow these steps:
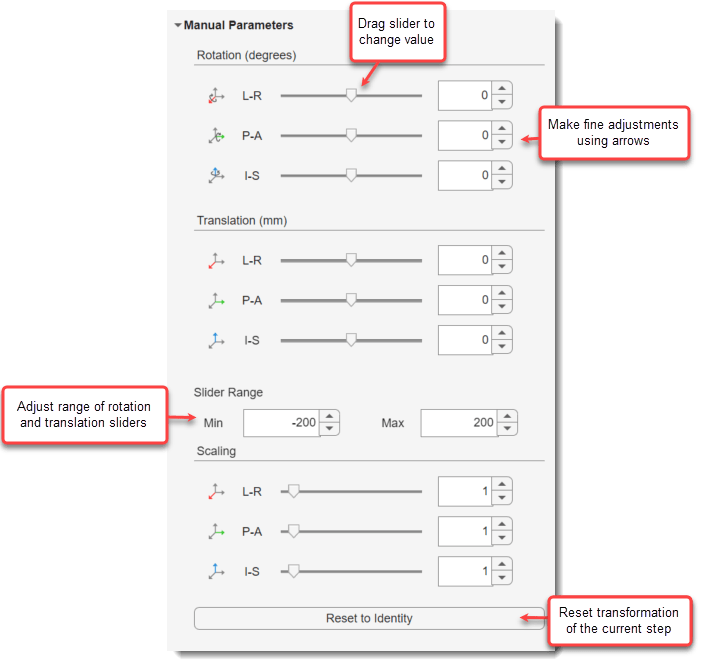
From the app toolstrip, select Manual Registration. An new step,
Manual, is added to the trial in the Registration Browser.In the Manual Parameters panel, use the controls to specify the rotation, translation, and scaling needed to achieve a rough alignment. For most volumes with specified spatial referencing information, scaling is not required. To change a parameter, drag the slider. The current value for the control is displayed next to the slider, and you can make fine adjustments using the up and down arrows. The sensitivity of the slider depends on the Slider Range, which you can optionally adjust.
As you apply the transformations, the 3-D view updates in real time. Pause to view the updated 2-D slice views. The Transformation pane also updates to display the 4-by-4 transformation matrix that describes the current registration.
Apply Automated Registration
To apply an automated registration technique in the app, follow these steps:
In the app toolstrip, from the Automated gallery, select a technique. The techniques are grouped as Intensity, Surface, and Deformable techniques based on their underlying algorithm. For details about each technique, see the table below.
After you select a technique from the gallery, the Parameter Panel opens on the right side of the app window. The parameters for each technique correspond to adjustable settings of the underlying algorithm. For details about the parameters for each technique, see the table below.
In the app toolstrip, select Run.
When the technique completes, the 2-D and 3-D display panes update to show the registered volumes. The Transformation pane updates to show the updated 4-by-4 transformation matrix for affine techniques. If you apply a deformable technique, the transformation is cleared.
Optionally apply another technique. To apply multiple techniques in series within a trial, in the app toolstrip, select the new technique from the gallery. Adjust the parameter values for the technique, and select Run. The display panes and Transformation pane updates to show the new cumulative registration results. To assess the incremental impact of the step, click between the current and previous step in the Registration Browser. To undo the addition of the second technique, in the app toolstrip, select Delete Last Step.
To apply the second technique in a separate trial, in the app toolstrip, select Add Trial > Add Trial with Manual Registration. This action creates a new trial without the first automated technique, but with the initial manual transformation you created in the previous section. If you do not want to include the manual transformation, select Add Trial > Add Empty Trial. Select your parameter values, and select Run. You can compare the results of the two trials by clicking between them in the Registration Browser.
This table describes the available automated registration techniques. Expand the Parameters section to view details about each parameter for the technique.
| Technique | Description |
|---|---|
| Intensity-based registration of volumes acquired using the same imaging
modality. Equivalent to |
| Intensity-based registration of volumes acquired using the same imaging
modality. Equivalent to |
| Fast, similarity registration using the moment of mass method.
Equivalent to |
| Estimate nonrigid displacement field using demons deformable
registration. Equivalent to |
| Estimate nonrigid displacement field using the total variation method.
Equivalent to |
| Register surfaces using iterative closest point method. Equivalent to
|
Export Results
You can export the results of a specific trial to the workspace, or generate a function that recreates the registration steps of a trial that you can apply outside the app.
To export results to the workspace, follow these steps:
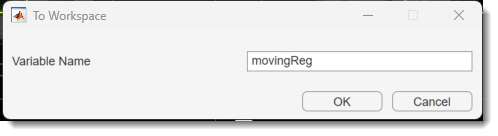
In the app toolstrip, select Export > To Workspace.
In the dialog box, specify the name of the variable to save. In the workspace, the app creates a structure with two fields.
The
tformfield contains the transformation object for the transformation of the last step of the selected trial. Thetformfield is anaffinetform3dobject for affine transformations, and a 4-D displacement field for deformable registrations.The
regVolfield contains the registered moving volume as amedicalVolumeobject.
To export a function, in the app toolstrip, select Export > Generate Function. Any manual registrations are included as hardcoded values, which might not generalize to other pairs of volumes.
See Also
Medical Registration Estimator