Automate Labeling for Multi-Sensor Data
R2026bThe Multi-Sensor Labeler app provides multiple automation options to accelerate the labeling process for both image and point cloud data. The automation features fall into two categories:
Semi-automated labeling — You provide initial guidance, such as drawing labels on key frames or selecting a time range, and the app completes or propagates the labels across the remaining frames. Semi-automated algorithms require some manual input before running.
Fully automated labeling — An algorithm processes the data and generates labels automatically without requiring manual label input. The app includes built-in fully automated algorithms and also supports custom automation algorithms that you create and import.
The following table summarizes the available automation options by signal type.
| Automation Type | Image Signals | Point Cloud Signals |
|---|---|---|
| Semi-Automated Algorithms (Built-In) | Point Tracker, Temporal Interpolator | Burst Mode, Lidar Object Tracker, Point Cloud Temporal Interpolator |
| Fully Automated Algorithms (Built-In) | ACF People Detector ACF Vehicle Detector, Lane Boundary Detector (requires Automated Driving Toolbox™) | Pretrained PointPillars, SalsaNext, and SqueezeSegV2 Models |
| Custom Algorithms (Examples) | Automate Vehicle Labels and Distance Attributes Using YOLOv2 in Multi-Sensor Labeler | Automate Point Cloud Labeling Using SNAP Model |
Run an Automation Algorithm
The following workflow applies to all automation algorithms — both semi-automated and fully automated, built-in and custom. Follow these steps to label multi-sensor data using an automation algorithm:
Load the data into the app, and create ROI label definitions. For more details, see Create Labels and Label Multi-Sensor Data.
On the Labeler tab of the app toolstrip, click Select Algorithm in the Automate Labeling section.
Select an existing automation algorithm, or click Add Algorithm to import or create a new algorithm. To see the code for the chosen automation algorithm, click Open Selected Algorithm.
Click Select Signals to choose which signals to include in the automation session. Ensure that you select signal and label types supported by the automation algorithm.
Click Automate. The app opens the Automate tab. Follow the automation instructions on the right pane of the app. For semi-automated algorithms, draw the required initial labels before running.
Click Run to apply the automation algorithm. When satisfied with the results, click Accept to close the session and apply the labels.
Automate Image and Video Labeling
The app includes these built-in automation algorithms for image signals:
| Automation Algorithm | Automation Type | Supported Label Definition Types | Description |
|---|---|---|---|
| ACF People Detector | Fully Automated | Rectangle ROI Labels | Detect people in video frames using aggregate channel features. |
| ACF Vehicle Detector | Fully Automated (requires Automated Driving Toolbox) | Rectangle ROI Labels | Detect vehicles in video frames using aggregate channel features. |
| Lane Boundary Detector | Fully Automated (requires Automated Driving Toolbox) | Line ROI Labels | Detect lane boundaries in video frames. |
| Point Tracker | Semi-Automated | Rectangle ROI Labels | Track a labeled object across video frames. Draw an initial label on the object to track before running. |
| Temporal Interpolator | Semi-Automated | Rectangle ROI Labels | Estimate rectangle ROI labels between video frames by interpolating positions. Draw labels on at least two frames before running. |
To use a built-in image algorithm, select it from the Select Algorithm drop-down in the Automate Labeling section of the app toolstrip, then follow the automation algorithm workflow.
Automate Point Cloud Labeling
The app includes these built-in automation algorithms for point cloud signals:
Automation Using Pretrained Models (Fully Automated)
Use deep learning models to automatically label point cloud data. This algorithm uses pretrained models to detect objects or segment points in a point cloud. To use this algorithm:
In the Settings dialog box, select from a list of existing pretrained models for PointPillars, SalsaNext, and SqueezeSegV2 networks, or import a custom deep learning network.
Note
The custom network must be a
dlnetworkMap the label definitions to the output classes of the network.
Run the automation algorithm, and get your automated labels.
Lidar Object Tracker (Semi-Automated)
Track an object across different point cloud frames. To use this algorithm, you must draw a cuboid ROI label on the object to track before running. You can also draw multiple labels to track more than one object. Once you run the algorithm, you can accept or reject the generated labels. You can also undo the run and perform it again.
The app displays the step-by-step procedure on the right pane when you select the Lidar Object Tracker algorithm.
Point Cloud Temporal Interpolator (Semi-Automated)
Estimate cuboid ROI labels between point cloud frames by interpolating the ROI locations across a time interval. To use this algorithm, you must draw a cuboid ROI on a minimum of two frames before running: one at the beginning of the interval and one at the end of the interval. The interpolation algorithm estimates and draws ROI labels in the intermediate frames.
Consider a point cloud sequence with 10 frames. The first frame has a cuboid ROI centered at (5, 5, 0). The 10th frame has a cuboid ROI centered at (25, 25, 0). At each frame, the algorithm moves the ROI 2 points in the x-direction, 2 points in the y-direction, and 0 points in the z-direction. Therefore, the algorithm centers the ROI at (7, 7, 0) in the second frame, (9, 9, 0) in the third frame, and so on, up to (23, 23, 0) in the second-to-last frame.
Create and Use Custom Automation Algorithms
In addition to the built-in algorithms, you can create and import custom automation algorithms into the Multi-Sensor Labeler app. You can implement custom algorithms using either a function-based or class-based interface.
| Interface Type | Description | Use Case |
|---|---|---|
| Function-based | Define automation logic using a standalone function with parameter tuning. | Quick setup, prototyping, migrating existing code |
| Class-based | Create a custom class inheriting from
vision.labeler.AutomationAlgorithm, which offers
full control over labeling behavior and app interaction. | Complex workflows, temporal automation, custom settings, multi-signal support |
The apps provide templates for both interface types. To create a custom automation algorithm,
Define the algorithm logic in the template.
Save the algorithm file to a package folder (
+pointcloud/+labeler/) on the MATLAB path.Import the algorithm into the app by selecting Select Algorithm > Add Algorithm in the Automate Labeling section under the Label tab of the app toolstrip.
For more details on how to create and import a custom automation algorithm, see Create Custom Automation Algorithm for Labeling.
AI-Assisted Algorithm Examples
The following AI-assisted algorithms use deep learning foundation models for labeling. These algorithms are implemented as custom automation algorithms and can be added to the app using the custom algorithm workflow.
| Algorithm | Signal Type | Supported Label Definition Types | Examples |
|---|---|---|---|
| Automated object detection and labeling | Image | Rectangle, Pixel, Polygon ROI Labels | Automate Vehicle Labels and Distance Attributes Using YOLOv2 in Multi-Sensor Labeler |
| Automated cross-sensor labeling | Image and Point Cloud | Rectangle ROI Labels, Cuboid ROI Labels | Automate Multi-Sensor Ground Truth Labeling Using Moondream Vision-Language Model |
| Automated Point Cloud Segmentation | Point Cloud | Semantic Point ROI Labels | Automate Point Cloud Labeling Using SNAP Model |
Label Point Cloud Data Using Burst Mode
Burst mode is a semi-automated labeling feature for point cloud signals. It merges point clouds across a selected time range into a single view, enabling you to annotate static or semi-static objects once and apply the labels across all timestamps in that range. Burst mode supports Cuboid and Semantic Point ROI labels only. It is useful for large point cloud sequences where per-frame labeling is inefficient, or when automation algorithms are not suitable but the same objects appear across many timestamps.
To label data using burst mode:
In the labeling window, select the point cloud signal that you want to label.
In the ROI Label Definitions pane, select a
CuboidorSemantic Point ROIlabel definition. The Burst Mode button in the range slider pane becomes enabled.Use the left and right flag knobs on the range slider to define the timestamp range that you want to label. By default, the range starts at 0 seconds and ends at the selected signal's end time. If the flag range extends outside the selected signal's timestamp extent, the app displays an error dialog prompting you to readjust the flags. If you adjust the flags to constrain the range, the app displays a confirmation dialog showing the effective range that will be used.
Click Burst Mode. The app merges the point clouds from all timestamps in the selected range into a single view. Non-selected signals are hidden and playback controls are removed from the range slider.

Draw labels on the merged point cloud. In the merged view, static objects appear as dense point clusters, while moving objects appear elongated due to the combined timestamps. For Cuboid labels, you can use the Projected View to fine-tune the label in front, top, and side views simultaneously. For Semantic Point ROI labels, use the Brush, Lasso, and other labeling tools as in normal mode — the labeling footprints apply across all timestamps in the selected range.
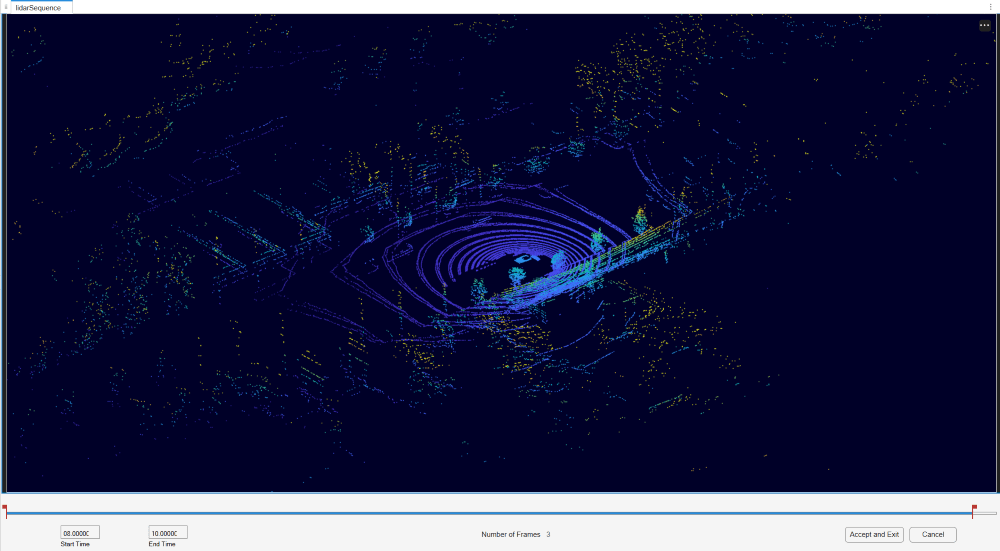
When you finish labeling, click Accept and Exit to apply the labels across all timestamps in the selected range and return to normal mode. Alternatively, click Exit to discard all burst mode annotations. On exit, all previously hidden signals are restored.
Note
Burst mode uses timestamp-based range selection, not frame numbers. It operates on one point cloud signal at a time. Burst mode is not available for non-point-cloud signals or for point cloud signals that contain only a single frame (for example, LAS or LAZ files).
See Also
Multi-Sensor
Labeler | vision.labeler.AutomationAlgorithm (Computer Vision Toolbox)

