Automate Multi-Sensor Ground Truth Labeling Using Moondream Vision-Language Model
R2026bThis example shows how to automate multi-sensor ground truth labeling using the Moondream vision-language model and the Get Started with Multi-Sensor Labeler app. In this example, you first detect vehicles in image frames using natural language prompts. Then, you estimate 3-D bounding boxes in corresponding point cloud frames using the multi-sensor calibration parameters stored in a multiSensorParameters object.
Detect Vehicles Using Moondream Vision-Language Model
Load the moondream (Computer Vision Toolbox) model. Moondream is a compact 1.6B parameter vision-language model that supports object detection using natural language class descriptions. Unlike traditional detectors limited to fixed vocabularies such as COCO classes, Moondream accepts descriptive phrases like "red car" or "parked truck" as detection queries.
md = moondream("moondream-1.6B");Load sample data containing an image, point cloud, and calibration information.
data = load('bboxGT.mat');
I = data.im;
ptCloud = data.pc;
camIntrinsics = data.cameraParams;
camToLidar = data.camToLidar;
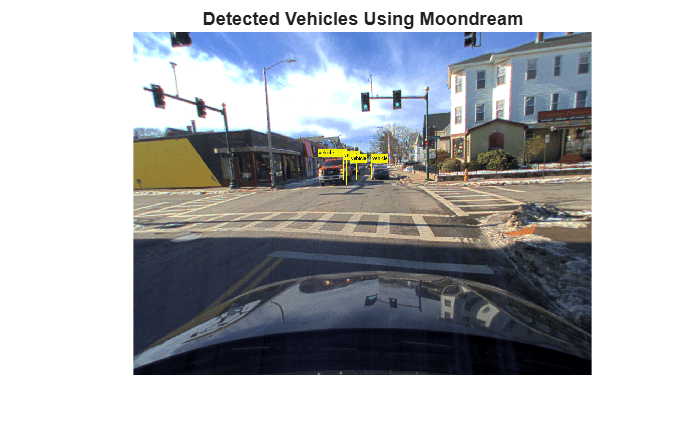
Detect vehicles using Moondream. Specify "vehicle" as the detection class. Moondream interprets this as a natural language query and returns bounding boxes for all matching objects. You can set the execution environment to cpu or gpu. By default, the detectObjects function uses the GPU when available, which accelerates inference for batch automation workflows.
detectionClasses = "vehicle";
if canUseGPU()
    [bboxes, labels] = detectObjects(md, I, detectionClasses);
else
    [bboxes, labels] = detectObjects(md, I, detectionClasses, ExecutionEnvironment = "cpu");
end
Display the detection results.
% Filter out ego vehicle detections
[imgH, imgW, ~] = size(I);
isEgo = (bboxes(:,3) > 0.5 * imgW) & (bboxes(:,2) > 0.5 * imgH);
bboxes = bboxes(~isEgo, :);
labels = labels(~isEgo);

I_annotated = insertObjectAnnotation(I, 'rectangle', bboxes, string(labels), ...
    TextBoxOpacity = 0.9, FontSize = 14);
figure
imshow(I_annotated)
title('Detected Vehicles Using Moondream')
Create Multi-Sensor Calibration Parameters
Create a multiSensorParameters (Computer Vision Toolbox) object to store the spatial relationship between the camera and lidar sensors. This calibration enables projecting lidar points onto the image plane for 2-D to 3-D correspondence.
sensorParams = multiSensorParameters(ReferenceFrame="vehicle");
sensorParams = addSensor(sensorParams, "lidar", "lidar", rigidtform3d);
sensorParams = addSensor(sensorParams, "camera", "camera", ...
    camToLidar, "lidar", Intrinsics=camIntrinsics);
Display the multi-sensor parameters to verify the sensor configuration.
disp(sensorParams)
  multiSensorParameters with properties:

    ReferenceFrame: "vehicle"
             Count: 2
           Sensors: [2×6 table]

                           Name        Type              MountingAngles                    MountingLocation                  Intrinsics           SensorInfo
                         ________    ________    _______________________________    _______________________________    ______________________    ____________

                    1    "lidar"     "lidar"           0           0           0          0           0           0    {0×0 double          }    {1×1 struct}
                    2    "camera"    "camera"    -87.903    -0.16616     -96.589    0.17957     -0.1132    -0.21321    {1×1 cameraIntrinsics}    {1×1 struct}

                	Get insights using Copilot
Estimate 3-D Bounding Boxes in Point Cloud
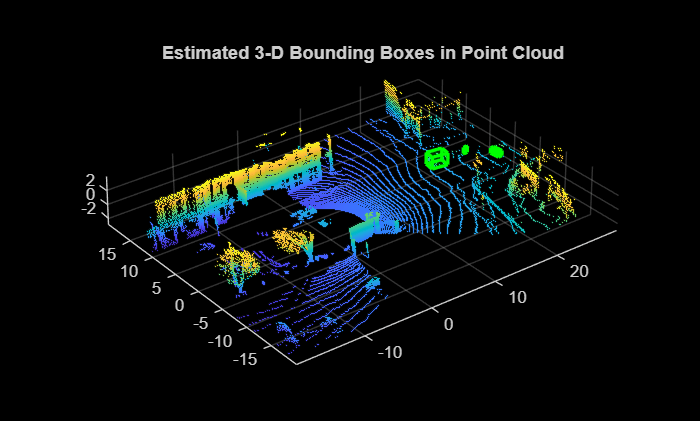
Use the bboxCameraToLidar function to estimate 3-D bounding boxes in the point cloud from the 2-D image detections. This function projects lidar points onto the image plane, identifies points within each 2-D bounding box, and fits 3-D cuboids.
camIntrinsicsFromParams = intrinsics(sensorParams, "camera");
cam2lidar_se3 = transformation(sensorParams, "camera", "lidar");
cam2lidar = rigidtform3d(cam2lidar_se3);
[pcBboxes, ~, boxesUsed] = bboxCameraToLidar(bboxes, ptCloud, camIntrinsicsFromParams, ...
    cam2lidar, ClusterThreshold=0.5);
Filter the 2-D bounding boxes to only retain detections with valid 3-D correspondences. This removes ego vehicle detections and other false positives.
bboxes = bboxes(boxesUsed, :);
labels = labels(boxesUsed);
Display the estimated 3-D bounding boxes in the point cloud.
figure
ax = pcshow(ptCloud.Location);
showShape('cuboid', pcBboxes, Parent = ax, Opacity = 0.1, ...
    Color = [0 1 0], LineWidth = 2)
zoom(ax, 1.5)
title('Estimated 3-D Bounding Boxes in Point Cloud')
Create Automation Algorithm Class
This example provides the MultiSensorVehicleDetectorMoondream class as a ready-to-use automation algorithm for multi-sensor vehicle detection using moondream and multiSensorParameters. The MultiSensorVehicleDetectorMoondream class inherits from the vision.labeler.AutomationAlgorithm (Computer Vision Toolbox) abstract base class, which defines the class-based API that the Multi-Sensor Labeler app uses to configure and run custom automation algorithms. To help you get started with writing your own custom automation algorithm, the Multi-Sensor Labeler app offers a convenient initial automation class template where you can add custom logic and integrate it into the app. For more details on accessing the template from the app, see Create Custom Automation Algorithm for Labeling (Computer Vision Toolbox).
The automation algorithm class defines constant properties for the name, description, and user directions displayed in the app:
    properties(Constant)
        Name = 'Multi-Sensor Vehicle Detector (Moondream)';
        Description = ['Detect vehicles using Moondream vision-language model in ' ...
            'image and estimate them in point cloud using multiSensorParameters.'];
        UserDirections = {
            'Select one of the rectangle ROI labels to label objects as Vehicle.', ...
            'Click Settings and import the multiSensorParameters object from the workspace.', ...
            'Verify camera and lidar sensor names match those in your multiSensorParameters object.', ...
            'Specify detection class names (supports natural language descriptions).', ...
            'Click Run to detect vehicles in each image and point cloud.', ...
            'Review automated labels manually. You can modify, delete, and add new labels.', ...
            'When you are satisfied with the results, click Accept and return to manual labeling.'
            };
    end
The class properties store the Moondream detector and its detection parameters, along with the lidar-camera multi-sensor calibration parameters.
    properties
        Detector                          % Moondream vision-language model
        DetectionClasses = "vehicle";     % Natural language detection query
        MinSize = [50 50];               % Minimum detection size [W H] pixels
        MaxSize = [600 400];             % Maximum detection size [W H] pixels
        SensorParams = [];               % multiSensorParameters object
        CameraSensorName = "camera";     % Camera sensor identifier
        LidarSensorName = "lidar";       % Lidar sensor identifier
        ClusterThreshold = 0.5;          % Euclidean clustering distance (m)
    end
The initialize method validates the calibration and loads the Moondream model.
        function initialize(algObj, ~)
            if isempty(algObj.SensorParams)
                error('multiSensorParameters object must be provided in Settings');
            end
            algObj.Detector = moondream("moondream-1.6B");
        end
The detectVehicle method uses detectObjects, which directly accepts natural language class names without requiring post-detection label filtering.
        function selectedBbox = detectVehicle(algObj, I)
            [bboxes, ~] = detectObjects(algObj.Detector, I, algObj.DetectionClasses);
            if isempty(bboxes)
                selectedBbox = [];
                return;
            end
            selectedBbox = bboxes;
            % Apply size filters to remove spurious detections
            ...
        end
Load Data and Automation Algorithm in Multi-Sensor Labeler App
The MultiSensorVehicleDetectorMoondream class file implements the properties and methods described above. To use this class in the app, you must first create the folder structure +vision/+labeler under the current folder and copy the class file into it.
    mkdir('+vision/+labeler');
    copyfile('MultiSensorVehicleDetectorMoondream.m','+vision/+labeler');
Download the point cloud sequence (PCD) and image sequence. This example uses WPI lidar data collected on a highway from an Ouster OS1 lidar sensor and WPI image data from a front-facing camera mounted on the ego vehicle. The helperDownloadImageData and helperDownloadPointCloudData download and save the data in a temporary folder returned by the tempdir function. The download can take some time depending on your Internet connection. Alternatively, you can download the data set manually using your web browser and extract the files.
Download the image sequence to a temporary location.
imageDataFolder = helperDownloadImageData();
For illustration purposes, this example uses only a subset of the WPI image sequence, from frames 920–940. To load the subset of images into the app, copy the images into a folder.
    % Create new folder and copy the images.
    imDataFolder = imageDataFolder + "imageDataSequence";
    if ~exist(imDataFolder,'dir')
        mkdir(imDataFolder);
    end

    for i = 920 : 940
        filename = strcat(num2str(i,'%06.0f'),'.jpg');
        source = fullfile(imageDataFolder,'imageData',filename);
        destination = fullfile(imageDataFolder,'imageDataSequence',filename);
        copyfile(source,destination)
    end
Download the point cloud sequence to a temporary location.
lidarDataFolder = helperDownloadPointCloudData();
The Multi-Sensor Labeler app supports the loading of point cloud sequences composed of PCD or PLY files. Save the downloaded point cloud data to PCD files. For illustration purposes, in this example, you save only a subset of the WPI point cloud data, from frames 920–940.
    % Load downloaded lidar data into the workspace.
    load(fullfile(lidarDataFolder,'WPI_LidarData.mat'),'lidarData');
    lidarData = reshape(lidarData,size(lidarData,2),1);

    % Create new folder and write lidar data to PCD files.
    pcdDataFolder = lidarDataFolder + "lidarDataSequence";
    if ~exist(pcdDataFolder, 'dir')
        mkdir(fullfile(lidarDataFolder,'lidarDataSequence'));
    end

    disp('Saving WPI Lidar driving data to PCD files ...');
    for i = 920:940
        filename = strcat(fullfile(lidarDataFolder,'lidarDataSequence',filesep), ...
            num2str(i,'%06.0f'),'.pcd');
        pcwrite(lidarData{i},filename);
    end
The WPI data includes calibrated camera intrinsics and a camera-to-lidar transformation (stored as a rigidtform3d (Image Processing Toolbox) object). Load the bboxGT MAT file which stores the camera intrinsics as a cameraIntrinsics (Computer Vision Toolbox) object and the camera-to-lidar transformation as a rigidtform3d (Image Processing Toolbox) object. Using the two, create a multiSensorParameters (Computer Vision Toolbox) object, which lets you retrieve intrinsics and compute transformations between any sensor pair using the intrinsics and transformation methods.
      data = load('bboxGT.mat');
      cameraParams = data.cameraParams;
      camToLidar = data.camToLidar;

      sensorParams = multiSensorParameters(ReferenceFrame="vehicle");
      sensorParams = addSensor(sensorParams, "lidar", "lidar", rigidtform3d);
      sensorParams = addSensor(sensorParams, "camera", "camera", ...
          camToLidar, "lidar", Intrinsics=cameraParams);
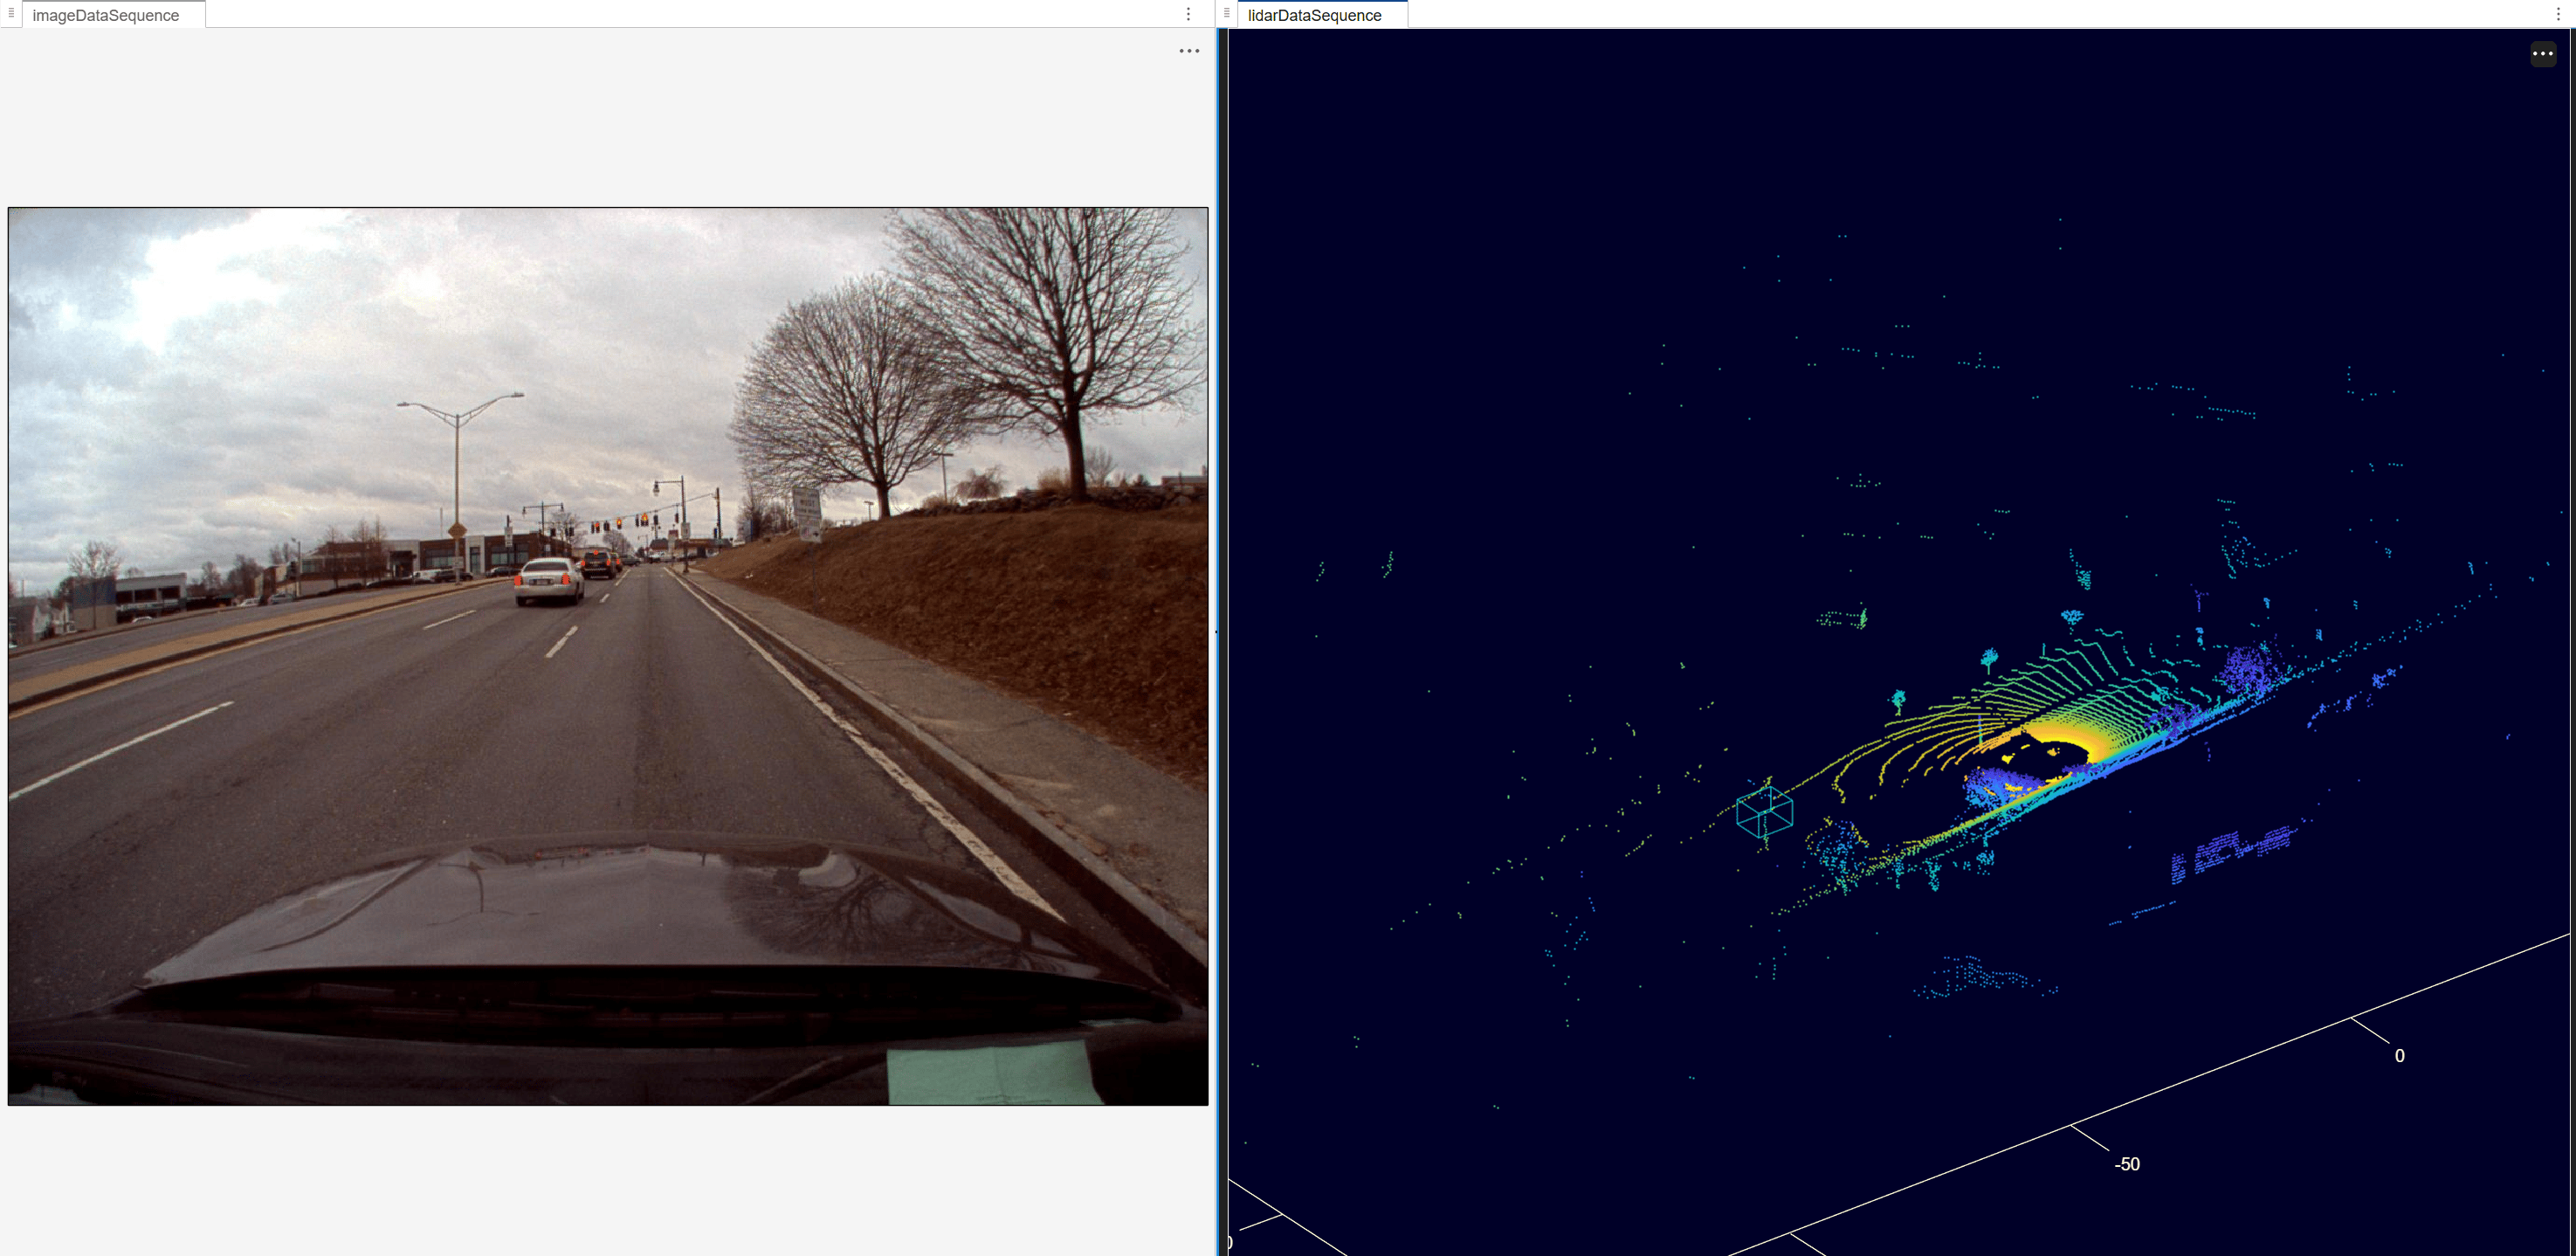
Open the Get Started with Multi-Sensor Labeler app and load the image sequence and point cloud sequence.
    imageDir = fullfile(tempdir, 'WPI_ImageData', 'imageDataSequence');
    pointCloudDir = fullfile(tempdir, 'WPI_LidarData', 'lidarDataSequence');

    multiSensorLabeler
Once loaded, to view signals side by side, select the Visualization tab, click Grid in the Layout section, and display the signals in a 1-by-2 grid.
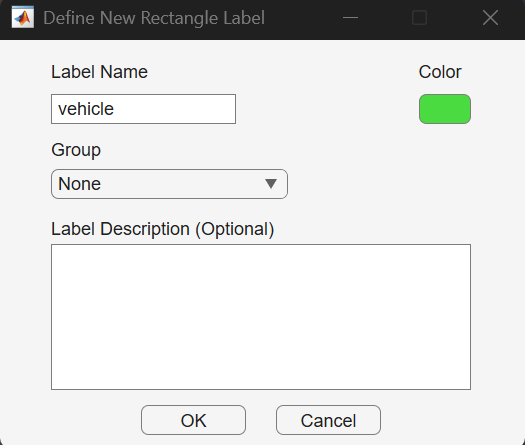
Define a label definition called "vehicle". On the Multi-Sensor Labeler tab, click Add Label. Select Rectangle/Cuboid from the dropdown. Specify the label name as Vehicle(monospace) and click OK.
Configure and Run Automation Algorithm in Multi-Sensor Labeler App
To use the Moondream automation algorithm in the Multi-Sensor Labeler app, follow these steps.
1. Select signals and algorithm.
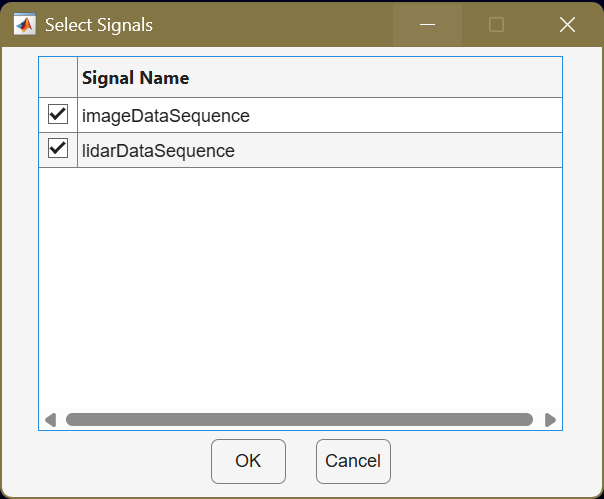
On Multi-Sensor Labeler tab of the app toolstrip, in the Automate Labeling section, click Select Algorithm > Select Signals and select both the image and point cloud signals. Click OK.
Click Refresh list, then select Multi-Sensor Vehicle Detector (Moondream). Ensure that the +vision/+labeler folder structure contains the class file
.
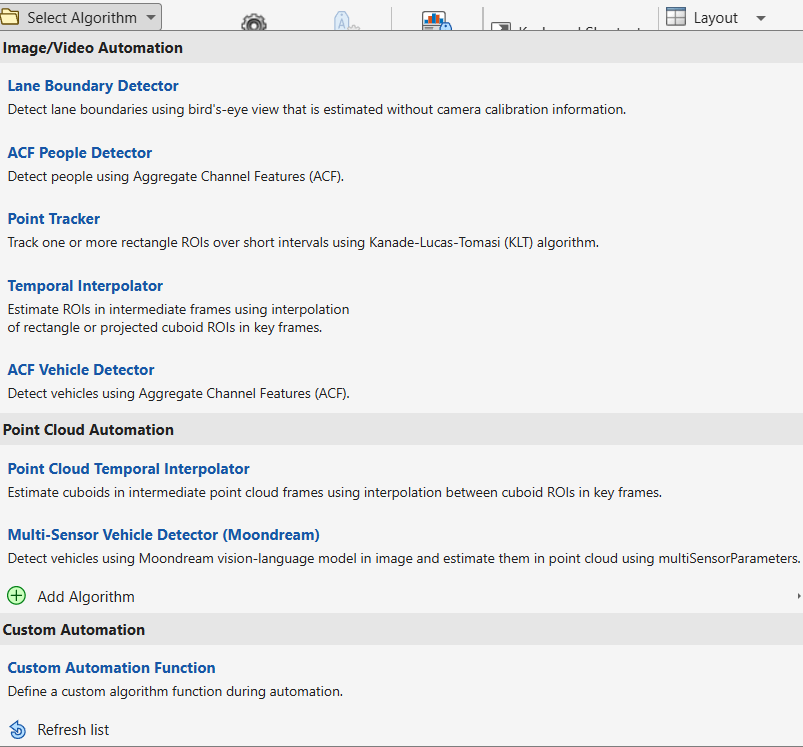
Click Automate to open an automation session. On the Automate tab, click Settings.
2. Configure settings.
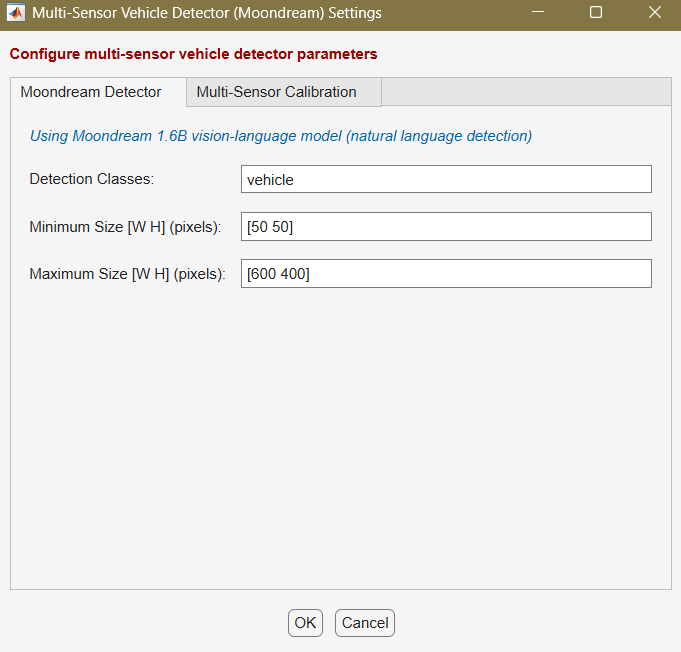
On the Moondream Detector tab, specify the detection class. The default "vehicle" works well for general use. You can also specify descriptive phrases such as "parked truck" or "red sedan".
Configure minimum and maximum detection sizes as needed. The defaults filter out very small and very large spurious detections.
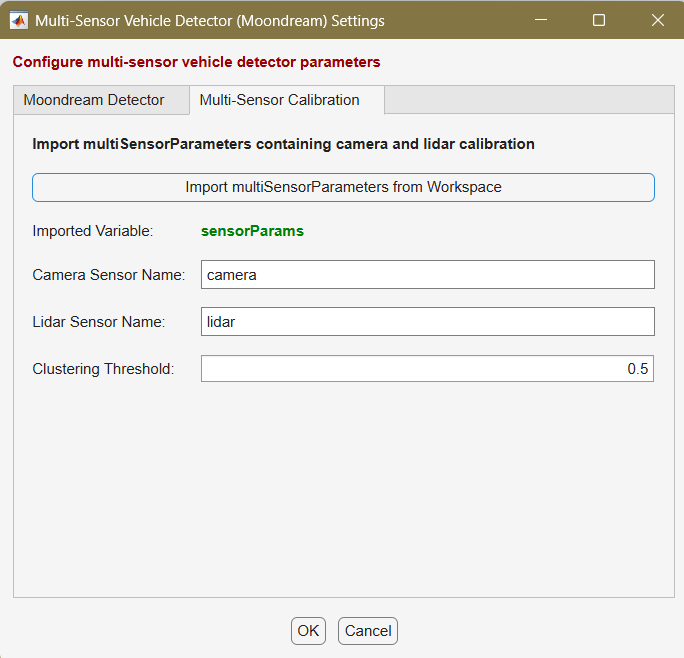
On the Multi-Sensor Calibration tab, click Import multiSensorParameters from Workspace and select the sensorParameters object.
Verify the camera and lidar sensor names match your calibration parameters. Click OK.
3. Run automation and review results.
Click Run. The algorithm detects vehicles in each frame and estimates 3-D cuboids. After the run completes, use the slider or arrow keys to scroll through the sequence. Adjust bounding boxes or add new labels where needed.
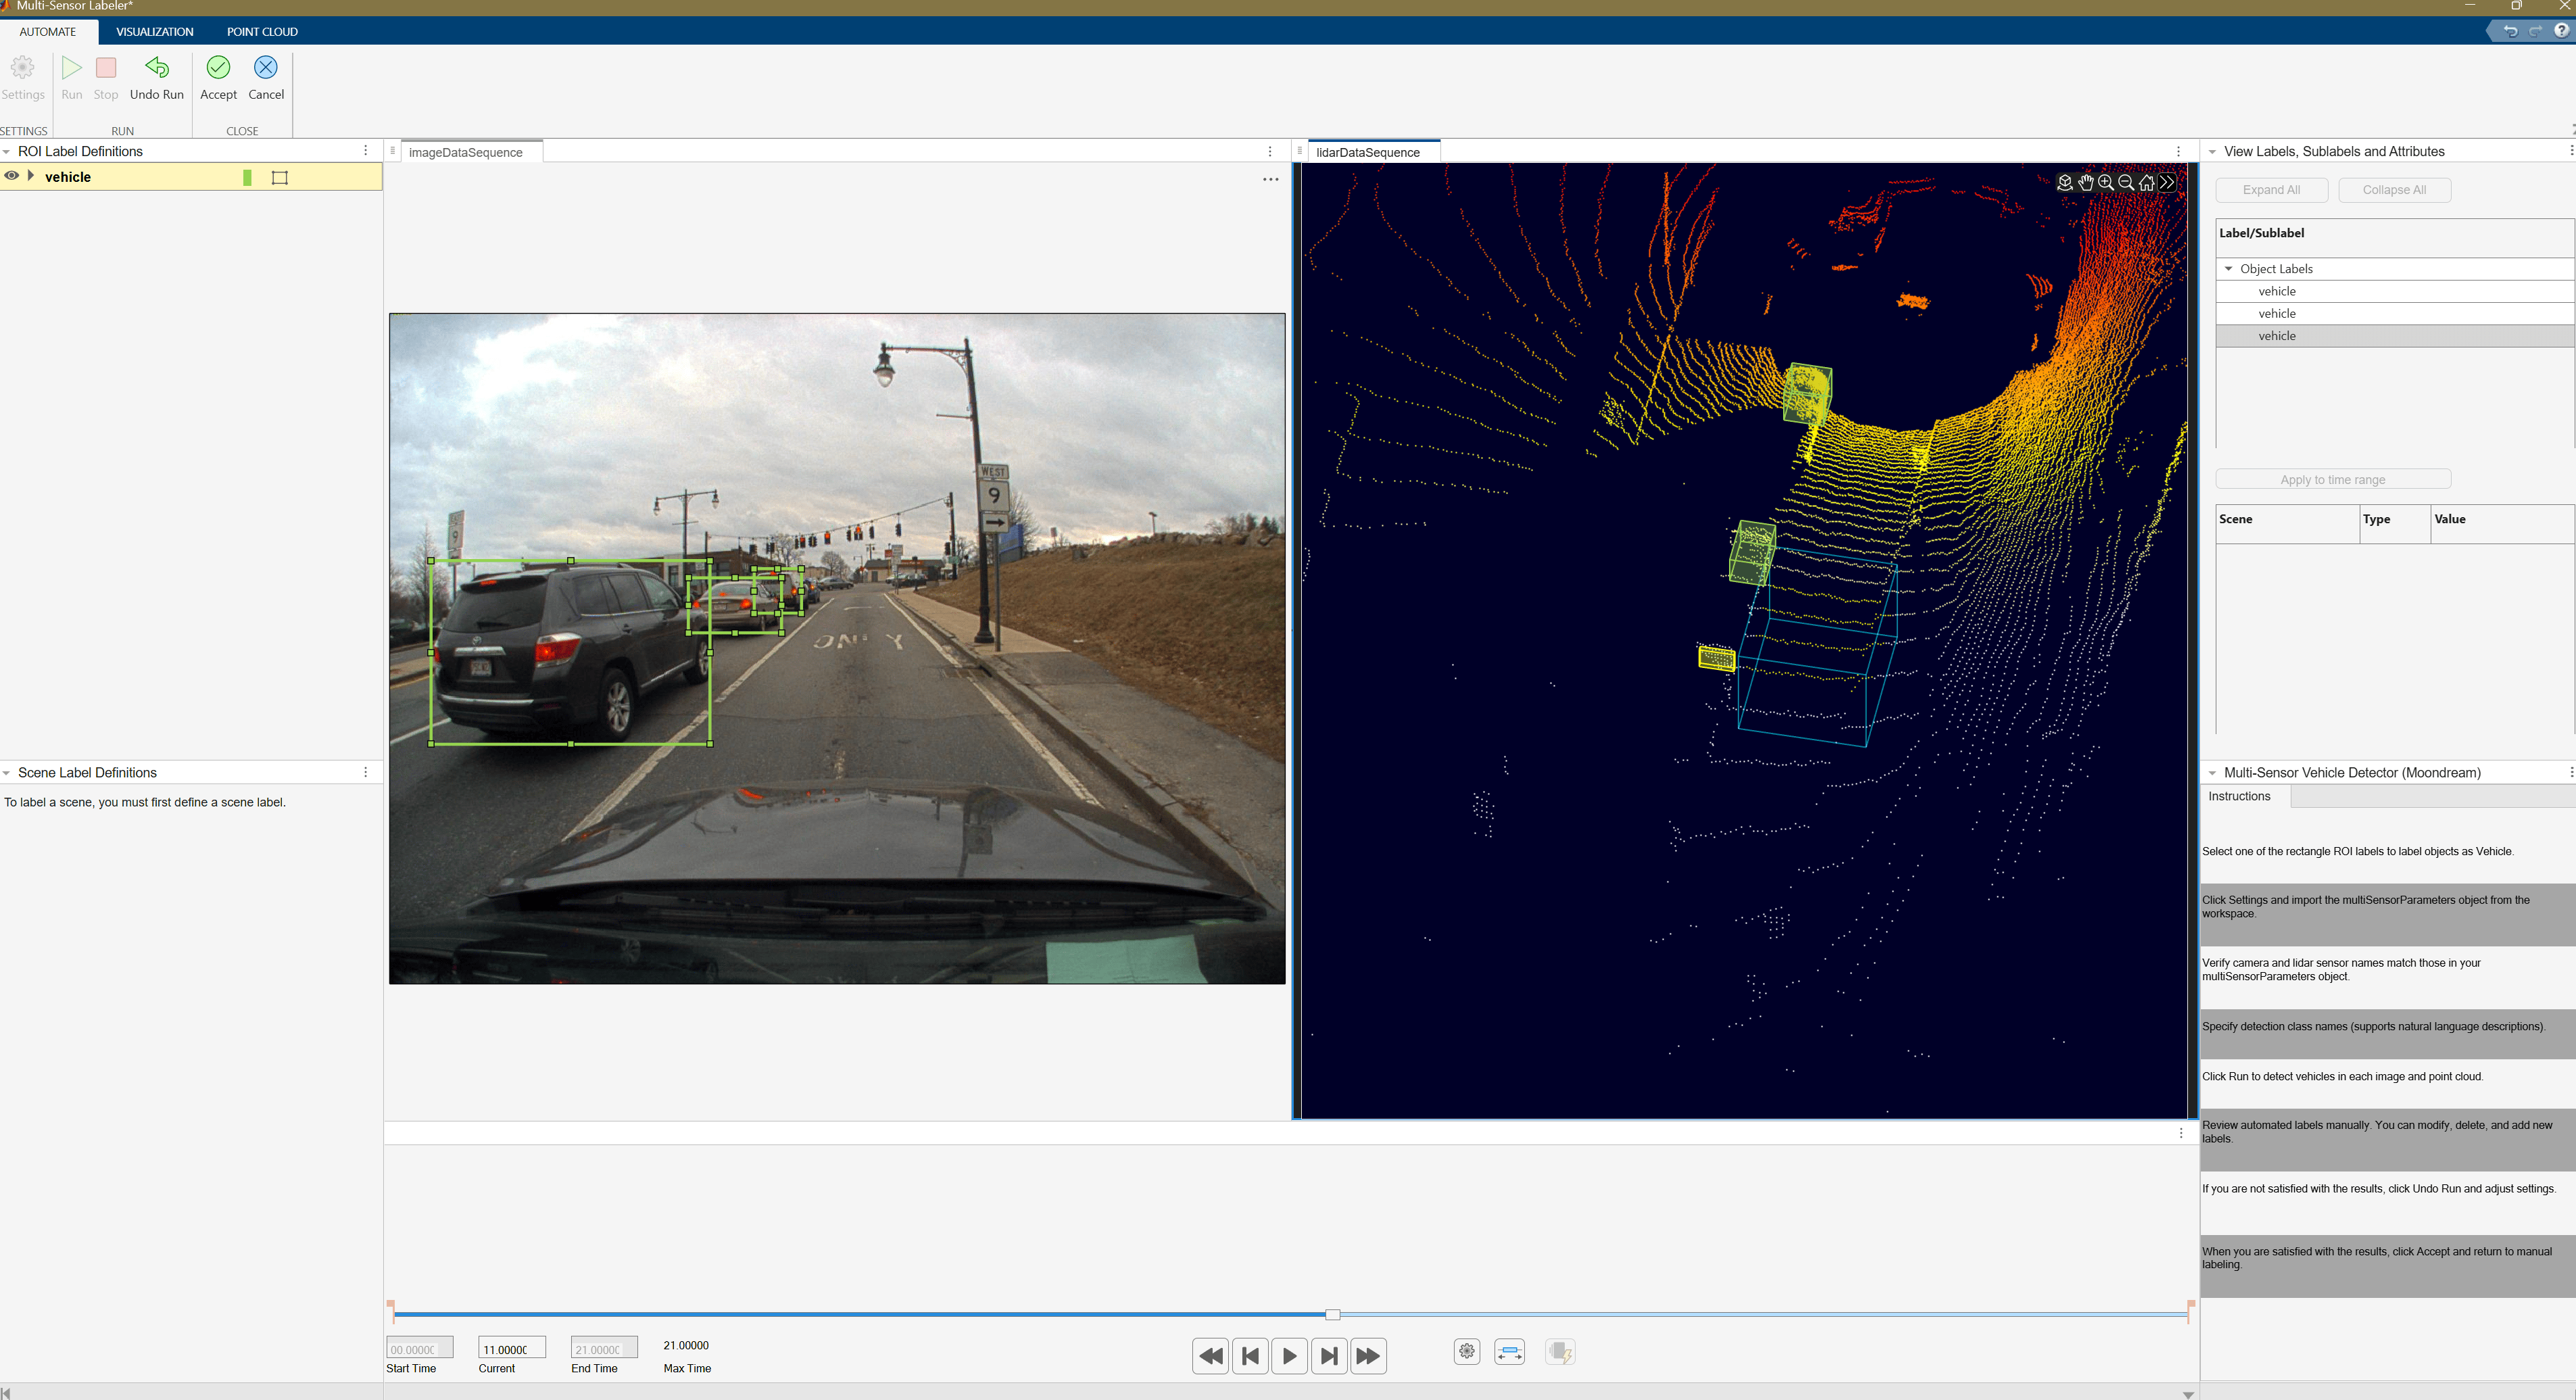
4. Accept labels.
Once satisfied with the detected vehicle bounding boxes for the entire sequence, click Accept. Export the labeled ground truth to the MATLAB workspace for downstream use.
You can adapt this approach to create custom multi-sensor automation algorithms using other Vision-Language Models (Computer Vision Toolbox) or Choose an Object Detector (Computer Vision Toolbox) approaches.
See Also
Multi-Sensor
Labeler | Moondream (Computer Vision Toolbox) | multiSensorParameters (Computer Vision Toolbox) | bboxCameraToLidar | vision.labeler.AutomationAlgorithm (Computer Vision Toolbox)
Topics
- Get Started with Multi-Sensor Labeler
- Create Custom Automation Algorithm for Labeling (Computer Vision Toolbox)
- Vision-Language Models (Computer Vision Toolbox)
- Choose an Object Detector (Computer Vision Toolbox)
- Automate Vehicle Labels and Distance Attributes Using YOLOv2 in Multi-Sensor Labeler
- Automate Point Cloud Labeling Using SNAP Model

