Automate Point Cloud Labeling Using SNAP Model
R2026bThis example shows how to automate point cloud labeling for segmentation in the Get Started with Multi-Sensor Labeler app. You create a custom automation algorithm that uses the Segment Anything in Any Point Cloud (SNAP) model.
The automation algorithm supports two labeling modes. In Interactive mode, you provide point prompts to label specific objects on a single frame. In Segment Everything mode, the algorithm automatically performs semantic segmentation and labels all objects across a sequence of frames without manual prompts. The SNAP model supports point clouds from indoor, outdoor, and aerial environments.
Preview SNAP Segmentation
Before building the automation workflow, preview how the snap model segments a point cloud. Load a point cloud and create the SNAP model by specifying the scene type for your data: "Outdoor", "Indoor", or "Aerial".
Load the point cloud from a pre-existing sequence in MATLAB
pcSequencePath = fullfile(matlabroot,"toolbox","pointcloud","pcdata","lidarSequence");
ptCloud = pcread(fullfile(pcSequencePath,"01_city_c2s_fcw_10s_30.pcd"));
Create the snap model by specifying the scene type. Choose "Outdoor", "Indoor", or "Aerial" depending on your data.
segmenter = snap("Outdoor");Specify a 3-D point prompt indicating the object of interest.
pointPrompts = [-2.1 -3.47 1.65];
Segment the point cloud using the segmentObjects object function.
[masks, labels, scores] = segmentObjects(segmenter,ptCloud,pointPrompts);
Visualize the segmented object overlaid on the point cloud.
figure
ax = pcshow(ptCloud.Location,single(masks));
ax.XLim = [-80 80];
ax.YLim = [-60 60];
zoom(ax,8)
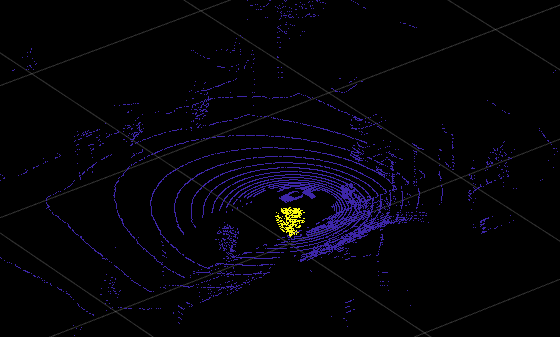
Display the predicted label.
labels
labels = categorical
     Vegetation
Create SNAP Automation Algorithm
To automate point cloud labeling using SNAP in the Multi-Sensor Labeler app, create an automation class that inherits from vision.labeler.AutomationAlgorithm (Computer Vision Toolbox). This base class defines the interface that the app uses to configure and run custom algorithms. For more details, see Create Custom Automation Algorithm for Labeling (Computer Vision Toolbox).
This example provides the PointCloudSNAPSegmenter class, which implements the required interface. The constant properties define the algorithm name, description, and in-app directions that appear when you load the algorithm in the app.
properties (Constant)
    Name = 'SNAP Segmenter';
    Description = 'Segment point clouds using SNAP (Segment Anything in Any Point Cloud). Supports interactive point prompts and segment-everything mode.';
    UserDirections = {...
        'Select a Voxel label definition to automate.', ...
        'Click Settings to choose Scene Type (Aerial/Outdoor/Indoor) and Mode (Interactive/Segment Everything).', ...
        'In Segment Everything mode, click "Map Labels..." to map SNAP output classes to your label definitions.', ...
        'In Interactive mode, switch to the "Interactive Picker" tab in Settings and click prompt points on the cloud.', ...
        'Click Run to execute the segmentation algorithm on each frame.', ...
        'Review the results and Accept to apply labels.'};
end
The private properties store the SNAP model and segmentation parameters.
properties (Access = private)
    SnapModel;
    SceneType (1,1) string = "Outdoor";
    Mode (1,1) string = "SegmentEverything";
    VoxelSize double = [];
    NumLevels (1,1) double = 3;
    ScoreThreshold (1,1) double = 0.5;
    SelectStrongestThreshold (1,1) double = 0.7;
end
The run method uses the snap model for performing the interactive and automated segmentation.
function autoLabels = run(algObj, ptCloud)
    if algObj.Mode == "Interactive"
        autoLabels = runInteractive(algObj, ptCloud);
    else
        autoLabels = runSegmentEverything(algObj, ptCloud);
    end
end
Use Automation Algorithm in Multi-Sensor Labeler App
To use the PointCloudSNAPSegmenter class with Get Started with Multi-Sensor Labeler app, create the folder structure +pointcloud/+labeler under the current folder, and copy the automation class into it.
mkdir("+pointcloud/+labeler");
copyfile('PointCloudSNAPSegmenter.m','+pointcloud/+labeler');
Open the Get Started with Multi-Sensor Labeler app.
multiSensorLabeler
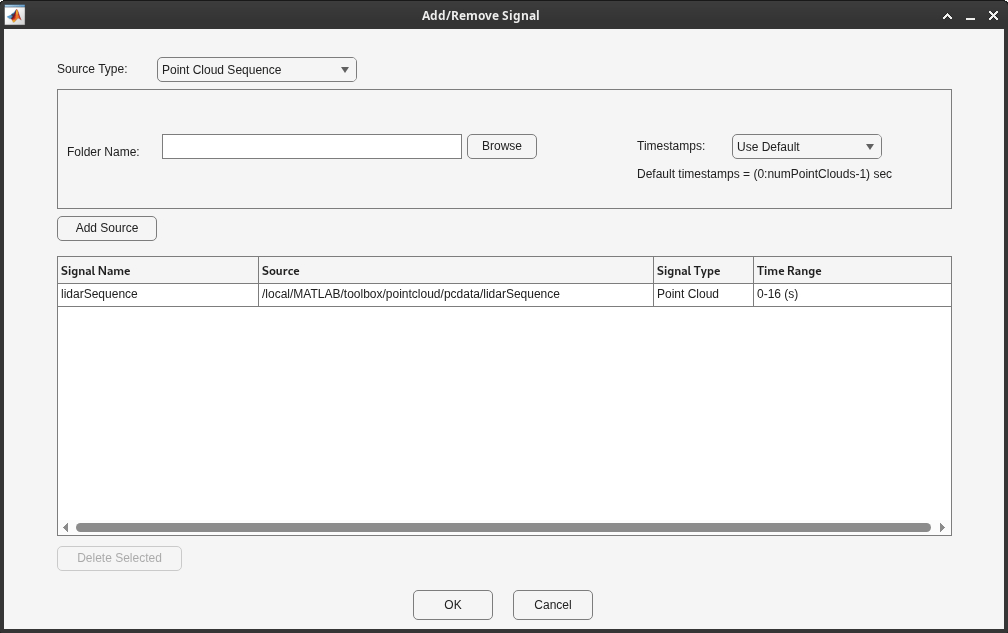
On the app toolstrip, select Import and then Add Signals. In the Add/Remove Signal window, load the point cloud sequence.
Set Source Type to
Point Cloud Sequence.Browse for the point cloud sequence folder, which is at the location specified by the
pcSequencePathvariable.Use the default timestamps and click Add Source. The point cloud sequence folder,
lidarSequence, is added to the signal source table.
Click OK to import the signals into the app.
Define Label Definitions
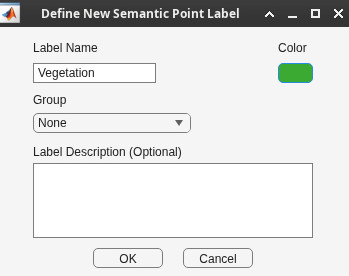
In the Labeler tab, click Add Label and select Semantic Point Label from the list.
Load the Automation Algorithm
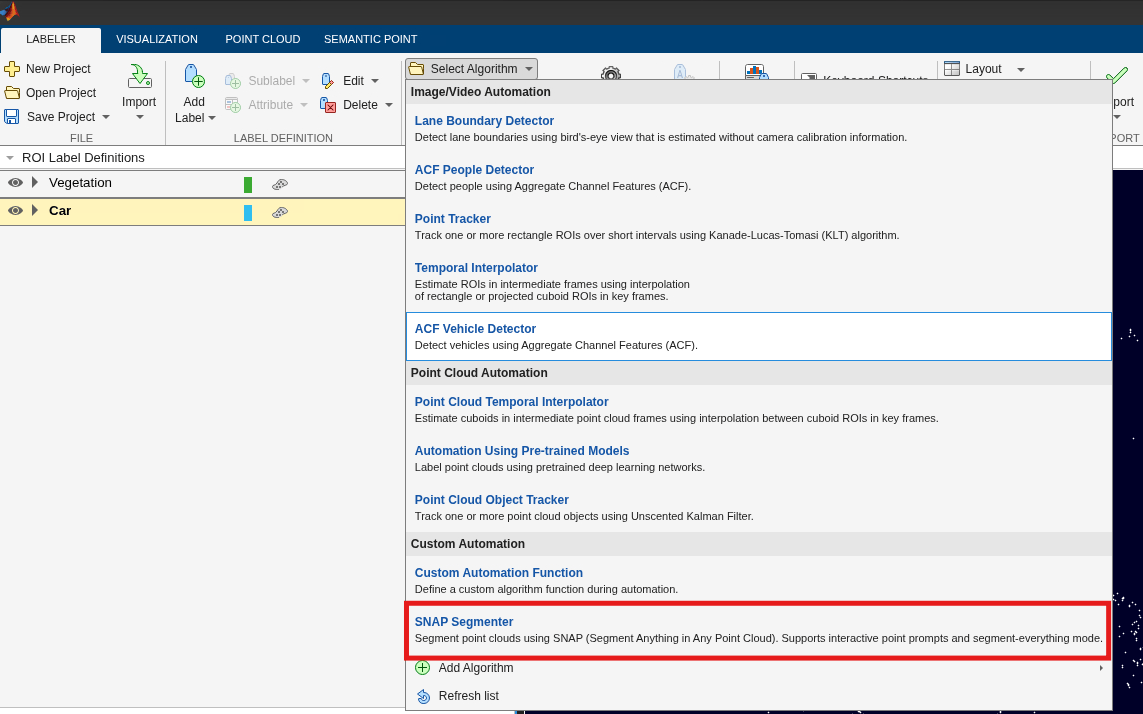
On the Labeler tab, in the Automate section, click Select Algorithm > Refresh list. Then click Select Algorithm > SNAP Segmenter. If you do not see this option, verify that the current working folder has a folder called +pointcloud/+labeler, with a file named PointCloudSNAPSegmenter.m in it.
The SNAP Segmenter algorithm supports two labeling modes:
Segment Everything - Automatically label all objects in the entire sequence without manual prompts.
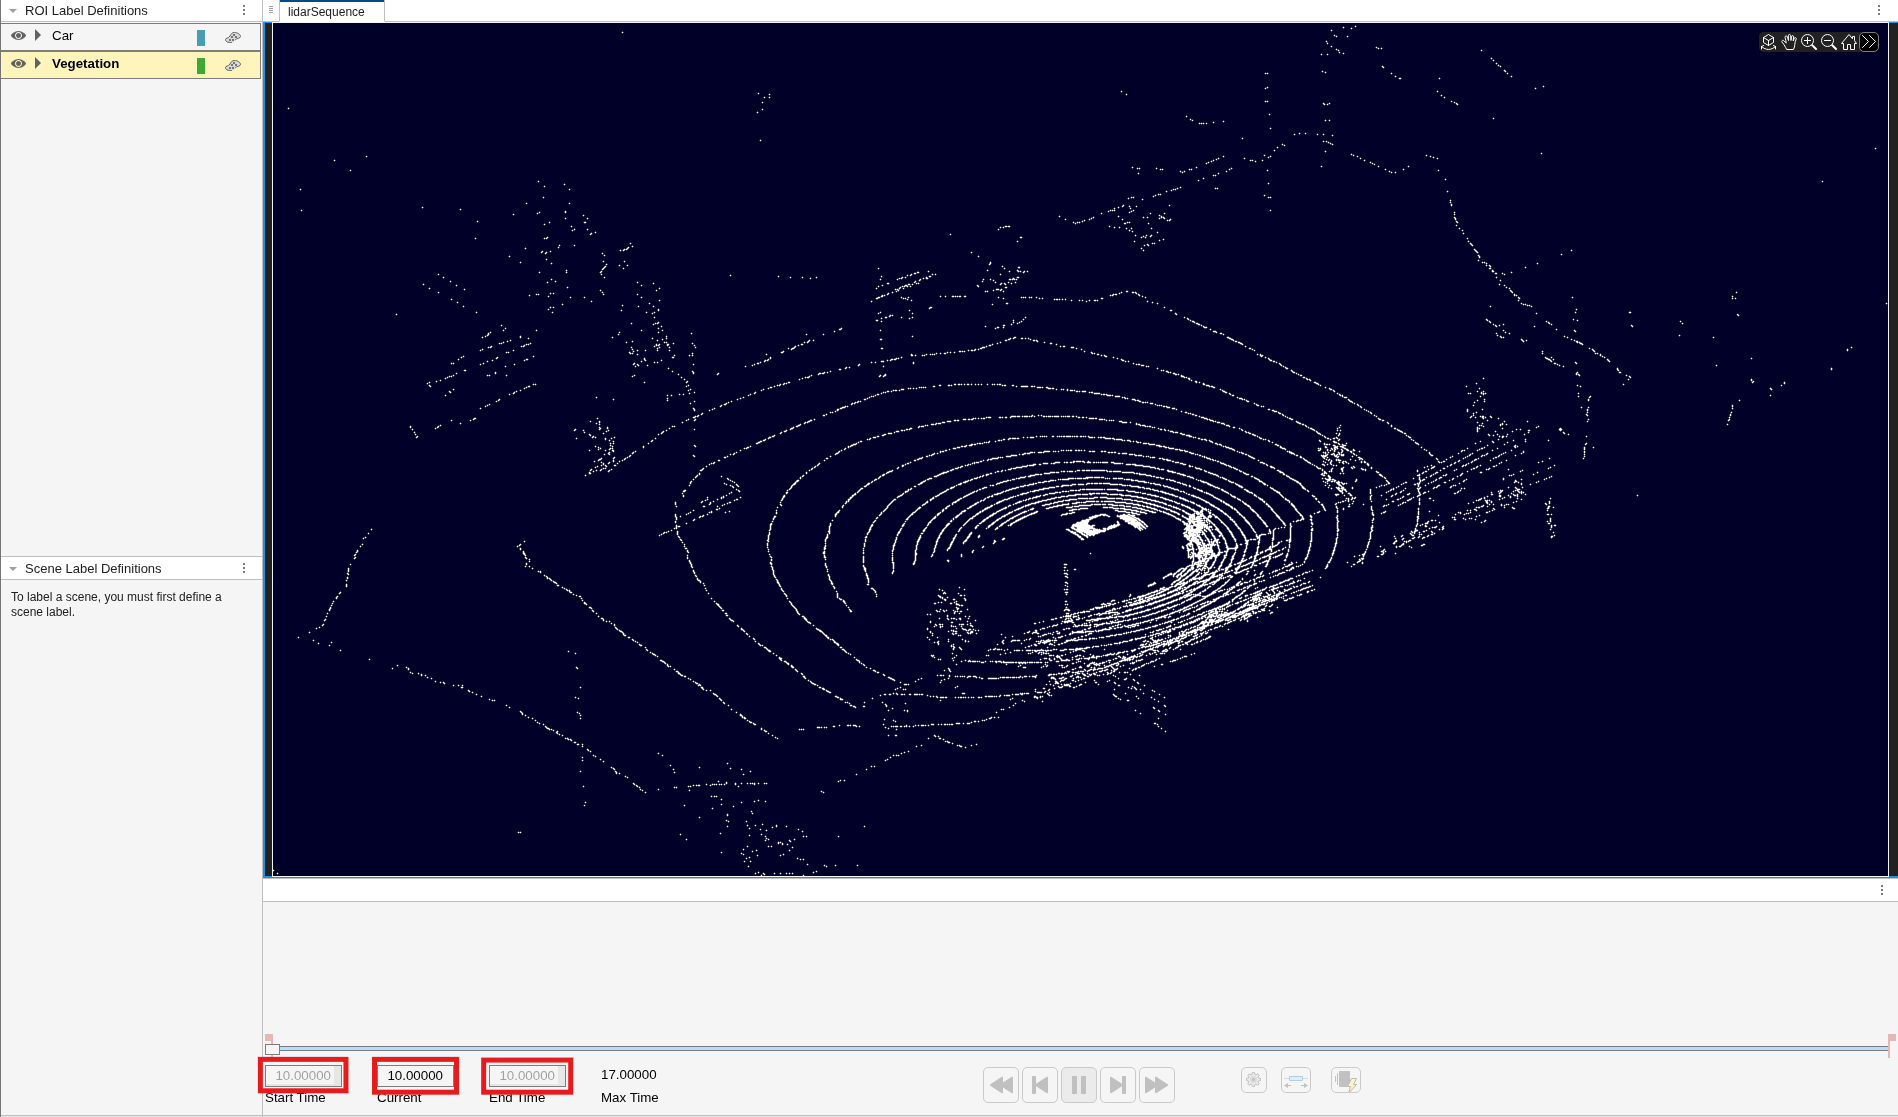
Interactive - Label specific objects of interest in a single frame using point prompts. To use this mode, you must select a single frame by setting the Start Time, Current, and End Time text boxes below the point cloud visualization to the same value.
To start an automation session, click Automate.
Label Objects Using Segment Everything Mode
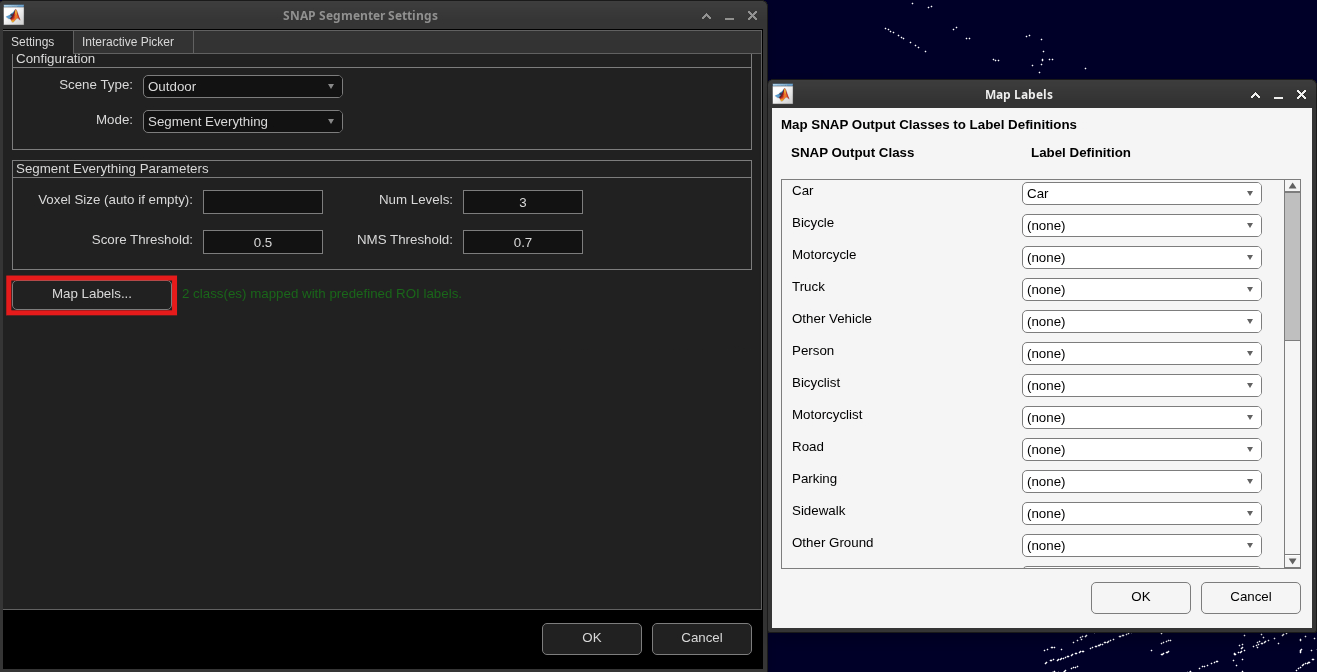
In the Settings dialog box on the Automate tab, set Scene Type to outdoor to match the data used in this example, and set Mode to
SegmentEverything.Map Labels displays the number of ROI label definitions mapped to the predefined classes. To manually specify how SNAP class predictions correspond to your label definitions, click Map Labels.
Adjust Segment Everything Parameters if required and click OK. For more information on parameters, see
segmentAllObjects.
Click Run.
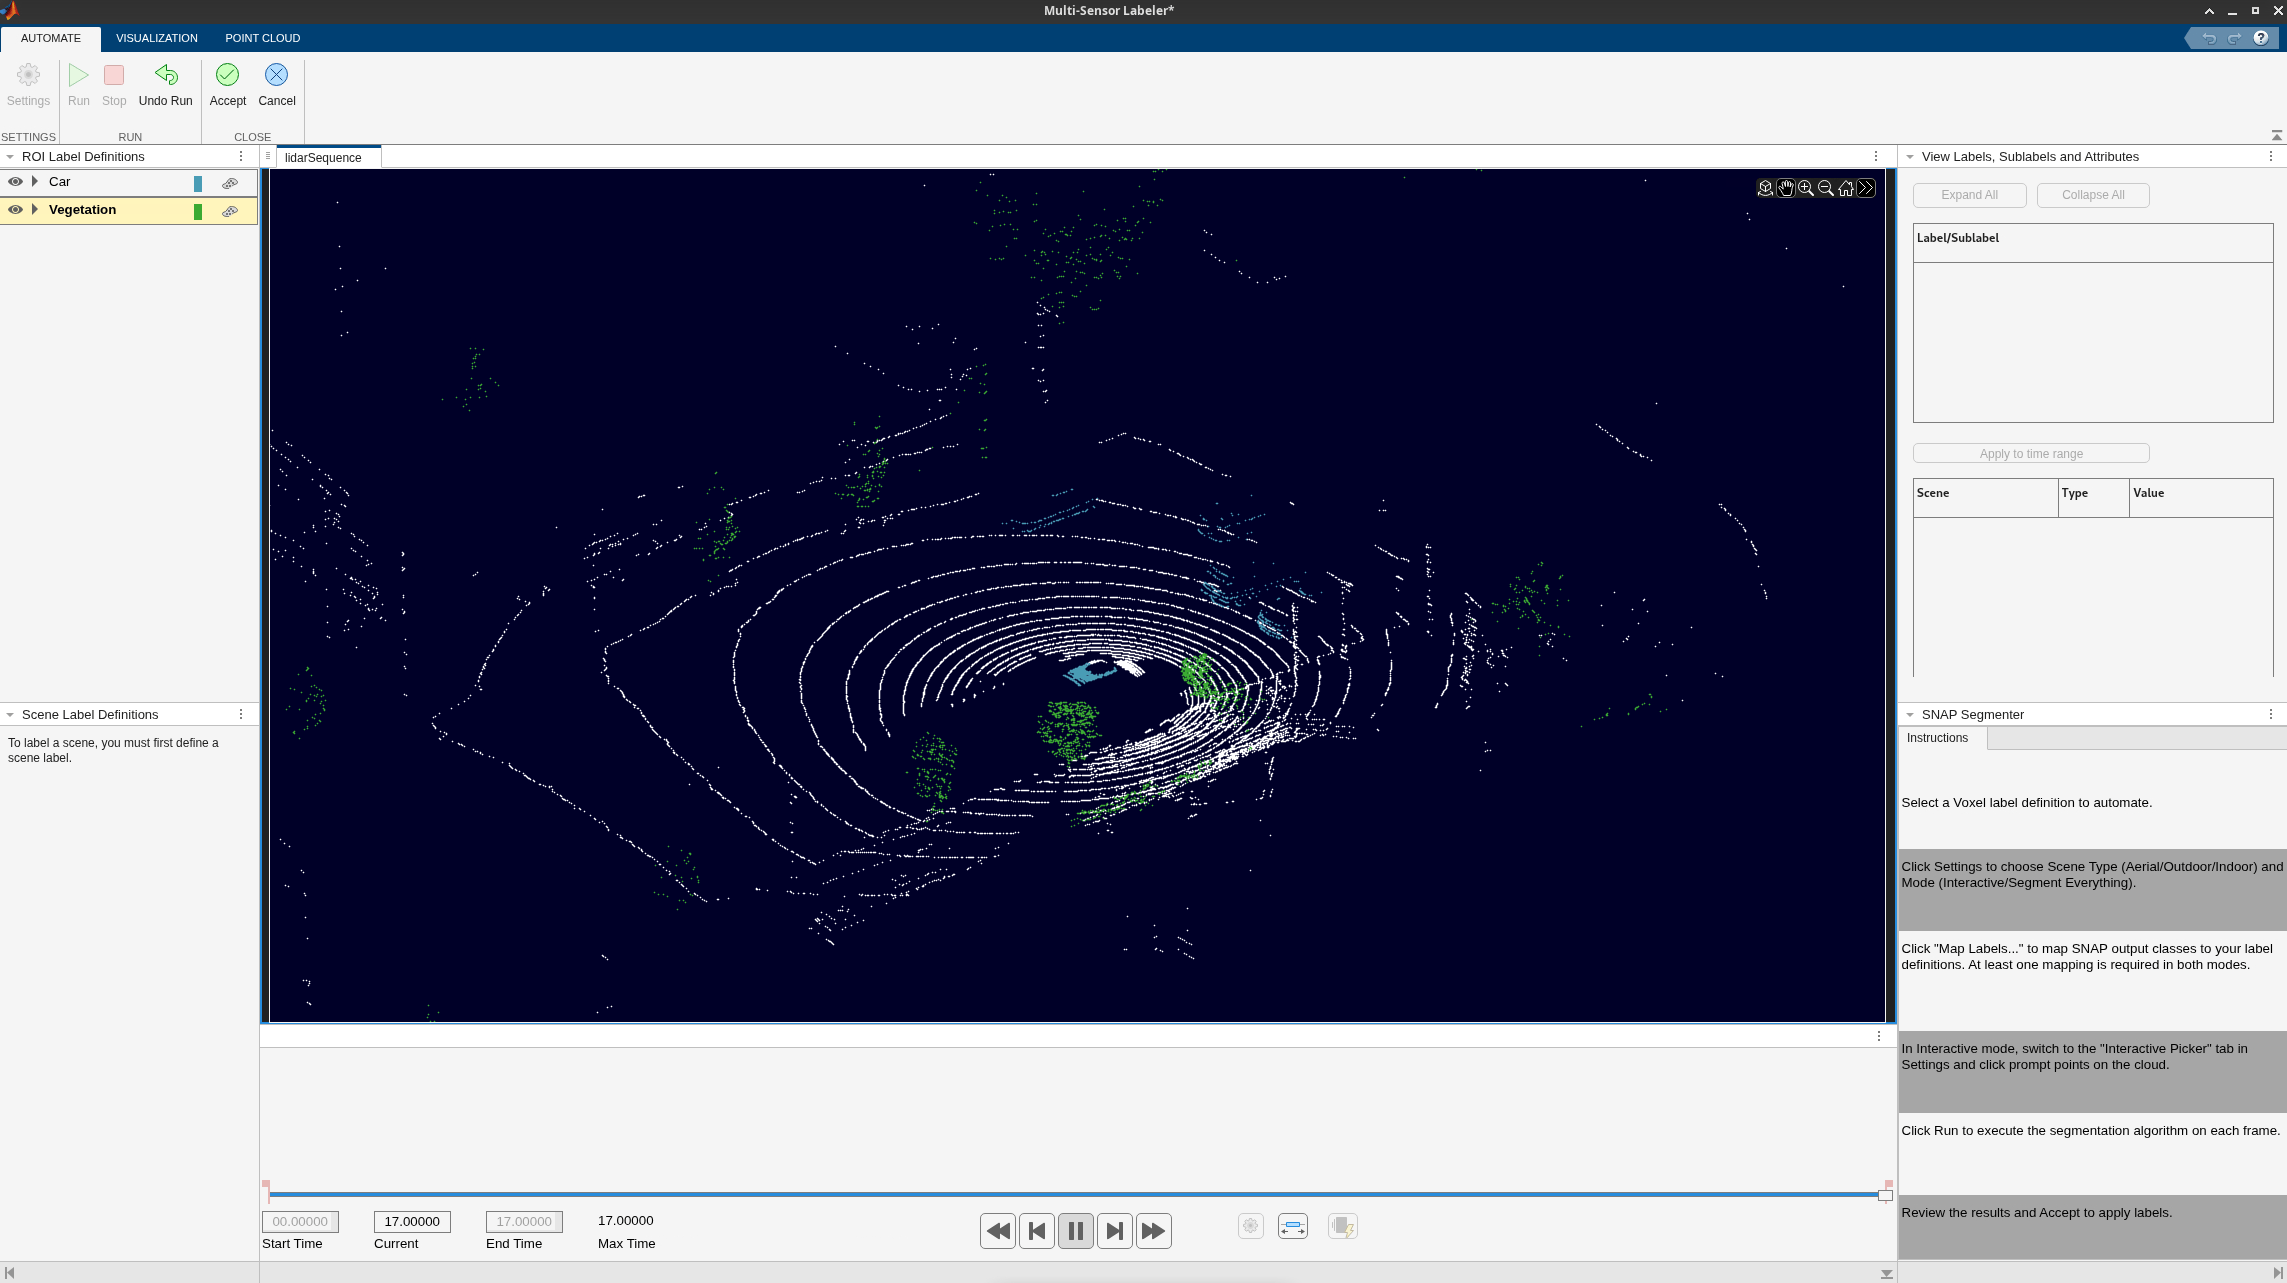
When you are satisfied with the segmentation results for the entire sequence, click Accept. You can then continue to manually adjust labels or export the labeled ground truth to the MATLAB workspace.
Label Objects Using Interactive Mode
To use Interactive mode, you must first select a single frame by setting the Start Time, Current, and End Time text boxes below the point cloud visualization to the same value. Then click Automate.
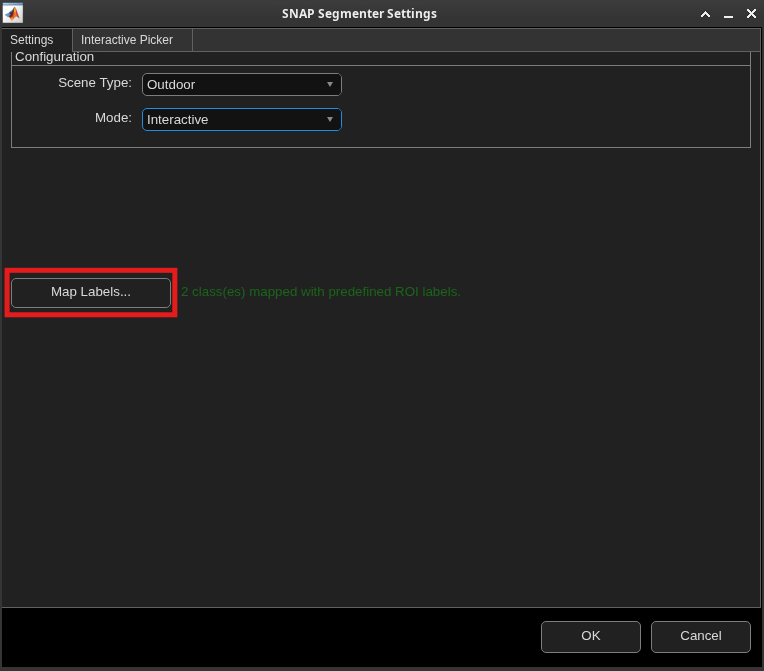
To configure the automation session for interactive mode, click Settings.
In the SNAP Segmenter Settings dialog box, set Scene Type to match your data. For this example, set it to "Outdoor".
Set Mode to
Interactive.Map Labels displays the number of ROI label definitions mapped to the predefined classes. To manually specify how SNAP class predictions correspond to your label definitions, click Map Labels.
Switch to the Interactive Picker tab and enter the Current Time to load the corresponding frame based on the time selected in the previous step. To segment an object, click Add Point and select a point on the object. Repeat to add more points on the same object. After adding all prompt points, click Confirm, then click OK.
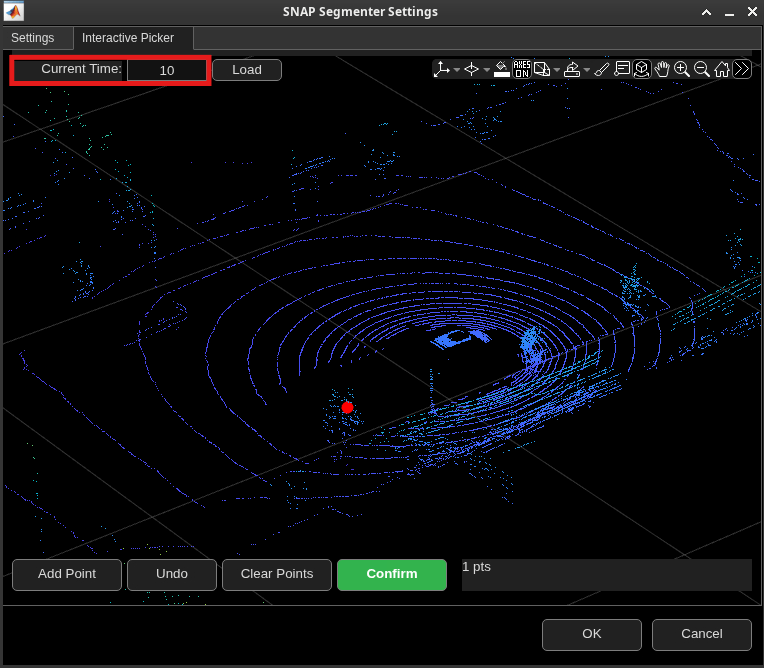
To run the automation algorithm, on the Automate tab, click Run. The algorithm segments the point cloud around the selected prompts and highlights the segmented object.
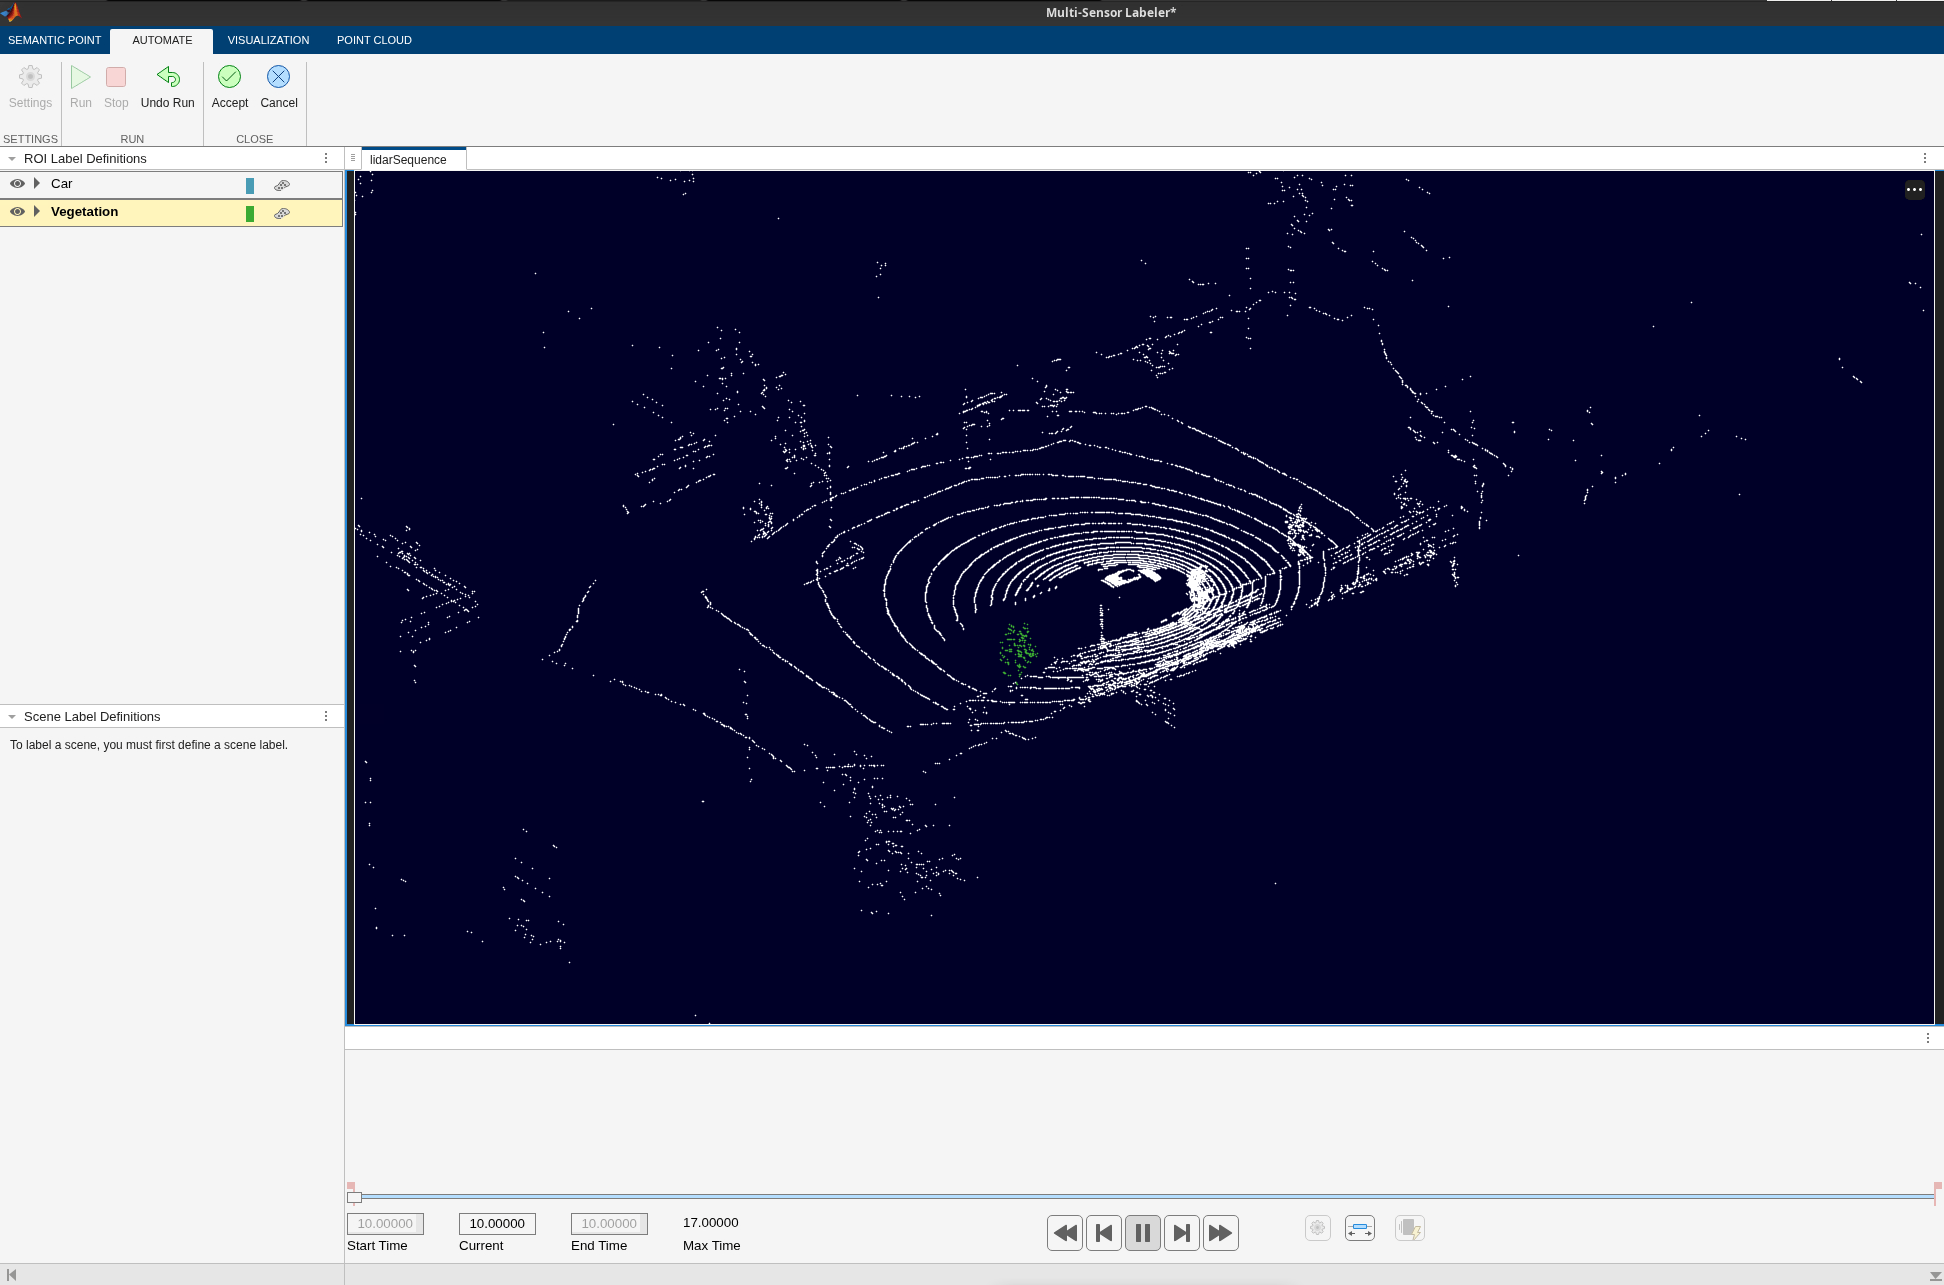
When you are satisfied with the segmentation results, click Accept. You can then continue to manually adjust labels if required and repeat this process for desired point clouds in the sequence. Once completed, export the labeled ground truth to the MATLAB workspace.
See Also
Multi-Sensor
Labeler | snap | vision.labeler.AutomationAlgorithm (Computer Vision Toolbox)

