Vehicle Assets
Define vehicles to add to driving scenarios
Description
![]()
Vehicle assets are the primary actors used to populate driving scenarios. By dragging
vehicle assets from the Vehicles folder of the Library
Browser into the editing canvas, you can create dynamic driving scenarios.
Creation
You can create new vehicle assets either from directly within the Library Browser or by importing vehicles meshes created outside of RoadRunner into the Library Browser
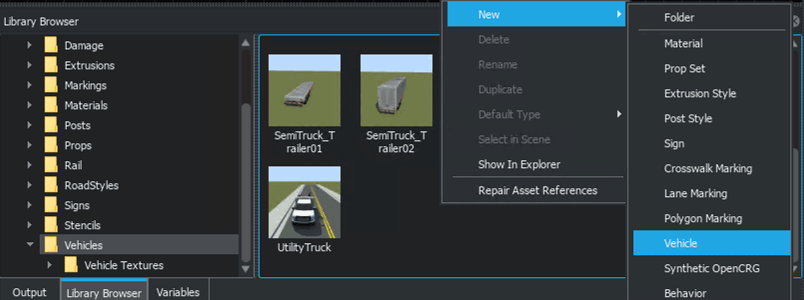
Create Within Library Browser
From the Library Browser, select the Vehicle
folder. Right click empty space in the Library Browser. Click
New, then Vehicle to create a new vehicle asset
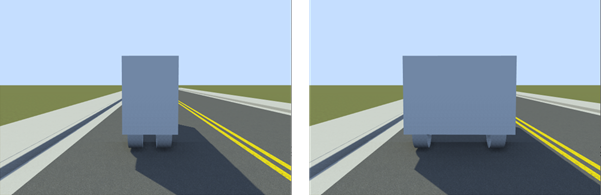
with the extension .rrvehicle. The asset browser displays this new
vehicle as a cuboid shape.

You can then customize the attributes of the vehicle from the Attributes pane. For details on the attributes you can customize, see the Vehicle Parameters section.
Alternatively, you can create a new asset by duplicating an existing asset. From the Library Browser, right click an existing vehicle asset and select Duplicate.
Note
Asset duplication is not supported for assets created from external source files, such as FBX® or texture files.
Create from Imported Vehicle Meshes
If you have vehicle meshes created outside of RoadRunner that you want to import into the Library Browser, you can define them in such a way to make them compatible with scenarios. For more details, see Import Custom Vehicle Meshes.
Vehicle Asset Parameters
Vehicle assets in the Library Browser have attributes that are common across all assets of that type. When you select a vehicle from the Library Browser, you can view these attributes in the Attributes pane, in the top level of the Vehicle section. These attributes do not influence scenario design and simulation, but RoadRunner includes them in exported ASAM OpenSCENARIO® files. The default value of each attribute depends on the vehicle type.
| Attribute | Description |
|---|---|
| OpenSCENARIO Category | Category of the vehicle, such as Bus, Car,
Van, or Truck. |
| Mass | Mass of the vehicle, in kilograms, specified as a scalar in the range [0, 10000). |
| Max Speed | Maximum speed of the vehicle, in meters per second, specified as a scalar in the range [0, 1000). |
| Max Acceleration | Maximum acceleration of the vehicle, in meters per second squared, specified as a scalar in the range [0, 1000). |
| Max Deceleration | Maximum deceleration of the vehicle, in meters per second squared, specified as a scalar in the range [0, 1000). |
| Max Steering Angle | Maximum steering angle of the vehicle, in degrees, specified as a scalar in the range [0, 100). |
| Default Color | Default color of the vehicle. |
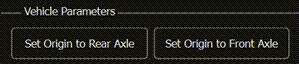
Vehicle Parameters
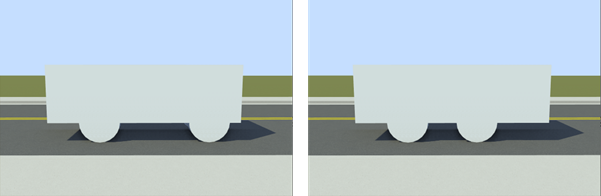
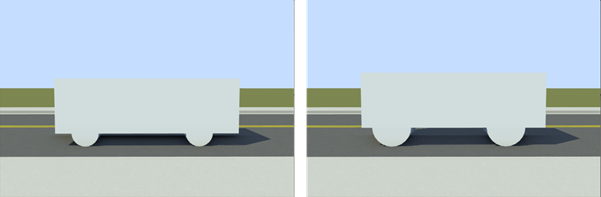
The Vehicle Parameters section of the Attributes pane displays information about the dimensions of the selected vehicle asset as well as options to set the origin of the selected vehicle asset to the front or rear axle.
In RoadRunner Scenario, the origins of vehicle assets are located at the center of the width of the vehicle (its lateral axis) at ground level. However, you can modify the position of the vehicle origin in the Attributes pane by selecting either Set Origin to Rear Axle or Set Origin to Front Axle to specify for RoadRunner Scenario to move the origin of the vehicle to the rear axle or front axle, respectively. You can also specify a different origin position by modifying the Forward Offset attribute of the vehicle asset.
RoadRunner Scenario cannot determine the position of the front and rear axles of a custom vehicle asset if it does not follow the mesh creation guidelines described in Import Custom Vehicle Meshes. To adjust the origin of custom vehicles with undetermined axle positions, modify the Forward Offset attribute of the asset to specify the desired origin position.
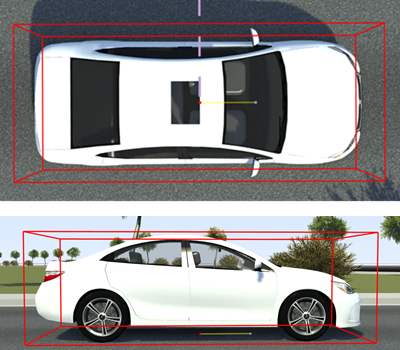
RoadRunner Scenario displays the dimensions, in meters, of the selected vehicle asset in the
Vehicle Parameters section of the Attributes
pane. For vehicle assets that use meshes created outside of RoadRunner, such as Sedan.fbx, most of the values under
Vehicle Parameters are read-only. However, for vehicles created
within the Library Browser, you can modify additional attributes for
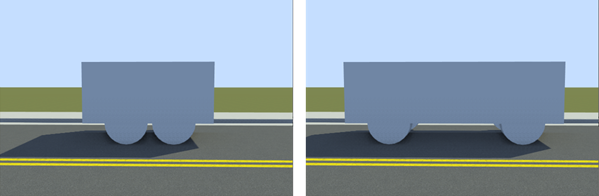
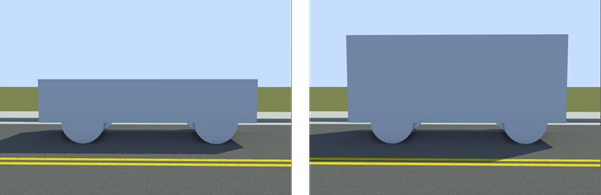
the vehicle dimensions. To modify these dimensions, select the placeholder cuboid vehicle
you created from the Library Browser and modify the attributes under
Vehicle Parameters. When you modify a dimension, RoadRunner Scenario updates that dimension of the 3D model, in the asset viewer at the bottom of
the Attributes pane and in any vehicles in the scenario that use the
asset, to match. This table describes the vehicle dimensions listed in the
Vehicle Parameters section of the Attributes
pane.
| Attribute | Description |
|---|---|
| Forward Offset | Forward offset, in meters, of the vehicle from its origin, specified as a numeric scalar. The vehicle origin is on the ground, at the geometric center of the vehicle.
Default: |
| Front Overhang | Front overhang of the vehicle, in meters, specified as a scalar in the range [0, x], where x is half the Length of the parameter value. Front overhang is the distance from the front axle to the frontmost point of the vehicle.
Default: |
| Rear Overhang | Rear overhang of the vehicle, in meters, specified as a scalar in the range [0, x], where x is half the Length of the parameter value. Rear overhang is the distance from the rear axle to the rearmost point of the vehicle.
Default: |
| Body Height Gap | Vertical gap, in meters, between the bottom of the vehicle body and the center of its wheel axles, specified as a scalar in the range [0, 10].
Default: |
| Wheel Radius | Radius of the vehicle wheels, in meters, specified as a scalar in the range [0.05, 5].
Default: |
| Wheel Width | Width of the vehicle wheels, in meters, specified as a scalar in the range [0.05, 0.9].
Default: |
| Wheel Inset | Inset of the wheels on the vehicle, in meters, specified as a scalar in the range [0, 5]. Wheel inset is the distance between the outer edge of the wheel and the corresponding outer edge of the vehicle.
Default: |
| Width | Width of the vehicle, in meters, specified as a scalar in the range [0.1, 20].
Default: |
| Length | Length of the vehicle, in meters, specified as a scalar in the range [0.1, 20].
Default: |
| Height | Height of the vehicle, in meters, specified as a scalar in the range [0.1, 20].
Default: |


RoadRunner includes the wheels when calculating the length, width, and height of the
bounding box for the vehicle. For example, a vehicle with a Height of
1.0 m, Body Height Gap of 0.2
m, and Wheel Radius of 0.5 m has a
total bounding box height of 1.7 m.

Mesh Node Hierarchy
The Mesh Node Hierarchy section displays the mesh node hierarchy of
vehicle assets with externally created 3D meshes, such as the Sedan.fbx
asset. The Mesh Node Hierarchy section lists the components included in
your imported vehicle meshes, enabling you to troubleshoot potential issues, such as missing
wheel data, or to verify that the asset has a valid node configuration for simulation or
export.
You cannot edit the components in the Mesh Node Hierarchy section directly from RoadRunner Scenario.
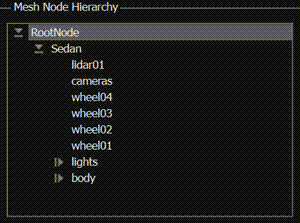
Note
This section is not available for the placeholder cuboid vehicles because they are not of the FBX file type.
Vehicle Instance Parameters
When you select a single instance of a vehicle asset that has been placed in a scenario, you can use the Attributes pane to view and set attributes that are specific to that vehicle instance.
Actor Attributes
Using these attributes, you can modify the appearance and behavior of vehicle actors in your scenario.
| Attribute | Description |
|---|---|
| Name | Name of vehicle. In the Logic editor, this name displays in the action phases that apply to that vehicle. |
| Actor Id | Unique id for the actor. You can modify the actor id by incrementing or decrementing its value in the Attributes pane. |
| Color | Color of vehicle. To change the color of a vehicle, select the current color from the Color attribute box and set the color in the Set Color dialog box. |
| Actor Type | Asset type used to display the vehicle in the scenario. To select a new asset type for the selected vehicle, drag a vehicle asset from the Attributes pane onto the Actor Type attribute box. |
| Behavior | Driving behavior of vehicle. If you do not specify a behavior, then the vehicle either follows its lane or drives along its specified driving path during simulation. To specify a vehicle behavior, drag a behavior asset from the Library Browser onto the Behavior attribute box. You can specify behaviors defined in RoadRunner, in MATLAB® or Simulink®, or in external simulators such as CARLA. For more details, see Specify and Assign Actor Behaviors. |
Connection Attributes
Use these attributes to connect vehicles together, such as a trailer connected to a truck.
| Attribute | Description |
|---|---|
| Parent Attachment | Parent vehicle for the current vehicle. When you assign a parent vehicle, the Attributes pane changes to show the Connection Attributes. |
Point Offsets
Using these attributes, you can specify the vehicle relative to a specific point in the scenario, such as a road anchor, path waypoint, or to another vehicle.
| Attribute | Description |
|---|---|
| Enable Anchoring | Enable vehicle to anchor to another point. By default, this attribute is enabled. |
| Position | Position of vehicle within the scene. Specify the (x,y,z) position of the vehicle by using the enabled X, Y, and Z parameters. Units are in meters. The position is relative to the center of the scene. This parameter is only available if Enable Anchoring attribute is disabled. |
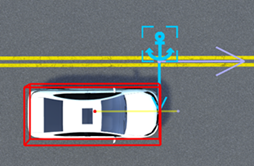
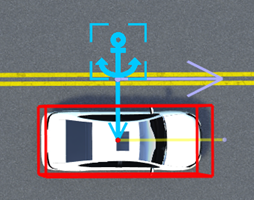
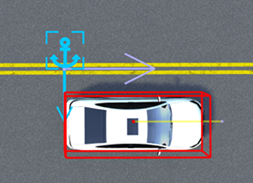
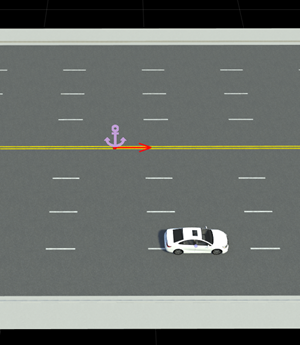
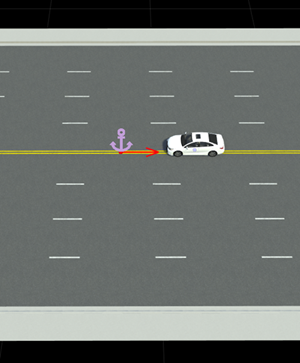
| Anchor | Anchor point that the vehicle is offset from. An anchor point can be a road anchor, path waypoint, or another vehicle. To select an anchor point, first click the
attribute box. Then, select an anchor point from the scenario editing canvas or
the Logic editor. RoadRunner outlines these selection areas with blue lines. To frame the camera
around the current anchor point in the scenario, click the Frame object in the
scene button |
| Lock To Anchor | Lock the vehicle to its current anchor no matter where you drag it within the scenario. If you do not select this attribute, then the vehicle locks to new road anchors as you drag it onto different roads. By default, this attribute is not selected. |
| Forward Offset | Distance, in meters, that the vehicle is in front of its anchor point. |
| Reference Line | Reference line from which to measure the forward offset of the actor from
its anchor point, specified as
This attribute applies only to actors. |
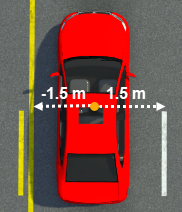
Lane Offset
Using these attributes, you can place vehicles relative to the road edge and relative to the lane they are in.
When specifying lane offsets, keep these points in mind:
Lane offsets can be relative to the road edge only (Relative To =
Road Edge) attribute. You cannot offset vehicles from the lanes that other vehicles are in.Lateral offsets within a lane (Lateral Offset attribute) are positive to the right of the vehicle, as shown by this figure.
These sample attributes show the key values that you can set.
| Attributes | Description |
|---|---|
Relative To — Offset From —
Direction
— Travel
Direction — Lateral Offset —
| Set vehicle two lanes from the left road edge, traveling in the same direction as the road anchor. Offset the vehicle 1.5 meters to the right within its lane.
|
Relative To — Offset From —
Direction
— Travel
Direction — Lateral Offset —
| Set vehicle in the lane along the left road edge, traveling in the opposite direction of the road anchor. Offset the vehicle 1.5 meters to the left within its lane.
|
Connection Attributes
When you connect a vehicle to another vehicle as a trailer, you can set attributes that are specific to that trailer from the Attributes pane. These sections describe the attributes you can set.
Note
The connection attributes only become available when the vehicle gets attached to a parent vehicle and becomes a trailer.
Use these attributes to connect vehicles together, such as trailer connected to a truck.
| Attribute | Description |
|---|---|
| Parent Attachment | Name of the parent vehicle that the current vehicle attaches to. |
| Type | Specify the behavior of the trailer relative to the parent. Select
|
Use these attributes to edit the attachment point with respect to the selected
vehicle, and the Parent Attachment point.
| Attribute | Description |
|---|---|
| Source | Generate an attachment point from the bounding box geometry of the
vehicle, select |
| Point Name | When the Source attribute value is
When the Source attribute value is
|
| Attribute | Description |
|---|---|
| Source | Specify the attachment point on the parent vehicle. To generate an
attachment point from the bounding box geometry of the vehicle, select
|
| Point Name | When the Source attribute value is
When the Source attribute value is
|
| Offset Right | Horizontal offset, in meters, of the vehicle relative to the parent attachment point in the direction of travel. Default offset right is 0.0 meters. |
| Offset Forward | Horizontal offset, in meters, of the vehicle relative to the parent attachment point in the direction of travel. Default offset height is 0.0 meters. |
| Offset Up | Vertical offset, in meters, of the vehicle relative to the parent attachment point in the direction of travel. Default offset height is 0.0 meters. |
Use these attributes to specify the trailer direction to the parent attachment point.
| Attribute | Description |
|---|---|
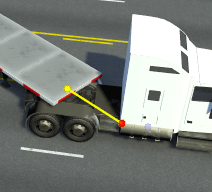
| Heading | Horizontal direction, in degrees, of the trailer relative to the parent attachment point. Default offset heading is 0.0 degrees. When you select a trailer, you can also modify the Heading value the editor using the direction widget, shown in this image, when the trailer is selected.
|
| Slope | Slope or pitch, in degrees, of the trailer relative to the parent attachment point. |
Examples
Add Vehicles to Scenario
When you switch the scenario editing mode, RoadRunner Scenario opens the Library Browser to the
Vehicles folder. This folder includes a Sedan asset.
Drag this asset into the scenario.

By default, assets snap to the center of lanes along road networks. The origin of vehicle is located on the ground below its geometric center.
If you have the RoadRunner Asset Library, then the Vehicles folder includes a variety of
additional vehicle assets that you can add to the scenario.

You can then modify the appearance or behavior of vehicles from the Attributes pane. For more details, see the Parameters section.
To control how the vehicle moves in the scenario, you can choose one of the following actions:
Set a driving path for a vehicle. For more details, see Path Editing. For an example, see Design Path Following Scenario.
Use the built-in behavior of the vehicle. By default, vehicles follow their current lane. For more details, see Built-In Behavior for Vehicles. For an example, see Design Lane Following Scenario.
Specify a custom behavior for the vehicle and add this behavior asset to the Behavior attribute of the vehicle. For more details, see Specify and Assign Actor Behaviors.
Limitations
In R2026a Update 3, the Forward Offset attribute of vehicle assets must be in the range [–10, 10]. Setting Forward Offset to a value outside of this range can cause issues, such as misalignment of the vehicle with the road direction, and prevent the Set Origin to Rear Axle and Set Origin to Front Axle buttons from functioning.
In scene editing mode, if you add vehicle assets in the
Vehiclesfolder into a scene, the vehicle is treated as part of the scene. In scenario editing mode, you cannot edit or simulate with this vehicle.Vehicle assets in the
Vehiclesfolder of projects created in R2021b or earlier are treated only as prop assets and you cannot simulate scenarios with them. As a workaround, create a new project and in your scenario, use the vehicle assets in theVehiclesfolder of the Library Browser. Alternatively, copy theVehiclesfolder from a new project into the Library Browser of your existing project.Some vehicle assets included in the RoadRunner Asset Library do not reflect changes made to their Color or Default Color attribute. Vehicle assets with initial default colors that are not white, like the
AmbulanceorGarbageTruck, display only their preassigned color. Assets that do not reflect alternate colors also display the "This Actor Type does not have a compatible paint material" warning in the Attributes pane when you select the asset in a scene.In R2022b, RoadRunner assigns a white Default Color to all vehicle assets in projects created before R2022b, including assets with preassigned colors like the
AmbulanceorGarbageTruck. To display the correct default color for assets in older projects, upgrade the asset library by, from the RoadRunner toolbar, selecting Assets and then Upgrade Asset Library.
Tips
You can set vehicle colors, asset types, and other attributes as variables, which you can then modify programmatically. Using this technique, you can generate variations of scenarios with different vehicles. For more details, see Generate Scenario Variations Using gRPC API.